Refresh your wardrobe with this Free crochet Blouse Pattern, making stylish, comfortable blouses that add charm, elegance, and a unique touch to any outfit.
A beautifully crocheted blouse can elevate any wardrobe, offering a blend of style and sophistication. Handmade designs, like those created using a Crochet Blouse Pattern, add a touch of individuality and charm that sets them apart from mass-produced garments.
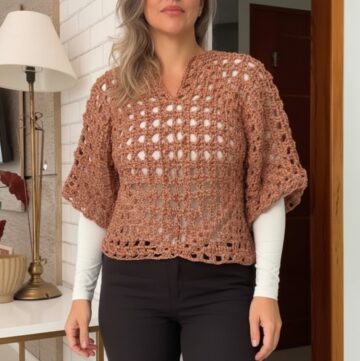
Trendy Crochet Blouse Pattern For Stylish Handmade Outfits

Easy and Quick Crochet Blouse
Uses
-
Create a lightweight, colorful Crochet Blouse or top.
-
Practice granny square assembly and seamless joining techniques.
Materials
-
Yarn: Use scraps of medium-weight yarn (e.g., Fio Bella, Fio Charme, or a mix of two strands of thinner yarn like Cléa 1000). Use different colors for the squares to achieve a patchwork look.
-
Crochet Hook: A hook size appropriate for your chosen yarn (typically 2.5 mm to 3.5 mm for fine/medium thread).
-
Notions: Scissors, Tapestry needle for weaving ends, and stitch markers.
Special Features
-
Scrap Yarn Friendly: This design encourages you to use multiple yarn colors and brands, making it a great way to use up leftovers.
-
Seamless Assembly: You join all squares on the wrong side using a Slip Stitch into the outer loops only technique, which provides a clean, decorative ridge on the right side.
-
Size Adaptability: You can easily change the finished size by adjusting the number of squares used or by adding/removing double crochet rounds around the perimeter of the squares themselves.
-
Medium (M) Size: Reduce the square size by removing one Double Crochet round from the border.
-
Large/Extra-Large (G/GG) Size: The pattern uses 16 squares total.
-
Larger Sizes: Add an extra Double Crochet round to the border of the squares.
-
Level of Difficulty
This project is Intermediate. While the stitches are basic (SC, DC), it requires precise assembly, joining techniques, measuring, and working in the round.
Tutor's Suggestions
-
Measure Rib Cage: When marking the armholes, use your rib cage measurement (below the bust) to determine the circumference of the main body tube, not the bust size.
-
Count Stitches: For the border and body rows, count your stitches to ensure the garment grows evenly and straight.
-
Consistency: While the square colors can vary, try to keep the final border color around the squares the same on each strip for a more cohesive look before joining.

This pattern allow you to create stunning and intricate tops that are lightweight, breathable, and perfect for any season. Whether it’s for a breezy summer outing or adding layers for colder weather, crochet blouses offer versatility and elegance that complement various styles.

The beauty of a Crochet Blouse Pattern lies in its flexibility and customization options. From intricate lacework and floral designs to eye-catching geometric patterns, these tops are endlessly adaptable to suit personal tastes.

Makers can choose from a variety of yarns and color palettes, tailoring the blouse to specific occasions or moods. Furthermore, crochet blouses carry the unique charm of handcrafted clothing, providing a sustainable and thoughtful alternative to fast fashion.

This style combines traditional craftsmanship with contemporary trends, making every piece timeless yet fashionable.

Creating a crochet blouse not only serves as a creative outlet but also results in an accessory that stands out from the crowd. Whether you crochet one for yourself or as a gift, these patterns showcase the intricate art of crochet while offering comfort and beauty that lasts.

Step-by-Step Details
Create a vibrant, patchwork-style crochet blouse using the classic granny square motif. This project is highly customizable and uses simple double crochet rows for assembly, allowing you to use up yarn scraps and easily adapt the garment to your preferred size and length.
Conclusion
You have successfully completed a vibrant, customizable crochet top built from joined squares. By following this easy-to-adapt pattern, you have created a stylish garment that is perfect for using up yarn scraps while mastering the skill of garment assembly.
Tip
Measure Your Gauge: Since you are using mixed yarns, measure the circumference of your finished 8-square strip before joining them. This total length must be slightly larger than your rib cage measurement to ensure a comfortable fit when the panels are joined into a tube.