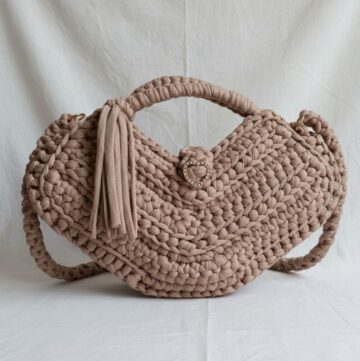
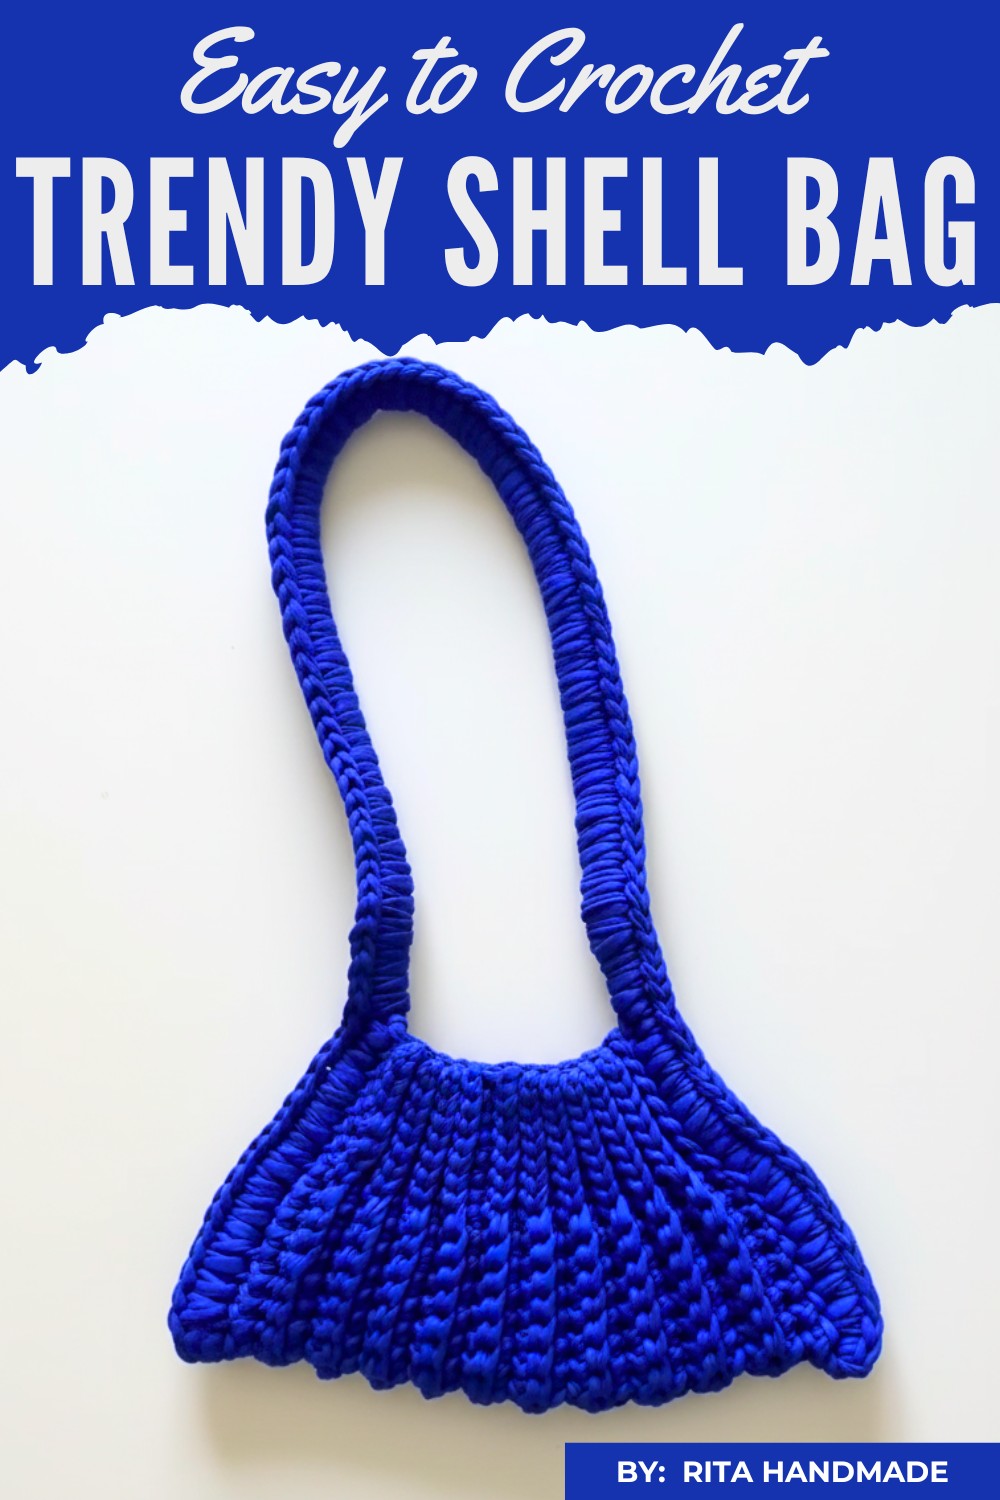
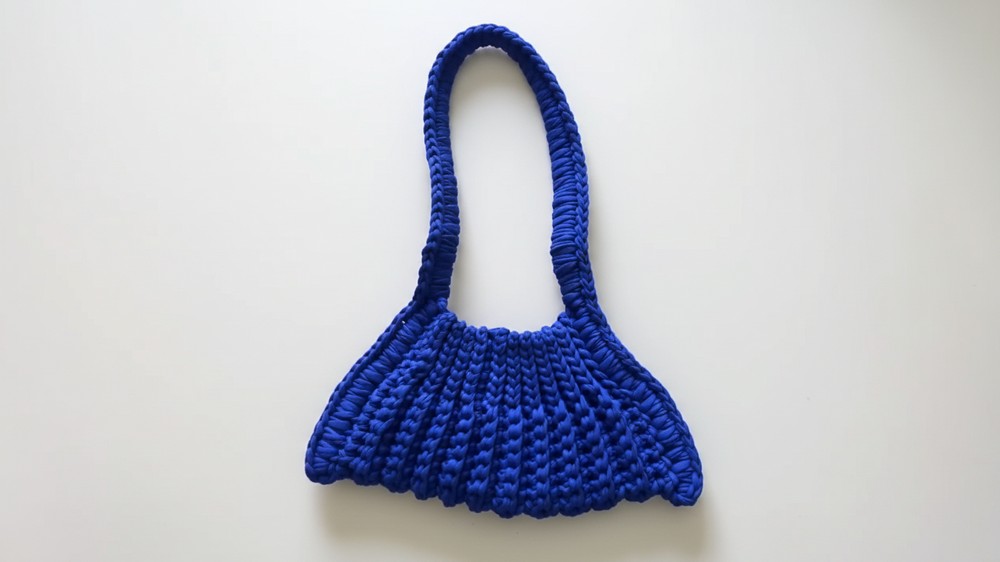
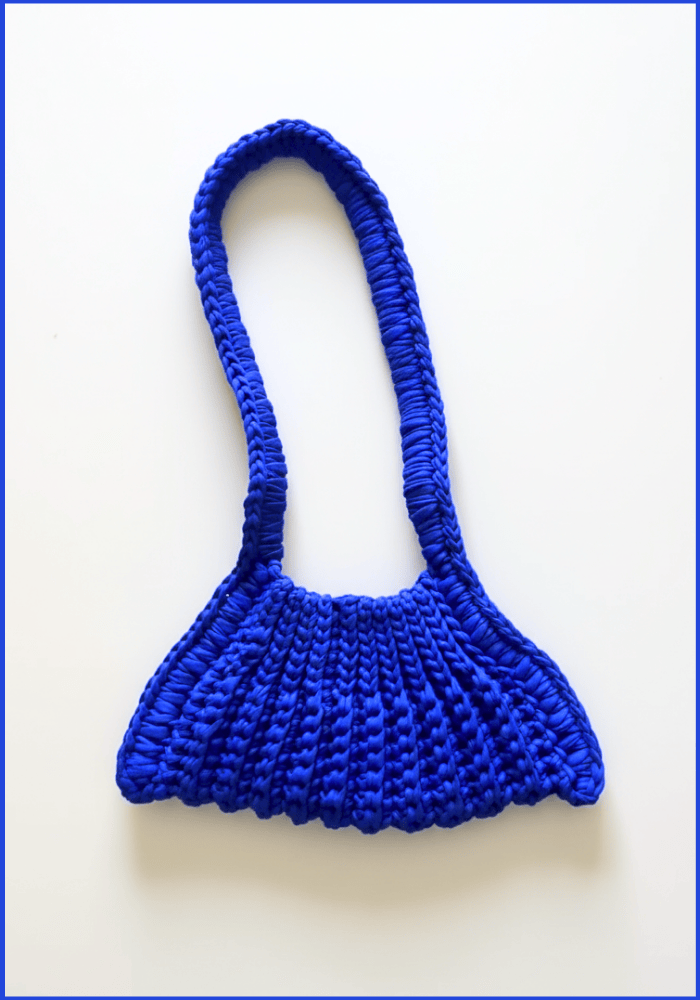
Adorn yourself with the Crochet Shell Bag Pattern featuring a stunning design that’s easy to follow and perfect for holding your essentials in style every day.
Carry your essentials in style with this charming and practical handmade accessory. The Crochet Shell Bag pattern adds a touch of elegance with its unique shell-like design, featuring soft curves and eye-catching details. This bag is not only beautiful but also useful for daily errands, casual outings, or even as a thoughtful gift for your loved ones.
Crochet Shell Bag Pattern is Perfect for All Occasions
Its delicate texture and sturdy appearance make it a perfect blend of fashion and functionality. Whether you pair it with casual or dressy outfits, this bag easily stands out, turning heads everywhere you go while giving you ample space for your belongings.
This crochet tote bag is simple yet versatile, perfect for daily use. The design ensures durability and flexibility, allowing you to customize its size and decoration to match your needs.
Below is a written pattern, formatted and detailed for efficiency.
Materials and Supplies
- Yarn: Approximately 250g of thick yarn (e.g., Biscuit yarn or yarn of similar thickness). You can also use two thinner strands together for added texture.
- Optional: Contrasting colored yarn for decorative details.
- Crochet Hook: 8mm hook (adjust hook size depending on the yarn used).
- Scissors.
- Yarn needle (to weave in loose ends).
Key Features:
- Bag Dimensions (Example Design):
- Width: 30cm / 12 inches.
- Height: 14cm / 5.5 inches.
- Handle Length: 60cm / 23.5 inches.
- Design Details:
- Base and body are worked in rows.
- Handles are crocheted separately and reinforced.
- Option to add piping, pendants, or other decorative features.
- Customizable Size: You can easily adjust the bag’s height, width, or handle size by modifying the number of starting chains and rows.
Pattern Instructions
1. Foundation Row:
- Begin by making a slip knot on your crochet hook.
- Chain 30 foundation chains (this will determine the height of your bag). You can adjust this based on your desired bag height, ensuring the total is an even number.
- Add one chain stitch for turning.
2. Base of the Bag:
- Turn your work and crochet into the back loops only:
- Work 7 slip stitches for structure along the first section.
- Switch to 16 single crochet (SC) stitches for the body.
- End with 7 slip stitches.
- At the end of the row, chain 1 for turning.
3. Repeating Rows for the Body:
- Repeat the base pattern:
- Start with 7 slip stitches.
- Crochet 16 single crochet stitches for the body.
- Finish with 7 slip stitches.
- Always work into the back loop only for texture.
- Repeat this pattern for 20 rows (or as many rows as needed for the desired width of the bag).
- TIP: Regularly measure your work to achieve the desired height and width.
4. Finishing the Main Canvas:
- After completing the last body row, cut the yarn and fasten off.
- Securely weave in any loose yarn ends for a neat finish.
5. Adding the Side Edges:
- Fold the rectangular canvas in half to form the sides of the bag.
- To ensure symmetry, mark the 15th and 16th stitch on both the top and bottom (since the foundation chain is 30 stitches wide).
- Begin attaching the sides:
- Insert the hook into the loops on one edge.
- Use single crochet stitches to crochet the two edges together.
- Work along the edge, stopping midway to ensure symmetry, and then continue crocheting to the base.
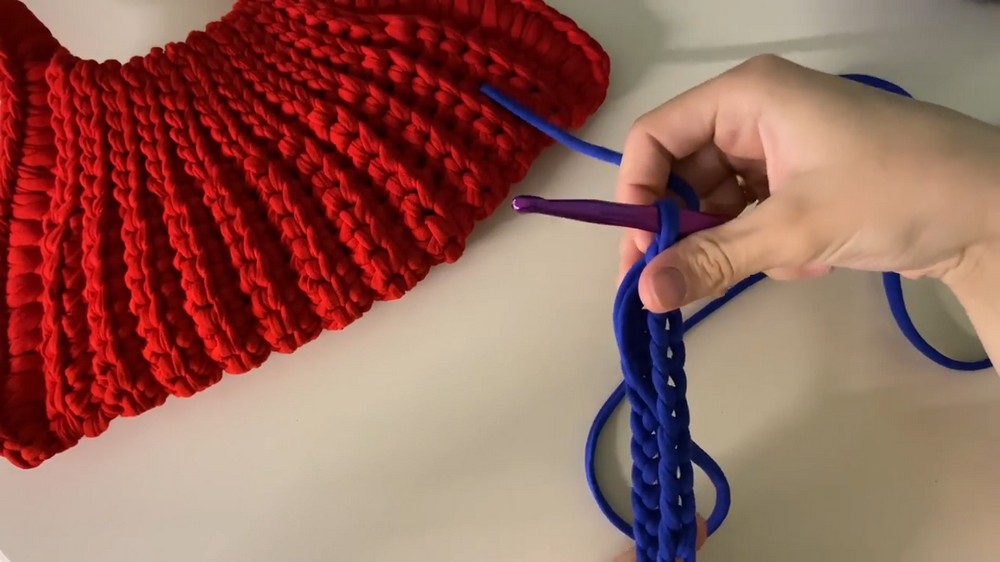
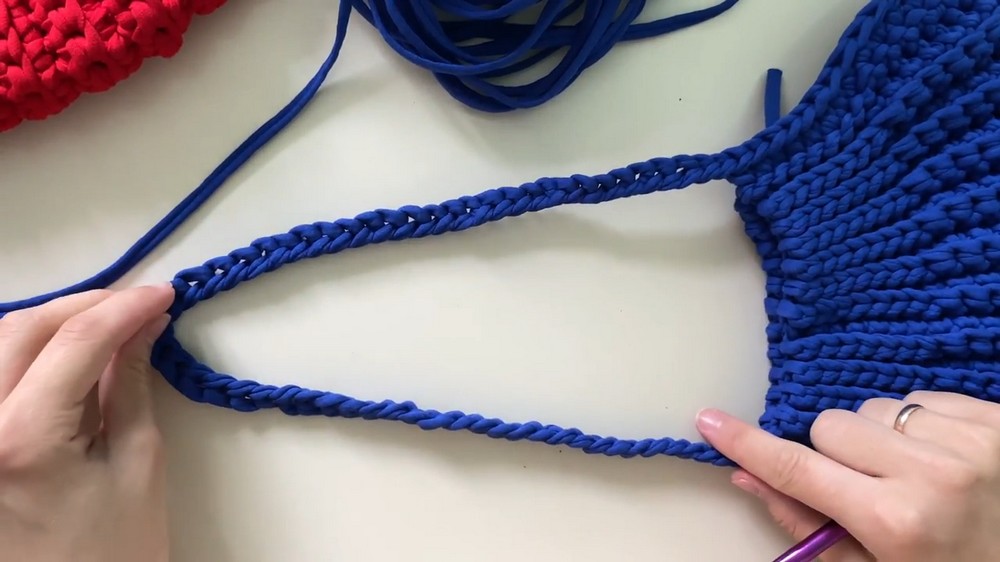
6. Creating the Handles:
- Attach the yarn to the midpoint of the top edge of the bag (marked from the previous step).
- Create 60 chains (CH) for the handle (adjust handle length as needed).
- Once complete, attach the chain to the opposite side of the bag and continue crocheting to secure the edges.
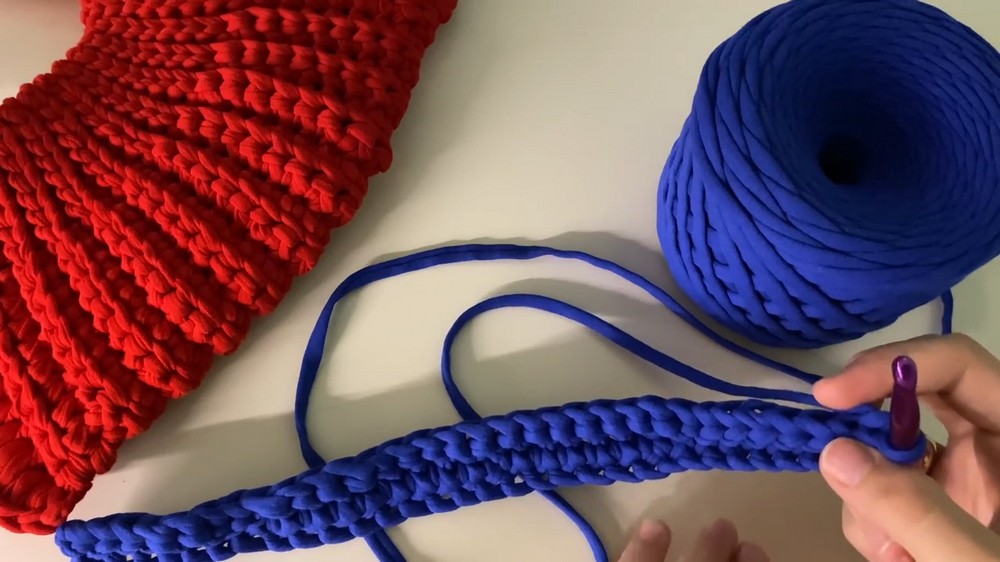
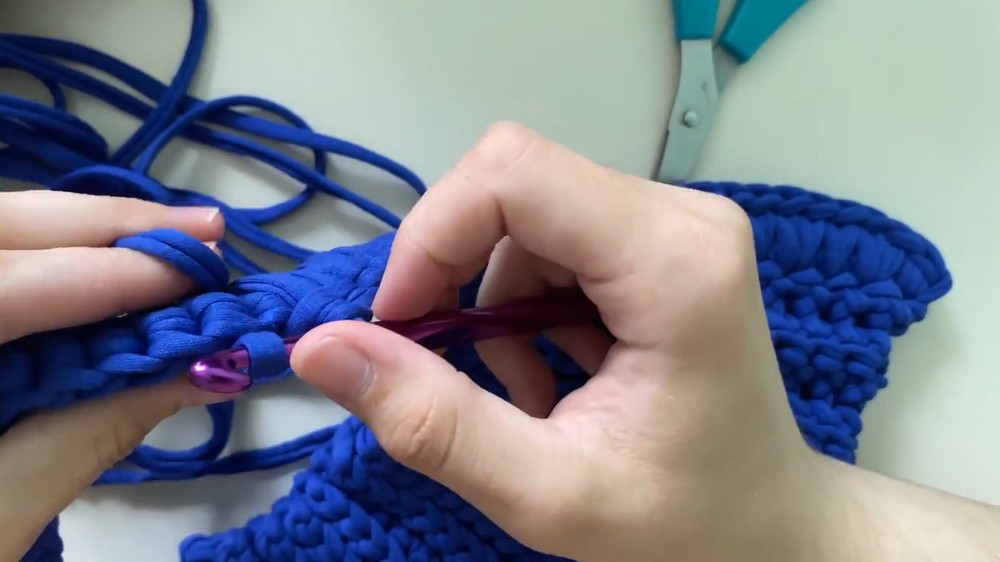
7. Reinforcing the Handles:
- Flip the bag and return to the handle section.
- Crochet a row of single crochet stitches along the handle to reinforce it and provide more structure. Crochet into the back loops of the chain for a cleaner look.
- Secure the yarn after completing the handle, cut the yarn, and weave in the ends.
8. Decorative Edging (Optional):
- For a more polished appearance, add an edging to the opening of the bag.
- Attach yarn to the first stitch along the top edge.
- Crochet single crochet stitches (SC) evenly around the opening of the bag to create a decorative looped finish.
- When arriving at the handle section, crochet into the handle stitches as well for uniformity.
- Fasten off, and weave in any remaining yarn ends.
Customizations
- Size Adjustments:
- Change the foundation chain to increase or decrease bag height (ensure the number of chains is even).
- Add more rows to the body for increased width.
- Adjust the number of chains for the handles to achieve your desired length.
- Color Options:
- Use two-tone or multi-colored yarns for a stunning striped effect.
- Alternate yarn colors between rows for added contrast.
- Decorative Customizations:
- Add tassels or pom-poms to the handles for an extra layer of detail.
- Use stitch markers to create designs like diamonds or diagonal patterns for a textured body.
- Handle Variations:
- Use braided or twisted yarn for the handles instead of crocheted chains.
- Substitute the yarn handles with rope, leather straps, or pre-made handles.
Tips for Success
- Tight Stitches: When working the slip stitches, make sure they are consistent but not too tight—they form the base structure of your bag.
- Back Loop Consistency: Crochet into the back loop as described to achieve a uniform texture across the bag.
- Reinforce Handles: Double-crochet the handles for durability, especially if the bag will carry heavier items.
- Yarn Stretch: If using stretchy yarn, adjust the handle length beforehand to ensure it doesn’t overstretch during use.
Conclusion
When finished, this tote bag will feature a sturdy structure with symmetrical handles and a textured, polished look. The seamless and reinforced edges ensure the bag’s durability and strength while maintaining its stylish appearance. It’s an ideal project for beginners looking to practice their skills or for advanced crocheters who want a practical design.
Take the time to adjust color, size, and decorative elements to truly make this bag your own. Share it as a gift, showcase it as your daily companion, or develop variations for different occasions.