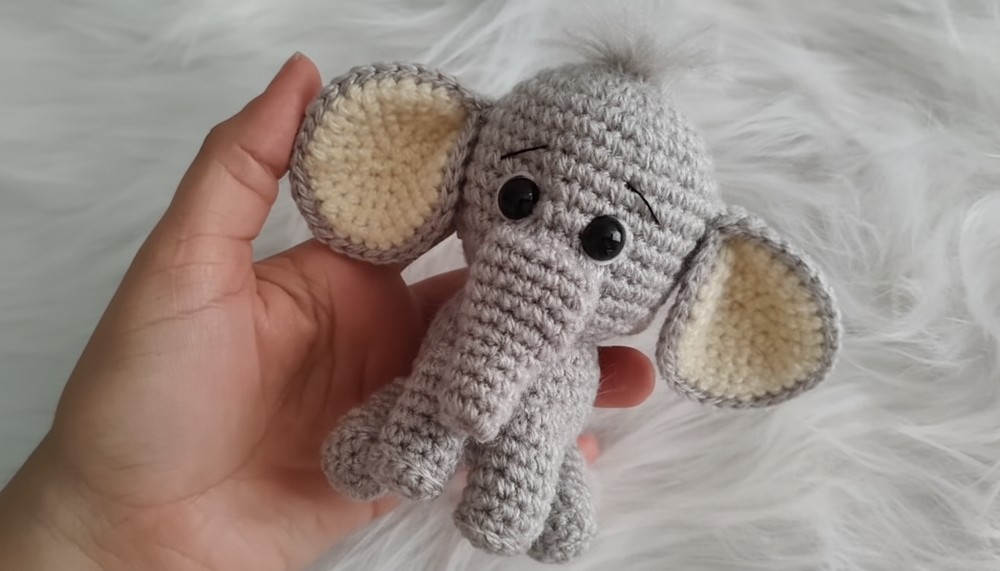
Delight in this Free crochet Elephant Pattern, making adorable, soft elephants that bring charm, playful joy, and a cute, handmade touch to any collection.
Elephants are well-loved symbols of wisdom, strength, and good luck, making them an ideal choice for unique and meaningful creations. A Crochet Elephant Pattern offers the opportunity to design these adorable figures to be used as thoughtful gifts, decorative accents, or cherished keepsakes. Their versatility and charm make them suitable for a variety of occasions, bringing joy and warmth wherever they are displayed.
Crochet Elephant Pattern That Brings Smiles And Joy
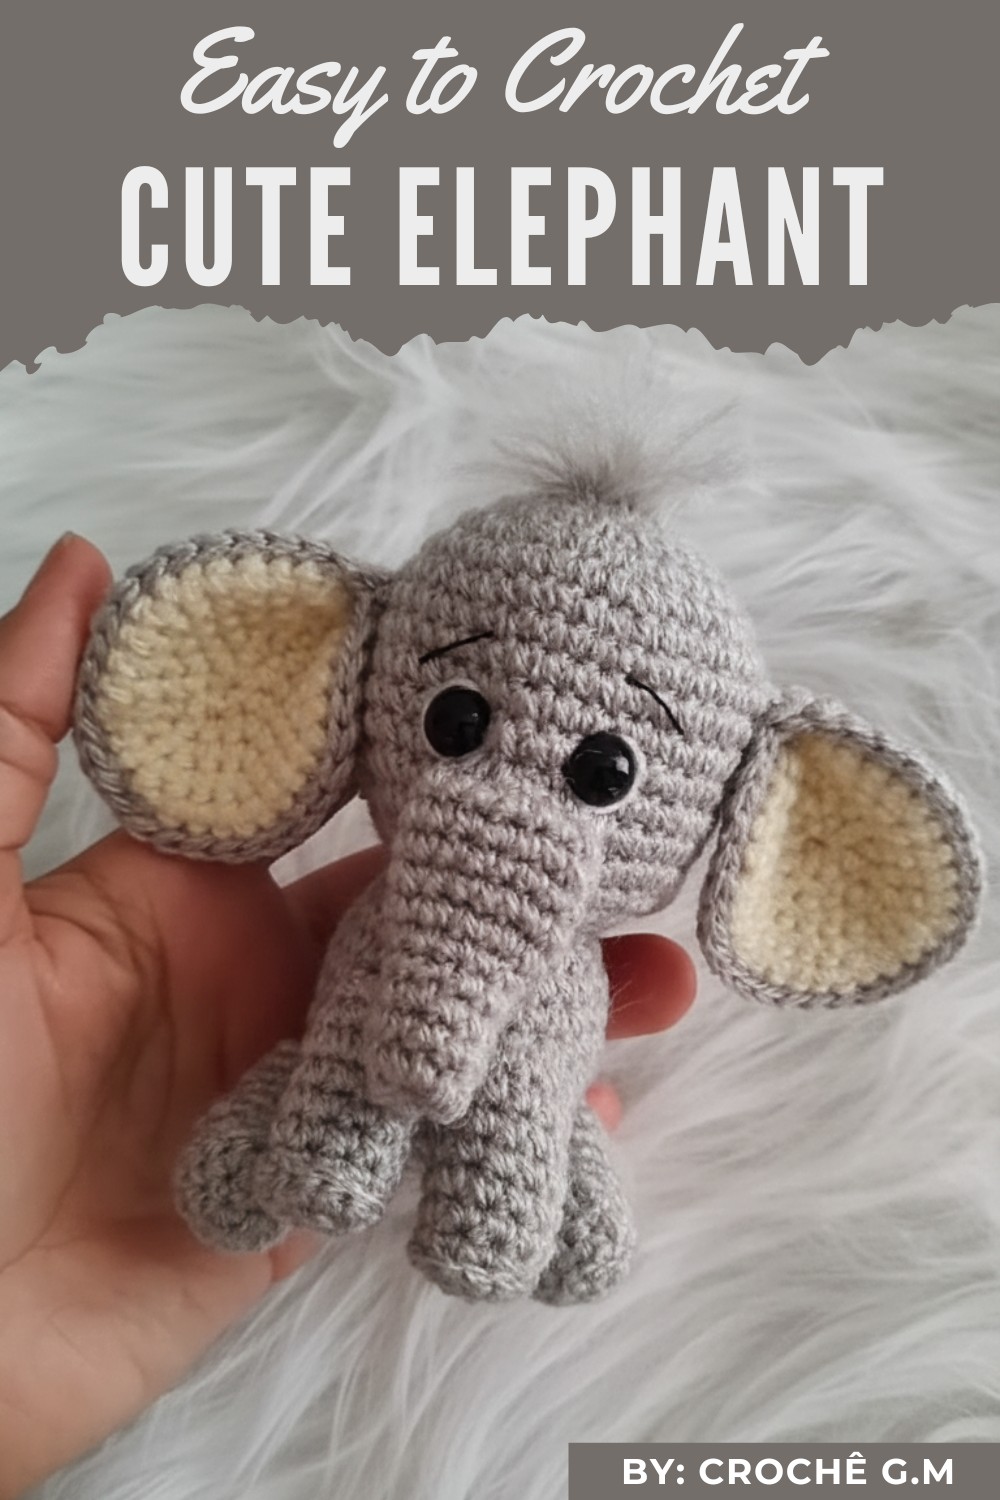
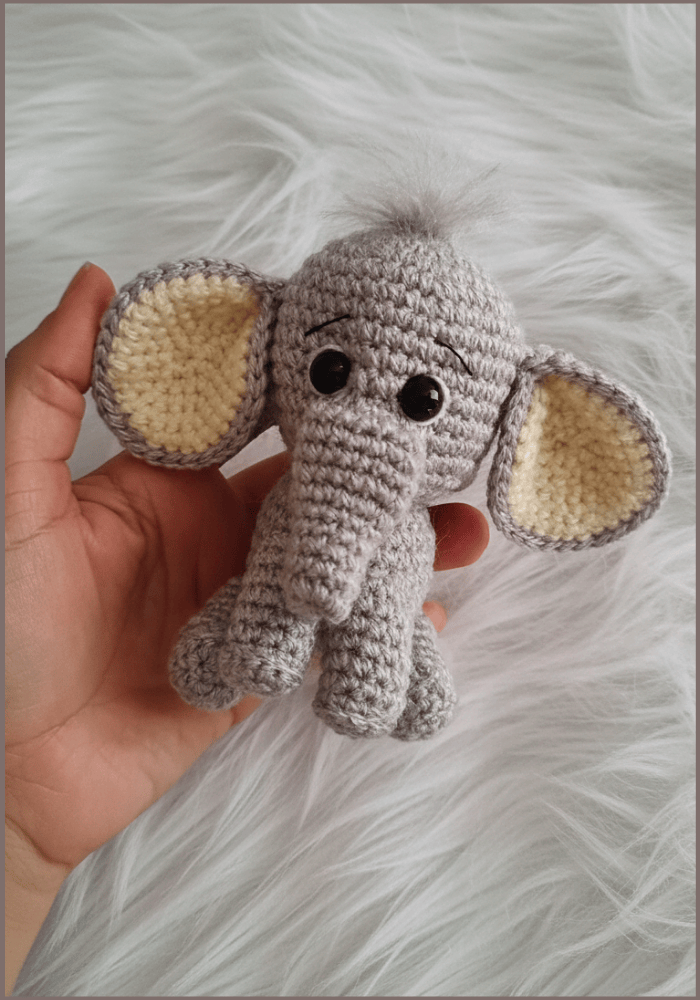
Safari Collection Amigurumi Elephant
Learn how to create this adorable Amigurumi elephant, a fantastic addition to any safari collection. You will build this stuffed toy using basic crochet techniques and simple shaping methods, bringing this charming creature to life with soft yarn and secure features.
Uses
-
Create a soft Stuffed Toy or a keepsake for a child.
-
Add to a Nursery Decoration or a themed collection.
-
Produce a unique Handmade Gift.
Materials
-
Yarn: Use two colors of yarn (e.g., grey and a contrasting color like pink/beige for the inner ear).
-
Hook: Use a 2.5 mm crochet hook.
-
Notions: You need stuffing (polyester fiberfill), 10 mm safety eyes, a tapestry needle for assembly, and a stitch marker.
-
Hair/Tail Tassel: Use a piece of the contrasting color yarn, cut into small strands.
Special Features
-
Modular Construction: You crochet the elephant in separate, simple pieces (body, head, trunk, ears, legs, tail) and then assemble them.
-
Spiral Rounds: You work all body parts in continuous, spiral rounds of Single Crochet (SC), making seam-joining unnecessary on the rounds.
-
Structured Feet: You use a back-loop only (BLO) row at the beginning of the legs to create a distinct edge, allowing the elephant to sit or stand better.
-
Tapered Shaping: You achieve the 3D form of the head and body by strategically placing increases and decreases according to a consistent SC formula.
Level of Difficulty
This project is Intermediate. While it uses only Single Crochet, the creation requires precise counting of stitches and rounds for all the small, separate pieces. You must also successfully execute joining and assembly of the various parts to achieve the correct elephant shape.
Tutor's Suggestions
-
Stuffing: Do not overstuff the legs, trunk, or tail; keep them moderately soft for better positioning and shaping.
-
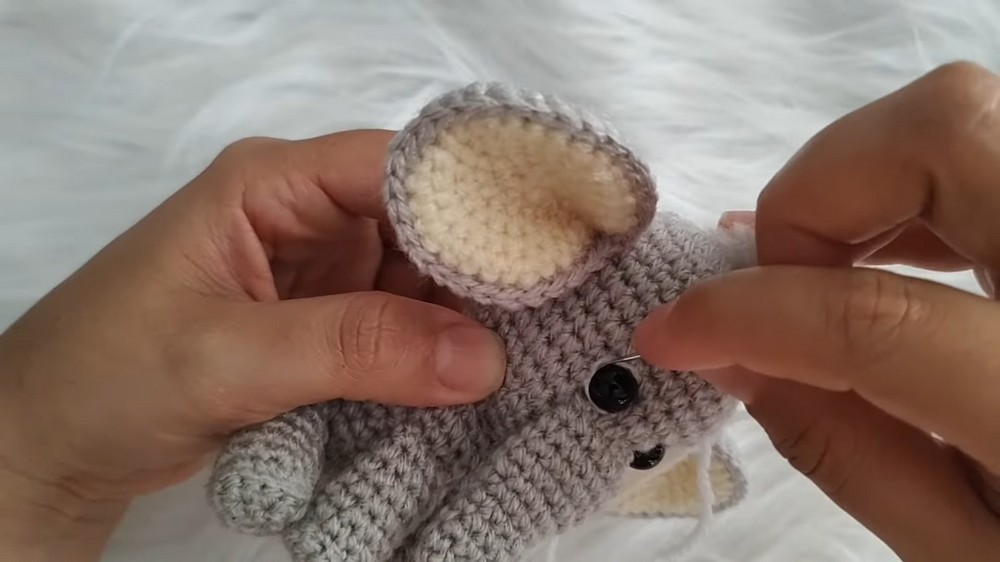
Eye Placement: Place the safety eyes between R.11 and R.12 on the head, separated by 4 stitches.
-
Assembly Alignment: When attaching the head to the body and the legs to the body, ensure you align the pieces horizontally so the elephant sits or stands straight.
Step-by-Step Details
Part 1: Crochet the Body (Grey Yarn)
-
R.1 (Start): Make a Magic Ring (MR) with 6 SC.
-
R.2 (Increase): Work 2 SC in each stitch (increase) around (12 SC).
-
R.3: Repeat (1 SC, 1 Inc) around (18 SC).
-
R.4: Repeat (2 SC, 1 Inc) around (24 SC).
-
R.5: Repeat (3 SC, 1 Inc) around (30 SC).
-
R.6-11 (Height): Work 6 rounds of SC in each stitch (30 SC).
-
R.12 (Decrease): Repeat (3 SC, 1 Dec) around (24 SC).
-
R.13 (Decrease): Repeat (2 SC, 1 Dec) around (18 SC).
-
Stuff the body firmly. Leave a long tail for sewing the head. (Total 13 rounds).
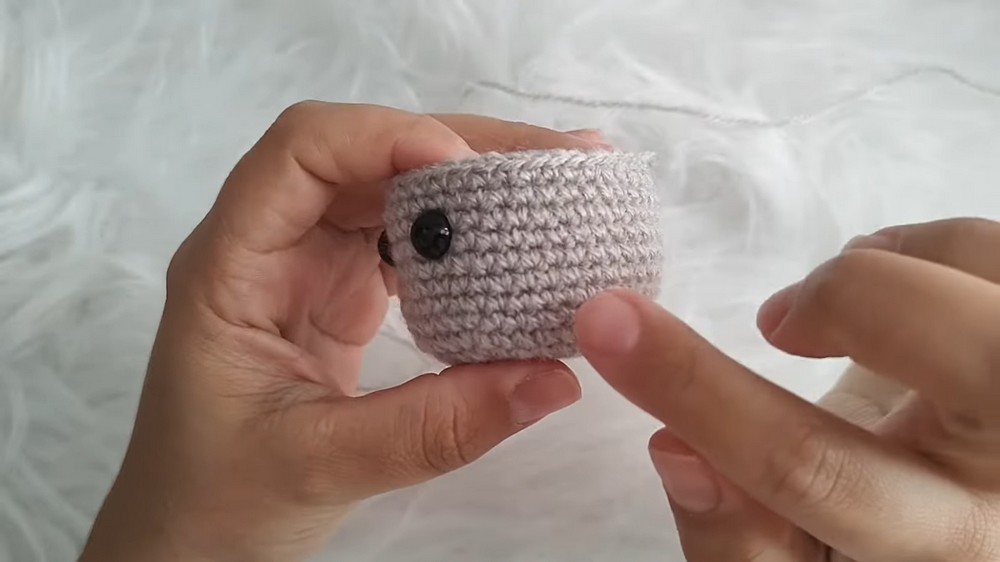
Part 2: Crochet the Head (Grey Yarn)
-
R.1 (Start): Make a Magic Ring (MR) with 6 SC.
-
R.2 (Increase): Work 2 SC in each stitch (increase) around (12 SC).
-
R.3: Repeat (1 SC, 1 Inc) around (18 SC).
-
R.4: Repeat (2 SC, 1 Inc) around (24 SC).
-
R.5: Repeat (3 SC, 1 Inc) around (30 SC).
-
R.6: Repeat (4 SC, 1 Inc) around (36 SC).
-
R.7-14 (Height): Work 8 rounds of SC in each stitch (36 SC). Place safety eyes between R.11 and R.12 with 4 stitches separation.
-
R.15 (Decrease): Repeat (4 SC, 1 Dec) around (30 SC).
-
R.16 (Decrease): Repeat (3 SC, 1 Dec) around (24 SC).
-
R.17 (Decrease): Repeat (2 SC, 1 Dec) around (18 SC).
-
Stuff the head firmly. Finish the round but do not close completely, leave the remaining opening for sewing to the body. (Total 17 rounds).

Part 3: Crochet the Trunk (Grey Yarn)
-
R.1 (Start): Make a Magic Ring (MR) with 10 SC. Do not fully close the MR.
-
R.2-5 (Height): Work 4 rounds of SC in each stitch (10 SC).
-
R.6 (Increase): Repeat (1 SC, 1 Inc) around (15 SC).
-
R.7-10 (Height): Work 4 rounds of SC in each stitch (15 SC).
-
Fasten off and leave a long tail for sewing. (Total 10 rounds).
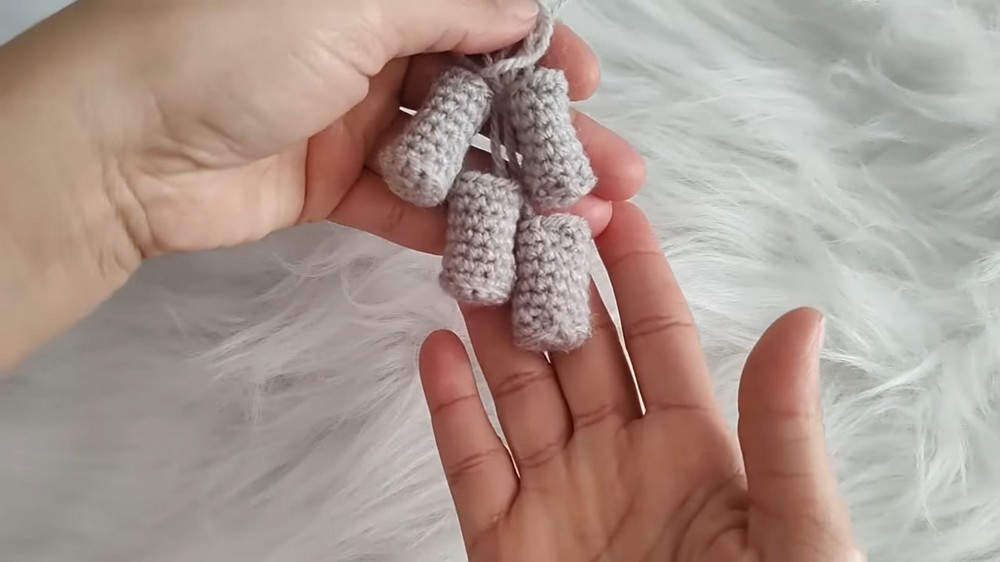
Part 4: Crochet the Legs (Make 4)
-
R.1 (Start): Make a Magic Ring (MR) with 5 SC.
-
R.2 (Increase): Work 2 SC in each stitch (increase) around (10 SC). Slip stitch to close.
-
R.3 (BLO): Chain 1, work 1 SC in the back loop only of each stitch (10 SC).
-
R.4-9 (Height): Work 6 rounds of SC in each stitch (10 SC).
-
Lightly stuff the leg. Fasten off and leave a tail for sewing. (Total 9 rounds).
Part 5: Crochet the Ears (Grey and Contrast Color)
-
Make 2 Grey pieces and 2 Contrast Color pieces:
-
R.1 (Start): Make a Magic Ring (MR) with 6 SC.
-
R.2 (Increase): Work 2 SC in each stitch (increase) around (12 SC).
-
R.3: Repeat (1 SC, 1 Inc) around (18 SC).
-
R.4: Repeat (2 SC, 1 Inc) around (24 SC).
-
R.5: Repeat (3 SC, 1 Inc) around (30 SC).
-
Fasten off the contrast color piece. Do not cut the grey yarn.
-
-
Join the Ears: Align one grey piece and one contrast piece. With the grey yarn, work a round of SC through both layers, joining the two pieces together along the edge (30 SC).
-
Fasten off and leave a long tail for sewing.
Part 6: Crochet the Tail (Grey Yarn)
-
R.1 (Start): Make a Magic Ring (MR) with 5 SC.
-
R.2-7 (Height): Work 6 rounds of SC in each stitch (5 SC).
-
Fasten off. Insert small strands of the contrast yarn through the end point to create a tail tassel.
Part 7: Assembly
-
Attach Trunk: Sew the trunk to the face, placing it directly below the eyes.
-
Attach Head to Body: Sew the head onto the body, ensuring the face is centered.
-
Attach Lower Legs: Sew the two lower legs to the bottom of the body, starting the seam around R.4 of the body. Place them on the sides for stability.
-
Attach Upper Legs: Sew the two upper legs to the front of the body, starting the seam around R.9 of the body.
-
Attach Ears: Fold the joined ear pieces slightly and pinch the bottom closed. Sew them to the sides of the head, starting the seam around R.9 of the head.
-
Attach Tail: Sew the tail onto the back of the body.
-
Embroider Hair (Optional): Attach small strands of the contrast yarn to the top of the elephant's head for hair.
Conclusion
You have successfully completed a charming Amigurumi elephant! You used simple stitches and focused shaping to create a well-proportioned and adorable stuffed animal, ready to join your collection or become a cherished gift.
Tip
Pinch and Pin the Ears: Before sewing the ears to the head, pinch the bottom edge of the ear piece and use a straight pin to hold the folded shape against the head. This technique ensures the ears stand out properly and allows you to check their symmetry before you start stitching.
The designs behind these patterns are typically straightforward yet detailed enough to suit different skill levels, from beginners to more experienced individuals. A Crochet Elephant Pattern enables you to create soft, endearing elephants that can be personalized with your choice of colors, textures, or playful accents like bows and embroidered features. This flexibility ensures that each piece carries a truly personal touch and blends seamlessly with your vision.