Upgrade your accessory game with a fun crochet round bag pattern that's perfect for every outing offering endless style options and a touch of handmade charm.
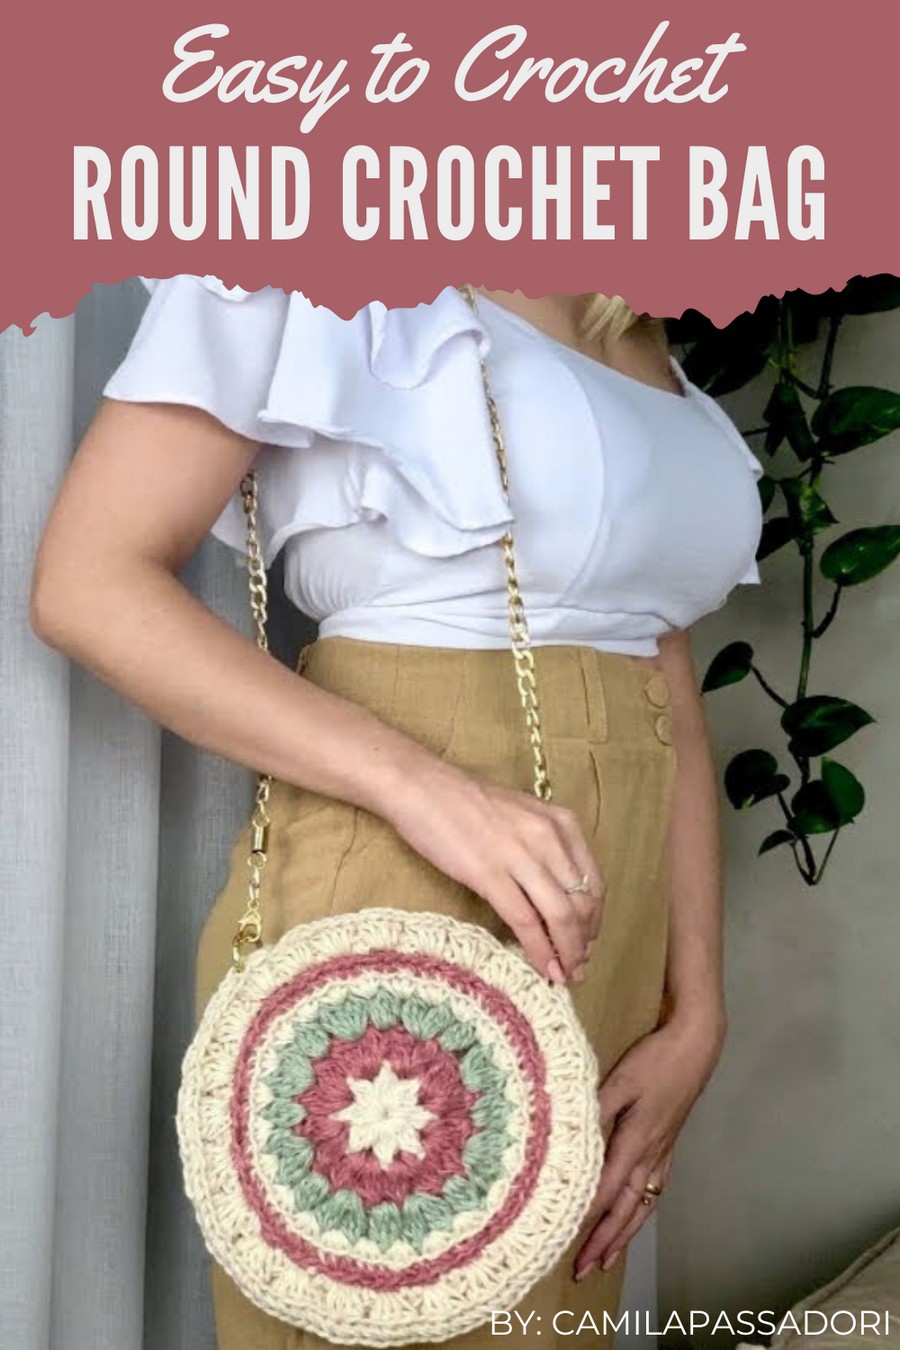
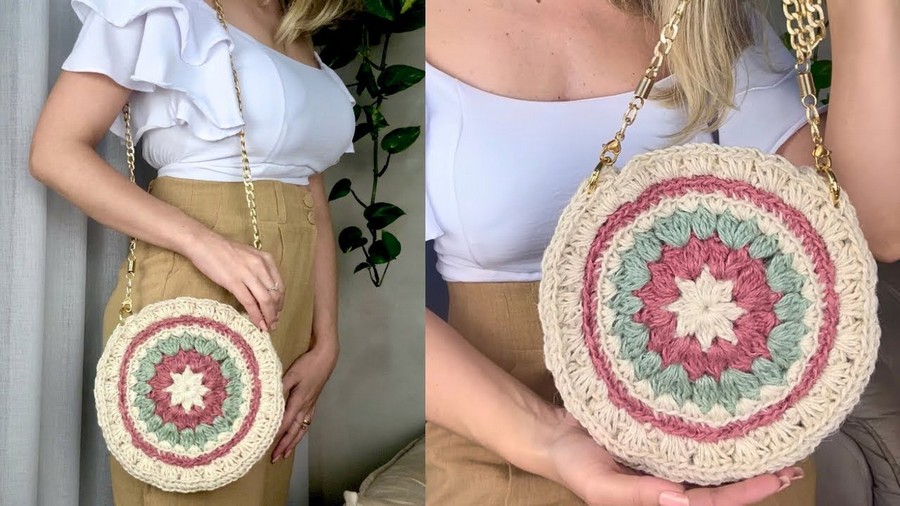
There’s something delightful about creating your own handmade accessories, and a free crochet round bag pattern is the perfect way to combine creativity with functionality. Featuring a charming circular design, this bag is ideal for everyday use—whether you’re heading to a coffee shop, the beach, or just running errands.
Chic Crochet Round Bag Pattern You Can’t Resist
Its versatile shape allows for endless customization, giving you room to experiment with colors, textures, and sizes to suit your personal style. Practical yet stylish, this project is great for beginners and seasoned crocheters alike, offering a unique and satisfying way to create an accessory you’ll love using daily.
Materials Needed
Yarn
- Main Yarn:
- Jute thread (double-strand) with a texture like Cisal Su Colored Jute.
- Approximate weight: 178 g.
- Alternatively, use String #6 or natural fibers like cotton threads for an equally beautiful finish.
- Other options: Nautical yarn or multi-tone yarn.
Crochet Hook
- Hook Size: Use a 4.0 mm crochet hook. Adjust the hook size if replacing the thread with a thicker or finer alternative.
Additional Supplies
- Bag Strap: Gold strap or chain approximately 50–60 cm for attaching to the bag. Alternatively, a crocheted strap works perfectly for an all-natural look.
- Carabiners: 2x carabiners for attaching the straps (optional).
- Tapestry Needle (for finishing and weaving ends).
- Scissors.
- Optional: Lining fabric, zippers, or magnetic clasps for closure.
Skill Level
Beginner to Intermediate.
Key Abbreviations (US Crochet Terminology)
- ch: Chain
- sc: Single Crochet
- dc: Double Crochet
- sl st: Slip Stitch
- yo: Yarn Over
- st: Stitch
- (...): Repeat instructions inside parentheses
- **: Instructions for repeats
Special Notes
- Splicing the Thread: If running out of thread, seamlessly add more by overlapping the old and new pieces within your stitches. This prevents knotting and secures the transition.
- Finishing: Use a tapestry needle to weave in ends securely. For additional durability, dab a small amount of fabric-safe glue over the edge threads.
- Size Adjustments: To make a larger or smaller bag, increase or decrease the diameter of the circular rounds for the two main panels.
Pattern Instructions
Step 1: Main Circular Panels (Make 2)
- Start with Double-Strand Jute or Thread:
Create a magic ring with your double-strand jute thread. - Round 1:
- Work 8 dc into the magic ring. Close with a sl st at the top of the first dc. (8 sts)
- Round 2:
- Ch 2, then work 2 dc in each st around. Close with a sl st. (16 sts)
- Round 3:
- Ch 2, (1 dc in the next st, 2 dc in the next st) repeat around. Close with a sl st. (24 sts)
- Round 4:
- Ch 2, (dc in next 2 sts, 2 dc in the next st) repeat around. Close with a sl st. (32 sts)
- Rounds 5–8:
- Continue increasing each round by working 1 additional stitch between the increases:
- Round 5: dc in next 3 sts, 2 dc in the next st. (48 sts)
- Round 6: dc in next 4 sts, 2 dc in the next st. (56 sts)
- Round 7: dc in next 5 sts, 2 dc in the next st. (64 sts)
- Round 8: dc in next 6 sts, 2 dc in the next st. (72 sts)
- Continue increasing each round by working 1 additional stitch between the increases:
- Finishing Panel 1: Pull the thread through the loop and fasten off, leaving a long end for sewing. Repeat these steps to make a second identical circular panel.


Step 2: Side of the Bag
- Foundation Chain:
- Create a slipknot with double-strand jute thread and work 74 ch.
- Rows 1–5: Work dc stitches back and forth for 5 rows, always beginning each row with ch 2 (turning chain).
- Finishing the Edges:
- Cut the thread, fasten off, and weave the tails using your tapestry needle. This side panel will act as the enclosure for your bag.

Step 3: Assembly
- Joining the Sides:
- Position the two circular panels inside-out (wrong sides facing each other).
- Align the edge of the side panel to the edge of the circular panels.
- Seaming the Pieces Together:
- Leave a 14 cm opening on one side to serve as the bag's top opening.
- Using a tapestry needle, whipstitch or slip stitch around the edge of the panels, joining the side panel to each circular panel.
- Ensure the stitching is tight but flexible enough to maintain the bag’s soft structure.

Step 4: Adding a Strap
- Optional Strap Attachment:
- Attach two carabiners on opposite sides of the bag’s top opening, centering them on the side seam.
- Hook the chain or gold strap to each carabiner.
- Crocheted Strap Alternative:
- If you prefer a crocheted strap, make a chain of desired length (e.g., 100 ch), then sc across for as many rows as needed for your preferred thickness.
- Sew each end of the strap directly onto the top edges or use the carabiners for adjustable functionality.

Step 5: Optional Lining and Finishing Touches
- Lining:
- If desired, sew a fabric lining to close off the bag gently. Use a lightweight fabric to maintain the bag's natural appearance and ensure durability.
- Attach the lining with small slip stitches around the inner edge of the bag's opening.
- Zipper/Magnetic Closure: Add a zipper or magnetic clasp at the top opening for added security.
Customization Ideas
- Colors & Texture: Use nautical yarn or gradient threads for a multi-tonal, intricate design. A metallic thread can also add a modern sparkle.
- Size Adjustments: For a larger bag, continue increasing the rounds of the circular panels, maintaining the same pattern. Adjust the side panel length accordingly.
- Straps: Add different strap materials such as leather, soft jute, or chunky crochet straps for variation in style.
Conclusion
The Laila Bag is a natural blend of elegance and utility, perfect for casual wear or evening outings. Its simple construction allows for creative personalization while maintaining a timeless design. With options for lining, straps, colors, and closures, this bag can be transformed into a versatile, stylish accessory that showcases your creativity and craftsmanship.
Tips for Success
- Seam Alignment: When attaching the side panel, align the stitches carefully to avoid unevenness. Use stitch markers if needed.
- Tension: Keep your tension consistent, especially when using jute threads, as they tend to vary in thickness.
- Durability: Reinforce key attachment areas, such as where the strap connects, by doubling your stitch work.
Pattern Variations
- Mini Version: Reduce the diameter of the circular panels (e.g., stop at Round 6 for a smaller bag). Shorten the side panel proportionally.
- Backpack Option: Add two straps to the bag to convert it into a small crochet backpack.
- Extra-Large Tote: Continue increasing the circular panels (e.g., up to Round 12–15) and make a wide, sturdy side panel for a fully functional tote bag.