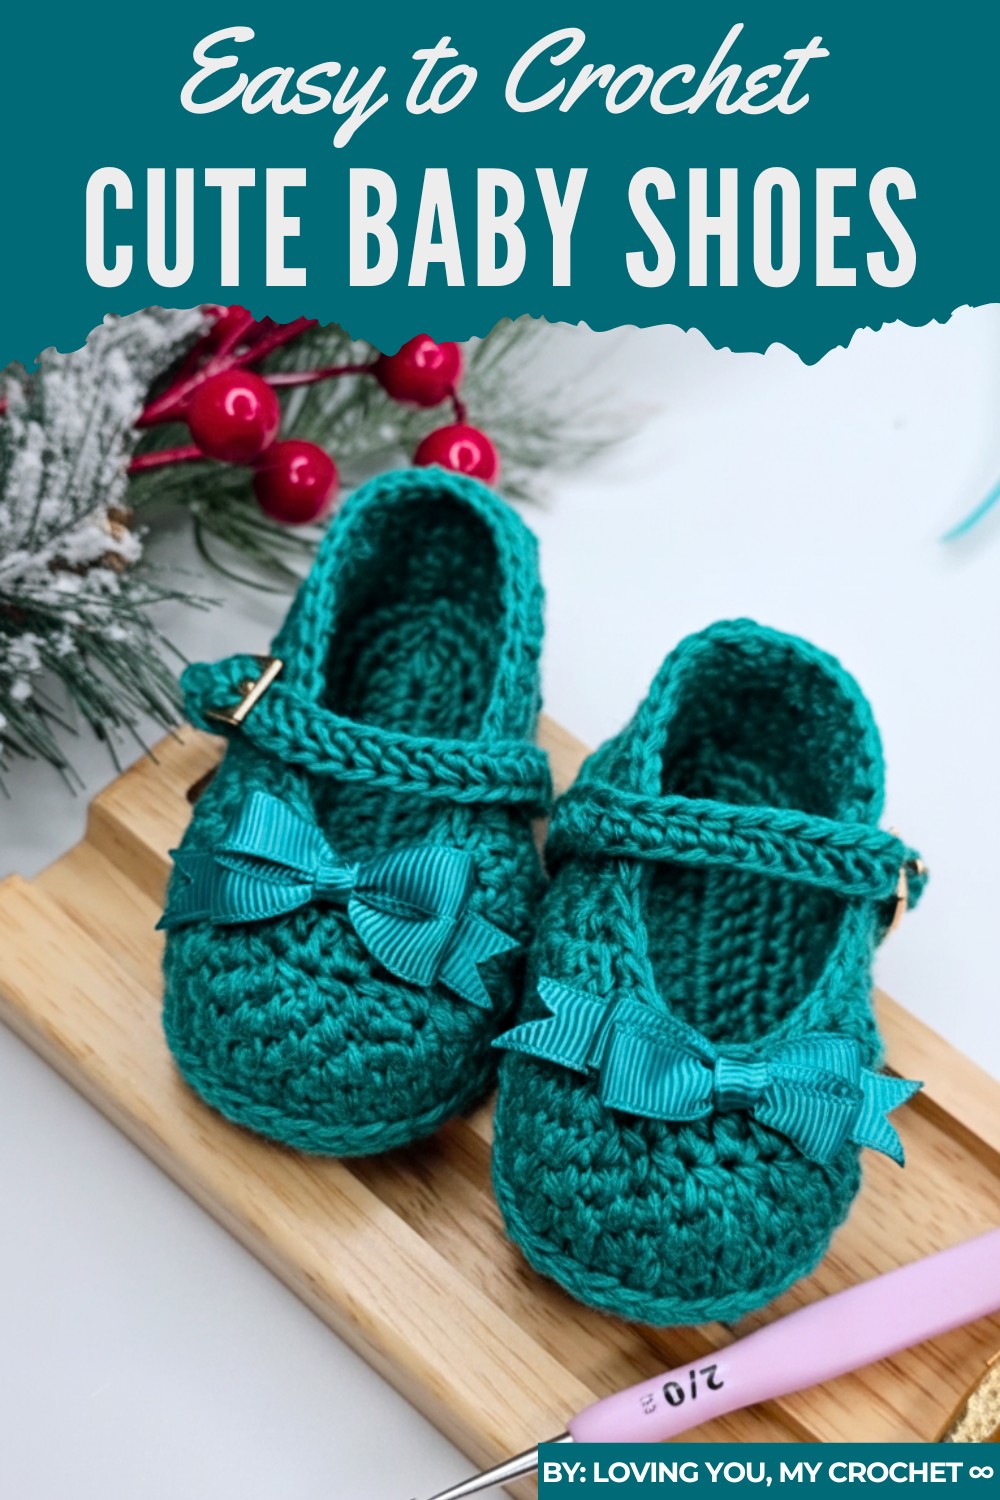
Step into cuteness with this Free crochet Baby Shoes Pattern, making soft, adorable shoes that bring comfort, charm, and a sweet touch to little feet.
Handmade baby accessories are cherished for their delicate charm and thoughtful craftsmanship. Among these, crochet baby shoes stand out as both practical and adorable. Designed to keep tiny feet cozy and stylish, these creations are perfect for special occasions, gifting, or simply adding a personal touch to a baby's wardrobe.
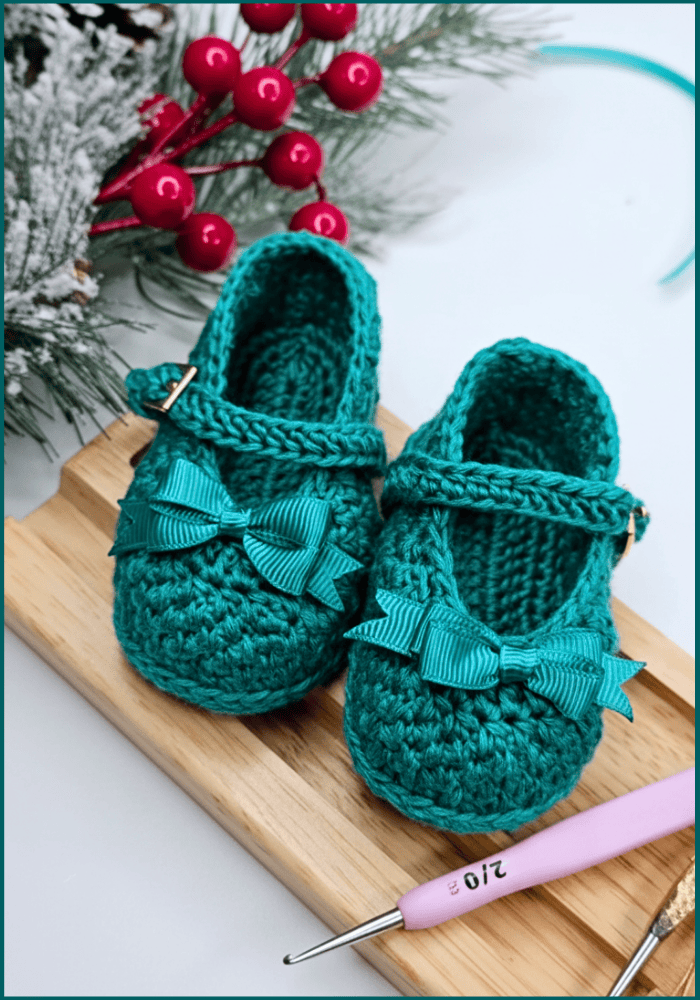
Handmade Crochet Baby Shoes Pattern That Looks Expensive
Crocheted Baby Shoes (Easy Step-by-Step)
Master the technique of crocheting an adorable pair of baby shoes, perfect for small feet measuring approximately 9 cm. This comprehensive tutorial guides you through creating a durable, two-layer sole and a textured upper body, resulting in a charming and secure little bootie.
Uses
-
Create a Comfortable Bootie for a newborn (0-3 months, size 9 cm).
-
Make a personalized Baby Shower Gift.
-
Customize the size by using a different hook or yarn weight (the tutor provides advice on sizing for 10 cm and 10.5 cm).
Materials
-
Yarn: Approximately 100 grams of Light Worsted or Sport Weight yarn (specifically, a 2 mm yarn is used in the video).
-
Hook: A 2 mm crochet hook for the 9 cm size. (Use 2.20 mm for 10 cm, 2.50 mm for 10.5 cm).
-
Closure: Two buttons or simple bows/laces for the ankle strap.
-
Tools: Tapestry needle for weaving ends, scissors.
Special Features
-
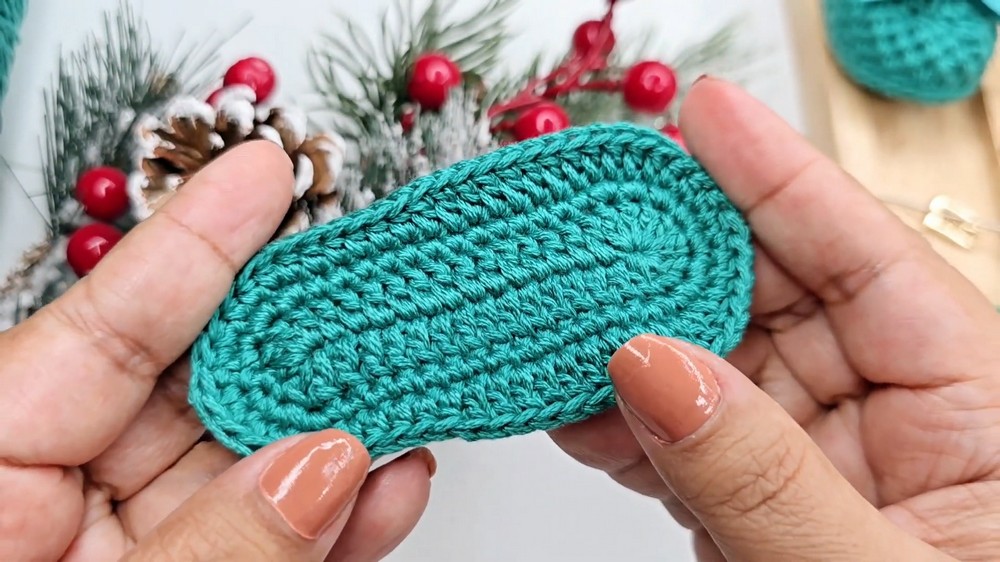
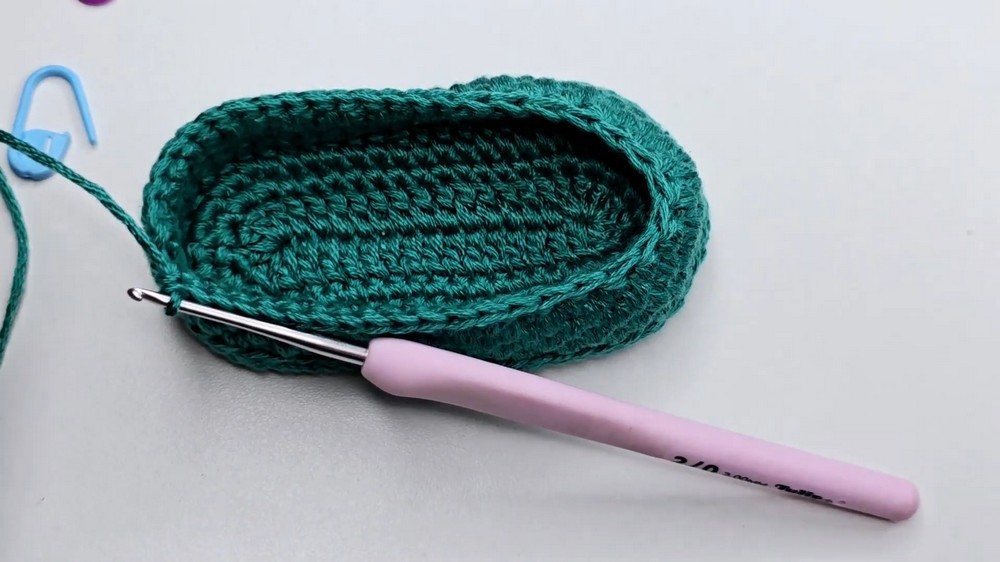
Double-Layer Sole: You crochet two separate sole pieces and join them with a slip stitch border, providing a structured, thick, and professional base for the shoe.
-
Basketweave Texture (Faux Ribbing): The main body of the shoe uses alternating front and back post stitches to create a stretchy, ribbed texture that closely resembles knitting.
-
Seamless Construction: You work the upper shoe continuously in the round, creating a smooth transition from the sole to the sides.
Level of Difficulty
This project is Intermediate. While individual stitches are simple (SC, DC), the project requires accuracy in counting stitches, systematic shaping (increases and decreases), and the clean execution of the textured pattern and sole join.
Tutor's Suggestions
-
Sizing: If you want a 10 cm shoe, use a 2.20 mm hook. For a 10.5 cm shoe, use a 2.50 mm hook.
-
Count Stitches: Pay close attention to the stitch count, especially in the sole, to ensure the left and right sides match and the body remains centered. The final stitch count for the sole should be 54.
-
Invisible Join: Use the method shown to join the two sole pieces using slip stitches. This technique creates a neat, decorative ridge that acts as the starting point for the shoe's upper body.
Step-by-Step Details
Stitch Abbreviations: CH (Chain), SL ST (Slip Stitch), SC (Single Crochet), HDC (Half Double Crochet), DC (Double Crochet), INC (Increase), DEC (Decrease).
A. Crochet the Double-Layer Sole (Make 2)
-
Base Chain: Chain 15 stitches.
-
Row 1 (DC): Work 3 CH (counts as 1 DC). In the 15th CH, work 2 DC. Work 1 DC in the next 13 stitches. In the last chain, work 8 DC. Work 1 DC in the next 13 stitches along the opposite side. Work 3 DC in the remaining space. Close with a SL ST in the 3rd CH (40 stitches total).
-
Row 2 (SC): Work 1 CH. Work 6 SC-INC (2 SC in each of the first 6 stitches). Work 13 SC. Work 8 SC-INC (2 SC in each of the next 8 stitches). Work 13 SC. Work 3 SC-INC (2 SC in each of the last 3 stitches). Close with a SL ST (54 stitches total).
-
Row 3 (HDC/DC): Work 1 CH. Work 11 HDC, 1 DC, 8 HDC, 8 SC, 8 HDC, 1 DC, 11 HDC, 4 SC. Close with a SL ST (54 stitches total).
-
Join Soles: Align the two finished sole pieces (one face up, one face down). Use a SL ST to join them all the way around, taking a stitch from both pieces simultaneously.

B. Shape the Shoe Body
-
Round 1 (First Side Wall): Work 1 CH. Work 1 SC in the back loop of each of the 54 SL ST you just created when joining the soles. Close with a SL ST (54 SC total).
-
Round 2 (Textured Ribbing): Work 1 CH. Begin the textured pattern: alternate 1 SC in the top of the stitch, followed by 1 SC worked down into the foundation/ridge below (this is a simple form of alternating post stitch). Repeat this alternating pattern for the entire round.
-
Rounds 3-4: Continue the alternating pattern, ensuring you place a top SC above a down SC from the previous row, and vice-versa, to create a checkerboard/ribbed effect (54 stitches total).
C. Reduce the Toe
-
Mark the Toe: Locate the center of the toe. Count and mark the 14 stitches on either side of the center (28 stitches total) for the decrease section.
-
Round 5 (SC Decreases): Continue the textured ribbing pattern until you reach the first marker. Work 13 SC-DEC using the same alternating texture (you decrease 13 stitches). Continue the textured ribbing pattern until the end of the round. Close with a SL ST.
-
Round 6 (DC/HDC Decreases): Work 1 CH. Continue the textured pattern until the beginning of the toe curve. Switch to a new decrease pattern:
-
Work DC-DEC or HDC-DEC (lifting two loops together) across the toe section.
-
Continue the textured ribbing pattern until the end of the round. Close with a SL ST.
-
D. Finish the Ankle and Add the Strap
-
Ankle Opening: Begin working back and forth in rows (not rounds) from the heel up to the front point, maintaining the textured ribbing pattern. This forms the upper ankle opening.
-
Final Heel Row: Work one final row of SC around the entire opening (including the front point) to neaten the edge. Cut the yarn and weave in the end.
-
Strap: Locate the desired starting point near the heel (on the side of the shoe) for the strap.
-
Attach yarn and CH 28 stitches.
-
Work SC or HDC back down the chain.
-
Attach the strap to the other side of the heel/ankle opening with a SL ST and cut the yarn.
-
-
Closure: Sew a button onto the appropriate side of the ankle to close the strap.

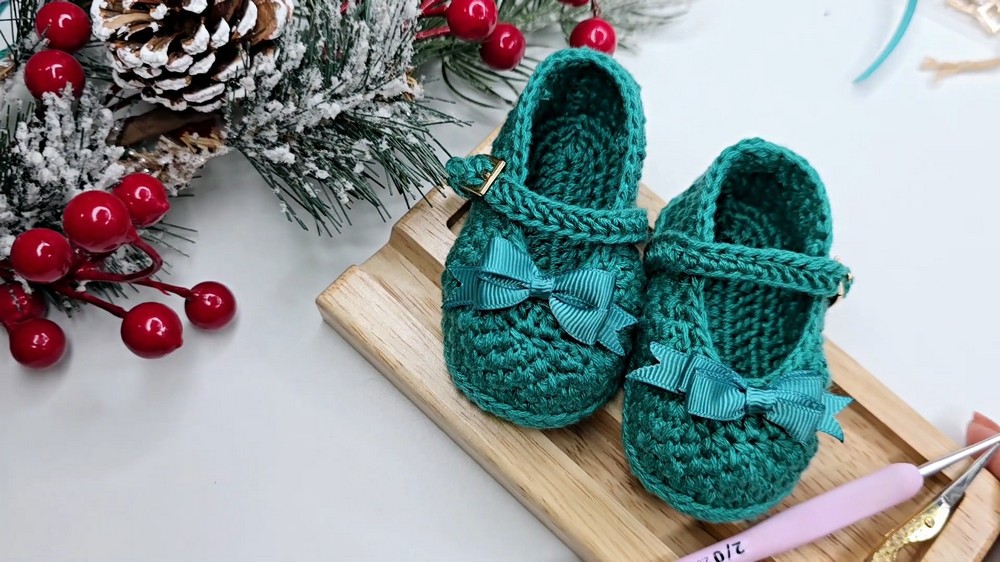
The Crochet Baby Shoes Pattern provides detailed guidance for crafting these sweet little shoes, ensuring a blend of comfort, elegance, and functionality. This pattern offers opportunities for customization, allowing you to explore various colors, textures, and designs to match unique tastes or themes. Whether you prefer a simple design or something adorned with bows, buttons, or floral accents, the Crochet Baby Shoes Pattern provides flexibility and creativity.
It also caters to crocheters of all skill levels, encompassing clear instructions that gradually lead to a beautifully finished product. These shoes make perfect heirlooms, showcasing craftsmanship that can be passed down through generations.
Conclusion
You have successfully completed a sturdy, beautifully textured baby shoe. The double sole provides durability, and the ribbed upper offers a comfortable, custom fit. Simply repeat the entire process to create the matching pair.
Tip
Use the Marker Trick: Place a stitch marker at the exact midpoint of the toe before starting the decrease rounds. This helps you align the center of your decreases, ensuring the shoe's front point is perfectly symmetrical.