Style your look with the Free crochet Bandana Pattern, perfect for adding a playful handmade touch and versatile charm to any outfit or accessory.
Accessories can completely transform a simple outfit, adding personality and charm with just a small touch. A crochet bandana pattern brings this idea to life, offering a versatile, handcrafted piece that can be worn as a headscarf, neck wrap, or even used as a decorative accent on bags and home items.
Playful Crochet Bandana Pattern to Pair With Any Outfit

Uses and Materials
Materials You Need
-
Yarn: Thin, cotton-based yarn.
-
Hook: 3 mm crochet hook, adjusted to match your specific yarn weight.
-
Notions: Scissors and a tapestry needle (for weaving in tails).
Uses of the Project
-
Fashionable Hair Accessory: Wear this piece as a stylish hair bandana or headband.
-
Scrap Buster: The project requires only a small amount of yarn, making it perfect for using up leftover cotton scraps.
-
Handmade Gift: Create this accessory in various colors to give as a personalized, handmade gift.

Special Features
-
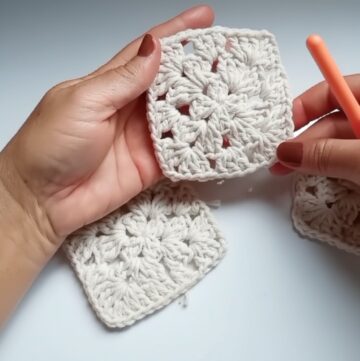
Floral Motif Design: The bandana consists of a repeating flower-like pattern created using a Popcorn Stitch (or Puff Stitch) technique.
-
Modular Assembly: You build the final triangular shape by joining individual full motifs and using specialized half-motifs along the edges, ensuring the V-shape is perfectly formed.
-
In-Process Joining: You join the motifs while crocheting the second round (Popcorn layer) of each new motif, creating a seamless, sturdy connection without requiring extra sewing.
-
Reinforced Ties: The final tie strings are worked in a strong chain and then reinforced by working a Slip Stitch into every chain on the return row, which prevents stretching and adds structure.
Level of Difficulty
This is an Easy project. The pattern relies on simple stitches (chain, slip stitch, double crochet) and a repetitive motif structure that is easy to master quickly.
Tutor's Suggestions
-
Choose Thin Yarn: Select an thin, cotton-content yarn to ensure the bandana drapes beautifully and does not become too stiff or bulky. Thicker yarn will result in a harder, larger accessory.
-
Check Stitch Count for Final Edge: When creating the final double crochet border around the sides, adjust the number of stitches (2 or 3 DC) you place into each horizontal space. The edge must lie perfectly flat; if it tightens, add more stitches; if it ripples, use fewer.
-
Complete the Motif First: For rows requiring joining on two or more sides (such as those in the middle of the bandana), complete the center of the motif first, then join the petals/popcorns to the necessary adjacent motifs.
-
Steam for Finishing: After you finish the crocheting, thoroughly steam or iron the bandana to relax the stitches and ensure the pattern lays flat and shows its detail clearly.
Crochet Bandana

Its triangular shape and open, airy stitches make it lightweight, breathable, and perfect for layering in different seasons. Beyond style, such a crochet piece is easy to customize in terms of color, size, and stitch design, giving it a unique, personalized flair.

Creating one begins with choosing soft, comfortable yarn and a suitable crochet hook. Start by making a small foundation chain, then build successive rows, gradually increasing stitches at the edges to form the classic triangular shape.

Once the desired size is reached, finishing the edges and weaving in loose ends ensures a neat, elegant look.

The final bandana is not only stylish but also practical, offering warmth, texture, and a charming handmade touch to any outfit.

Step-by-Step Details
Create a stunning, brand-inspired Crochet Motif Bandana using simple flower motifs. This project is a quick, easy make that uses a modular method of joining full and half motifs to achieve a stylish, V-shaped hair accessory. You will complete the structure with a clean double crochet border and long chain ties.
Conclusion
You successfully crocheted a beautiful, V-shaped motif bandana. By skillfully utilizing full and half floral motifs and joining them as you went, you created a professional, brand-inspired accessory. The structured border and reinforced ties ensure a durable and stylish finish, ready for you to wear.
Tip
Prevent Edge Puckering: When working the final double crochet border, pay close attention to the stitch count in the horizontal spaces. If you notice the edge starting to curve inward (pucker), it means you need more stitches; increase the number of Double Crochets from two to three in the next few spaces until the edge lies completely flat.