Turn yarn into stylish and functional one-piece front garments with this simple crochet guide perfect for all skill levels and endless customization options.
One-piece front garments are a wonderful choice for simplicity and style. This free crochet pattern combines practicality with versatility, making it perfect for tops, sweaters, or lightweight layering pieces. Its seamless construction minimizes effort while providing a polished finish, suitable for both beginners and experienced crocheters.
FREE Crochet One-Piece Pattern for All Skill Levels
With endless options for customization, you can adjust the fit, texture, or color to match your personal taste or seasonal trends. Whether for casual outfits or special occasions, this pattern works for a variety of uses, combining comfort and elegance effortlessly. A thoughtful choice for crafting timeless pieces with a modern appeal.
Materials Needed
Yarn
- Type: Lightweight yarn, such as cotton blend yarn (recommended Glam yarn or similar).
- Quantity: Approx. 250–300 m depending on size.
- Suggested Color: Any solid or variegated color that suits your personal preference (the video used Java Green).
Crochet Hook
- Size: 2.5 mm crochet hook (or suitable hook for your yarn and tension).
Tools
- Scissors
- Stitch markers (helpful for marking ties and body transitions).
- Measuring tape
Skill Level
Intermediate
Key Abbreviations (US Crochet Terminology)
- ch: Chain
- sc: Single crochet
- dc: Double crochet
- sl st: Slip Stitch
- sp: Space
- st: Stitch
Pattern Notes
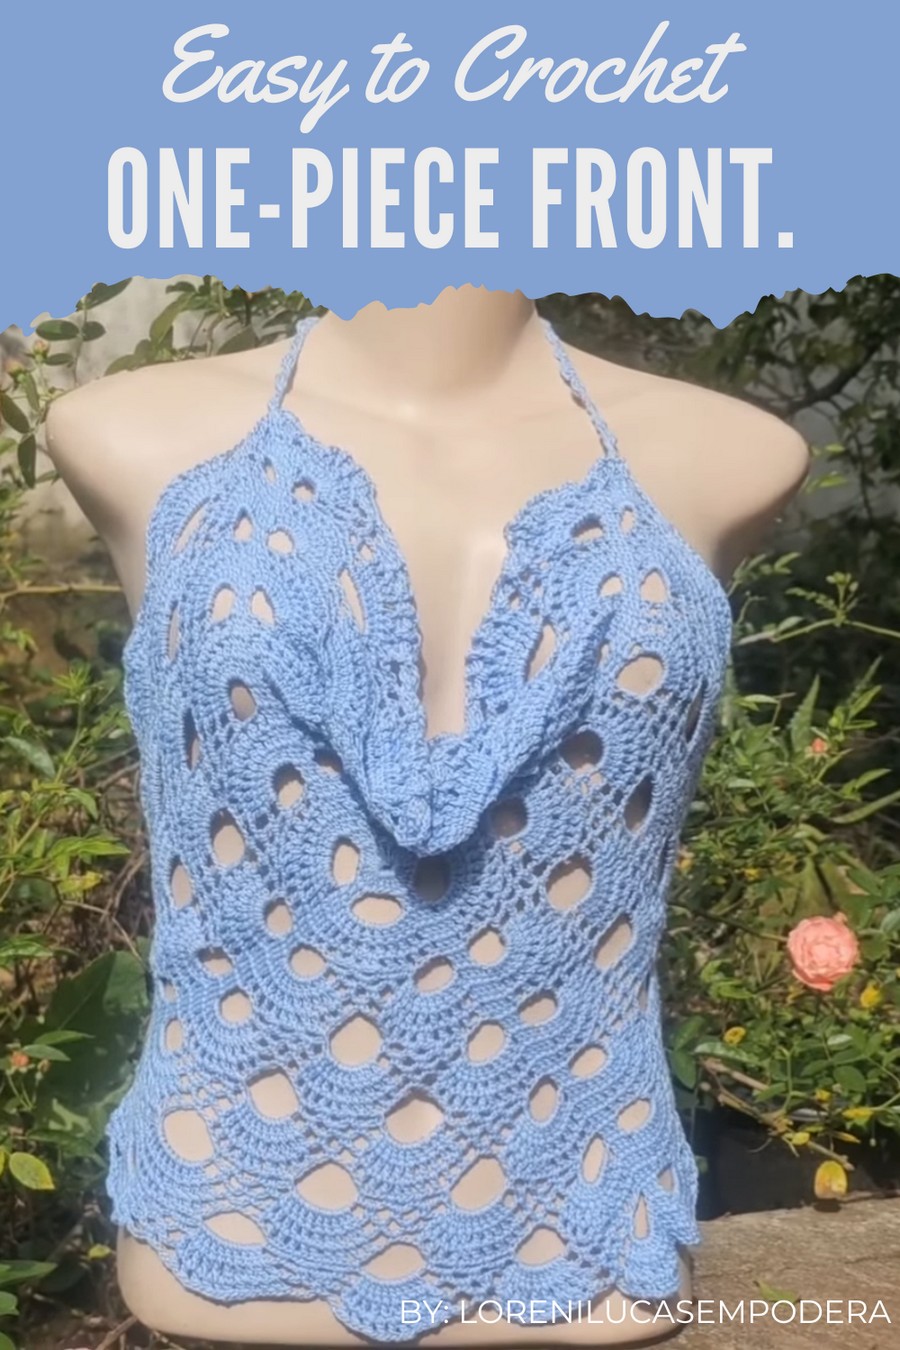
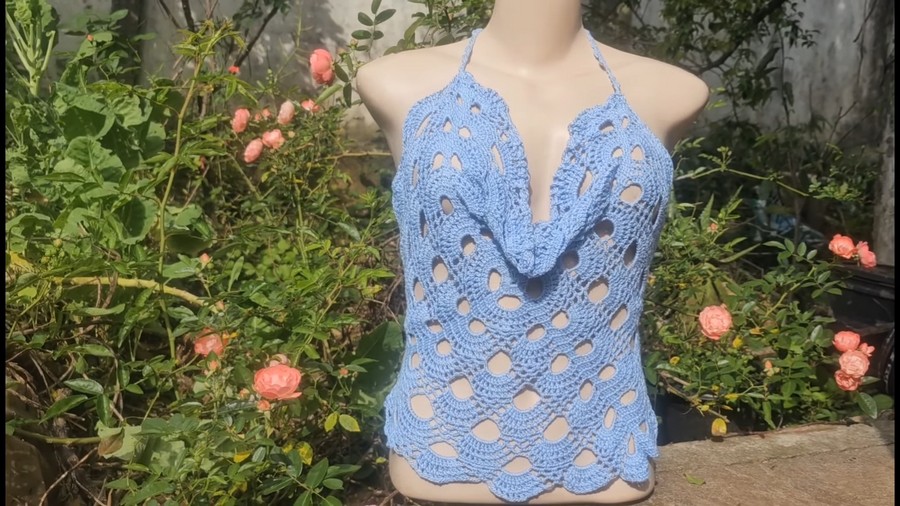
- The front panel of this top is based on the "Liz Square" design, a textured square format that serves as the base.
- The pattern accommodates options for wide waist straps or spaghetti straps based on personal preference.
- Always test fit before finalizing measurements for the waist cinch strap and neckline ties.
Step-by-Step Instructions
Step 1: The Liz Square (Front Panel)
- Foundation Round:
- Make a magic ring.
- Ch 3 (counts as the first dc), then work 2 dc into the ring. Ch 2.
- Work 3 dc, ch 2 three more times. Join with a sl st to the top of the ch-3.
- Rounds 2–5:
- Ch 3 (counts as the first dc), work 3 dc, ch 2, 3 dc into each corner space to create a square structure.
- Work 3 dc into each side space between the corners.
- Add Motifs (Optional): Work additional rounds of traditional granny square or textured motifs until the square reaches desired size for your bust width.
- Example: The tutorial used 5 reasons/motif rounds, resulting in a square approximately 30 cm across.
- Test Fit:
- Fold the square diagonally to form the bust region with the point of the square at the center front of the top.
- Confirm the size suits your bust measurements. Add rounds if needed for larger bust sizes.

Step 2: Wide Waist Strap
- Attach Yarn:
- Attach yarn at one side of the square, preferably at the bottom edge near the corner point.
- Foundation Row:
- Work dc across the bottom edge, creating a straight base for the wide strap.
- Subsequent Rows:
- For all rows, work dc through the back loop only to create a textured ribbed effect.
- Turn work and continue across the strap for subsequent rows.
- Length of Strap:
- Work enough rows to achieve a strap length that wraps comfortably around your waist.
- Example: The tutorial suggests approx. 18 rows, resulting in a strap length of 18 cm. Adjust based on your body measurements.
- Finishing:
- Test fit the strap around your waist to ensure adequate snugness.
- Crochet fewer rows for a tighter fit and take into account that cotton-blend yarn may stretch with wear.

Step 3: Neckline Strap (Halter Tie)
- Foundation for Strap:
- Attach yarn at the top corner edge of the square (near the neckline section).
- Strap Design Options:
- Option A: Traditional simple chain strap: Ch desired length, fasten off.
- Option B: Textured “Standing Points”:
- Ch 4, work 2 dc into the first ch.
- Repeat ch 4, 2 dc for the desired strap length (approximately 1 meter).
- Finishing:
- Ensure the strap length is adequate for tying around the neck comfortably.
- You can modify the halter strap to cross behind the neck or tie in an X-shaped design across the back.
Step 4: Final Assembly
- Join Wide Strap to Square:
- Fold the square to form the bust region and position the wide strap around your waist.
- Seam the strap using sc stitches or sew with a tapestry needle for a discrete finish.
- Insert Neckline Strap:
- Weave the halter strap through the top edge of the square or neck opening.
- Finishing Touches:
- Check for loose ends and secure them discreetly.
- Steam block or wet block the finished project to even out stitches and enhance stretch and fit.

Customization Ideas
- Color Variations:
- Alternate yarn colors for each square round or strap rows for a multi-colored piece.
- Use ombre or gradient yarn for an elegant fade effect.
- Size Adjustments:
- For larger sizes, increase square dimensions by adding more motif rounds.
- For smaller sizes or cropped versions, reduce the number of rounds in the square or adjust strap lengths.
- Spaghetti Strap Modification:
- Skip the wide strap and create two long ties on each corner point for a minimalist spaghetti strap design.
Tips for Success
- Count Stitches: Consistently count stitches during the strap rows to avoid accidental increases or decreases.
- Stretch to Fit: Always test-fit your elastic strap sections to ensure proper fit and snugness.
- Experiment with Tie Styles: Use the halter strap creatively to try X-shaped ties, tight bows, or even layering options with jackets or overlays.
Conclusion
This “Liz Square Cropped Top” combines elegance with ease in a unique design. The textured front square, sturdy halter ties, and fitted waist strap ensure versatility and flattering results. Whether paired with high-waisted jeans or a summer skirt, this top is always a statement piece.
Final Look
- Front Panel: Textured square with rich stitch definition.
- Halter Neck Strap: Adjustable and stylish design choices.
- Wide Waist Strap: Secure and fitted masterpiece.
Pattern Variations
- Tunic Style: Expand the length of the waist strap and body for a tunic to wear with leggings.
- Bikini Top: Use lighter yarn and create spaghetti straps for a swimwear top inspired by this design.
- Bandana Match: Crochet smaller versions of the square to create a matching bandana that ties with the top.