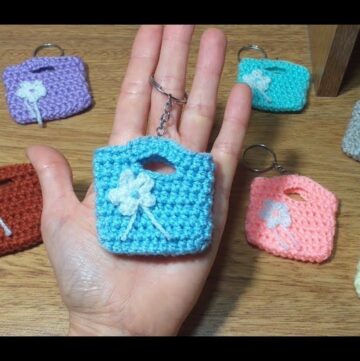
Express yourself with fun and easy Crochet Emoji Keychain Pattern perfect for accessories gifts or personal touches that showcase your favorite moods and styles.

Bring a touch of fun and personality to your accessories with this free crochet emoji keychain pattern! Perfect for brightening up your keys, backpack, or even gifting to friends, this project lets you crochet your favorite emojis into adorable, pocket-sized charms. With endless possibilities, you can create smiley faces, heart eyes, or even a silly wink to match your mood or style.
Fun Crochet Emoji Keychain for a Handmade Touch
The pattern is beginner-friendly and works up quickly, making it a delightful way to use up yarn scraps. Add a handmade twist to everyday essentials and enjoy crocheting these fun, expressive creations that will make anyone’s day brighter!

Materials List
Yarn
- Type: Acrylic yarn (can use small leftover skeins at home).
- Color 1: Yellow (main face color).
- Color 2: Black (for face details).
Crochet Hook
- Recommended Sizes:
- 4.0 mm hook or 4.5 mm hook depending on yarn thickness and desired pendant size.
Additional Supplies
- Scissors
- Tapestry Needle (for weaving in ends and embroidery).
- Optional:
- Googly eyes or beads for eyes instead of embroidery.
- Magnet (if using as a refrigerator magnet) or keychain hardware for keychain pendants.
Skill Level
Intermediate
Key Abbreviations (US Crochet Terminology)
- ch: Chain
- sl st: Slip Stitch
- sc: Single Crochet
- dc: Double Crochet
- inc: Increase (two stitches worked into the same stitch)
Special Notes
- Adjust hook size and yarn thickness based on desired emoji size. Thicker yarn and larger hook = larger pendant.
- These pendants can be adapted for various decorative uses (e.g., as appliqués or pins).
- Pay attention to stitch counts, especially on rows with increases, to maintain the round shape.
Pattern Instructions
Step 1: Happy Face Base
First Circle (Yellow)
- Begin with a Magic Ring:
- Wrap yarn around your fingers, pull a loop through, and secure with a knot for a magic circle foundation.
- Foundation Round:
- Ch 3 (counts as first dc). Work 11 dc into the ring.
- Pull the yarn tail to tighten the ring until the center hole closes.
- Join with a sl st into the top of the starting ch-3. (Total: 12 dc)
- Second Round (Increase Round):
- Ch 3 (counts as first dc). Work 2 dc into the next stitch (first increase).
- Continue working 2 dc into each stitch around.
- Join with a sl st. (Total: 24 dc)
- Fasten Off the Yarn:
- Cut yarn, leaving a small tail for weaving.
- Secure the thread using a tapestry needle and hide the ends inside the circle.
- Repeat the Steps Above: Create two identical circles with identical stitch counts. Do not fasten off the yarn on the second circle.

Step 2: Embroider Happy Face Features
Smile (Black Yarn):
- Cut a small piece of black yarn, thread it through a tapestry needle.
- Position and Stitch:
- Insert the needle into the edge of the emoji circle and create a curved smile following the shape of one crochet round.
- Secure the ends and carefully pull to adjust for a symmetrical smile.
- Fasten off and hide ends.

Eyes (Black Yarn):
- Using the same black yarn, position your needle for the eyes.
- Stitch Eyes:
- Create two horizontal lines or dots for each eye, spaced appropriately.
- Alternatively, you can double up the stitch to make thicker eyes.
- Secure thread tightly and hide leftover ends.
Step 3: Join Front and Back Circles
- Prepare to Join:
- Place the circles back-to-back, ensuring both are aligned evenly.
- Continue using the active yarn from the second circle.
- Slip Stitch to Join:
- Insert Hook: Through both layers, grab inner loops of each circle’s stitches.
- Make a sl st through the loops across all edges to join the circles completely.
- Finishing Edge:
- Once joined, make the last sl st. Cut the yarn and use a tapestry needle to weave in the remaining ends.

Step 4: Optional Pendant Loop
- Cut a small piece of yarn (color matching the circle or contrasting).
- Insert a tapestry needle and thread it through the top edge of the joined circles.
- Create a loop long enough for hanging as a pendant or attaching to keychain hardware.
- Knot securely and trim extra yarn.

Customization Ideas
- Colors: Use different colors for the face (e.g., fuchsia, turquoise) for playful customization.
- Expressions: Try varied features like heart-shaped eyes, winks, or surprised face details using embroidery.
- Sizes: Adjust hook size and yarn thickness to vary pendant dimensions from small keychain charms to larger appliqués.
Tips for Success
- Always count stitches to ensure symmetry while creating circles and avoiding distortions.
- Adjust facial feature placement as needed—use pins beforehand to test positions.
- If using googly eyes, sew or glue securely to prevent them from falling off.
Conclusion
This happy emoji pendant is quick, easy, and perfect for using leftover yarn. The design can be adapted for appliqués, necklaces, magnets, pins, or keychains. Stitch in varied sizes and colors for a unique collection. With its cheerful appeal, this project makes a lovely handmade gift for any occasion.
Pattern Corrections and Remarks
- Ensure the two circles are fully aligned before slip stitching around the edges to maintain symmetry.
- If circles don’t lay flat, check stitch counts or tension consistency during increases.
- Hide all thread tails securely to avoid loose ends showing on the final piece.