Shine with style using this Free crochet Star Keychain Pattern, making cute, charming keychains that add a playful, handmade touch to your everyday accessories.
Brighten up your everyday essentials with a design that’s fun, stylish, and utterly delightful! Perfect for adding a cheerful touch to keys, bags, or even gift tags, this creation is more than just a simple adornment. The Crochet Star Keychain Pattern combines practicality and charm, offering a handmade way to express personality while keeping your accessories organized and visually striking.
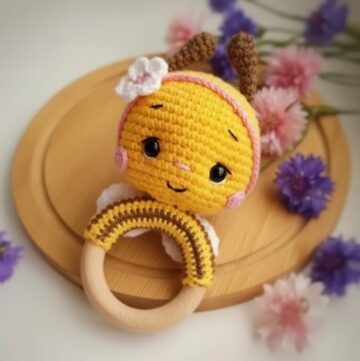
Playful Crochet Star Keychain Pattern To Use On Backpacks

Step-by-Step Guide to Crochet a Star Keychain
Learn to quickly and easily crochet a cheerful, five-pointed star keychain. This project creates two identical flat pieces that you join together, offering a quick, portable craft perfect for using up yarn scraps or adding a festive touch to your accessories. You can also easily transform the finished star into a charming starfish by adding small pearls.
Uses
-
Create a colorful Keychain or bag charm.
-
Make a whimsical Christmas Ornament or decoration.
-
Design a unique Starfish by adding small beads or pearls.
-
Produce a simple Handmade Gift.
Materials
-
Yarn: Choose a wool or acrylic yarn in your desired color (yellow is used in the video). You may also use thinner yarn to achieve a smaller size.
-
Hook: Use a 2.0 mm crochet hook or a size appropriate for your chosen yarn.
-
Notions:
-
Black thread for facial embroidery (optional).
-
Safety eyes (optional).
-
Tapestry needle for assembly and finishing.
-
Keychain ring or hook.
-
Small beads/pearls (for starfish variation).
-
Special Features
-
Five-Point Construction: You form all five points immediately following the central round using a chain and decreasing height stitches, creating the star shape in just two simple rounds.
-
Double-Layer Structure: You crochet two identical pieces and sew them together, which gives the keychain durability and a clean finish on both sides.
-
Versatile Design: The same basic pattern can be a plain, classic star or a detailed starfish by adding pearls of various sizes to the surface.
Level of Difficulty
This project is Easy/Beginner. It primarily uses basic stitches such as Chain, Single Crochet (SC), Half Double Crochet (HDC), and Double Crochet (DC). The main challenge is achieving the different stitch heights for the points.
Tutor's Suggestions
-
Embroider First: If you choose to add a face (eyes and mouth), complete the embroidery on one of the pieces before you sew the two pieces together. This makes the stitching easier to manage.
-
Shape the Star: After you finish sewing the two star pieces together, gently press and shape the star with your hands, particularly at the points, to ensure it lies flat and maintains its crisp shape.
Step-by-Step Details
Part 1: Crochet the Base Circle (Make 2)
-
Start: Make a Magic Ring.
-
R.1: Chain 3 (this counts as your first Double Crochet).
-
Work 14 Double Crochet (DC) stitches into the ring, totaling 15 stitches (including the starting Chain 3).
-
Pull the starting tail to close the center circle tightly.
-
Close the round with a Slip Stitch (Sl St) into the top of the initial Chain 3.

Part 2: Crochet the Five Points (R.2)
You will now work a sequence of chains and stitches to form one of the five points, then attach it back to the central circle.
-
Chain 6 for the height of the point.
-
Skip 2 chains from the hook.
-
In the 3rd chain from the hook, work 1 Single Crochet (SC).
-
In the next chain, work 1 Half Double Crochet (HDC).
-
In the next chain, work 1 Double Crochet (DC).
-
In the last chain, work 1 Treble Crochet (Trc) (Yarn Over twice).
-
Attach to Base: Skip the next 2 stitches on the base circle, and secure the point with 1 SC into the 3rd stitch on the base.
-
Repeat this entire sequence (Steps 1-7) a total of 5 times to complete the five-pointed star shape.
-
Fasten off the yarn, leaving a long tail on the second piece for assembly.

Part 3: Assembly and Finishing
-
Embroider (Optional): Embroider the mouth onto one of the star pieces using black thread, centered between two points. Attach safety eyes if desired.
-
Join Pieces: Line up the two crocheted stars perfectly.
-
Use the long yarn tail and a tapestry needle to sew the two pieces together around the entire edge. Work through the back loop of the front piece and the front loop of the back piece to create a clean seam.
-
Finish: Weave in any remaining yarn tails and attach a keychain ring to one of the points.
-
Starfish Option: Sew small pearls or beads onto the surface of the star for a starfish effect.


The process of making this keychain is truly enjoyable, giving you the opportunity to play with colors and textures while enhancing your crochet skills. Perfect for beginners and advanced crafters alike, the pattern offers a straightforward yet fulfilling experience. End up with a durable, lightweight creation that’s as functional as it is beautiful—a charming little piece that breathes life into everyday objects or special gifts.

Conclusion
You have successfully completed a charming and versatile star keychain! This quick pattern allows you to easily customize the final piece with different colors, a friendly face, or decorative pearls, creating a lovely personalized accessory.
Tip
Hide the Knot: When adding facial embroidery, start the black thread at the Magic Ring center and exit near the mouth line. After completing the embroidery, push the tapestry needle back through the head and exit near the Magic Ring. Tie the starting and ending tails together in a knot inside the center, and use the starting tail to pull the knot into the fabric to hide it completely.