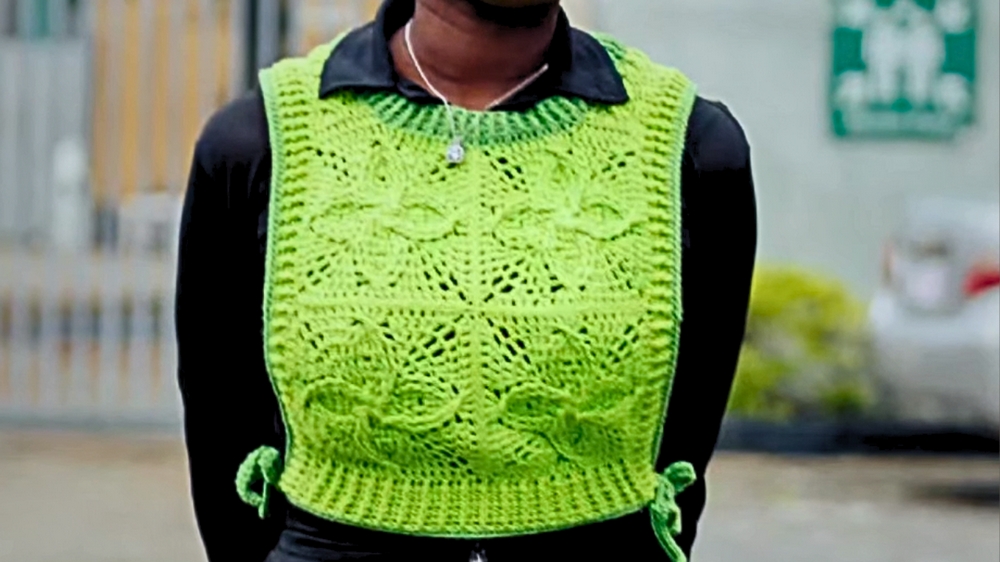
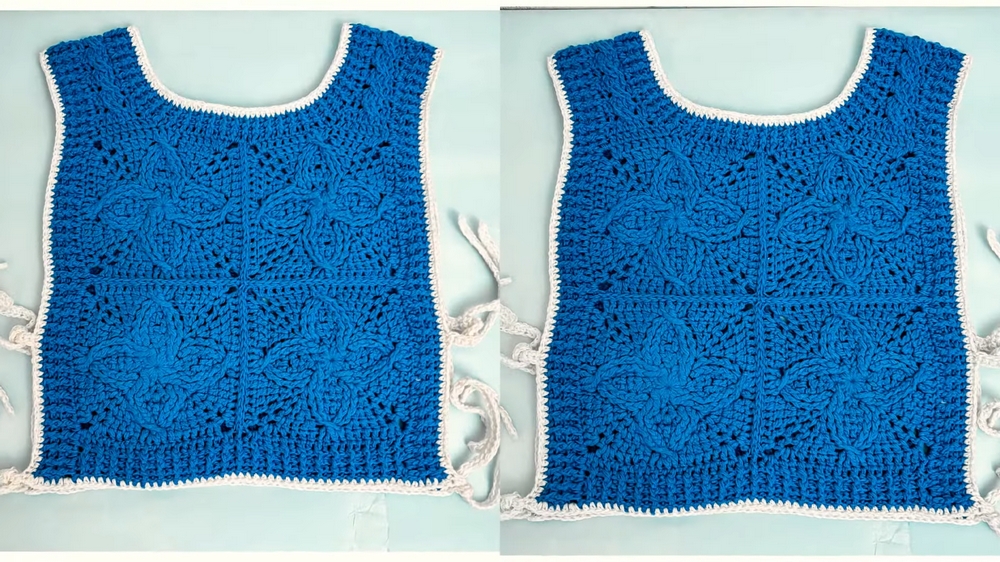
Wrap yourself in comfort with the Free Crochet Afghan Side Tie Vest Pattern offering flexible fit stylish layers and warmth for effortless seasonal transitions
In high-altitude towns where temperatures shift with the sun, locals have long favored adaptable clothing that balances warmth and breathability. A vest with open sides and adjustable ties isn’t just an accessory there, it’s an everyday staple. Inspired by that practicality, the Free Crochet Afghan Side Tie Vest Pattern offers a wearable solution with thoughtful structure. Its open armholes and side ties allow for layering over long sleeves, fitted tops, or even dresses without restricting movement.
How to Customize Length and Tie in a Free Crochet Afghan Side Tie Vest Pattern
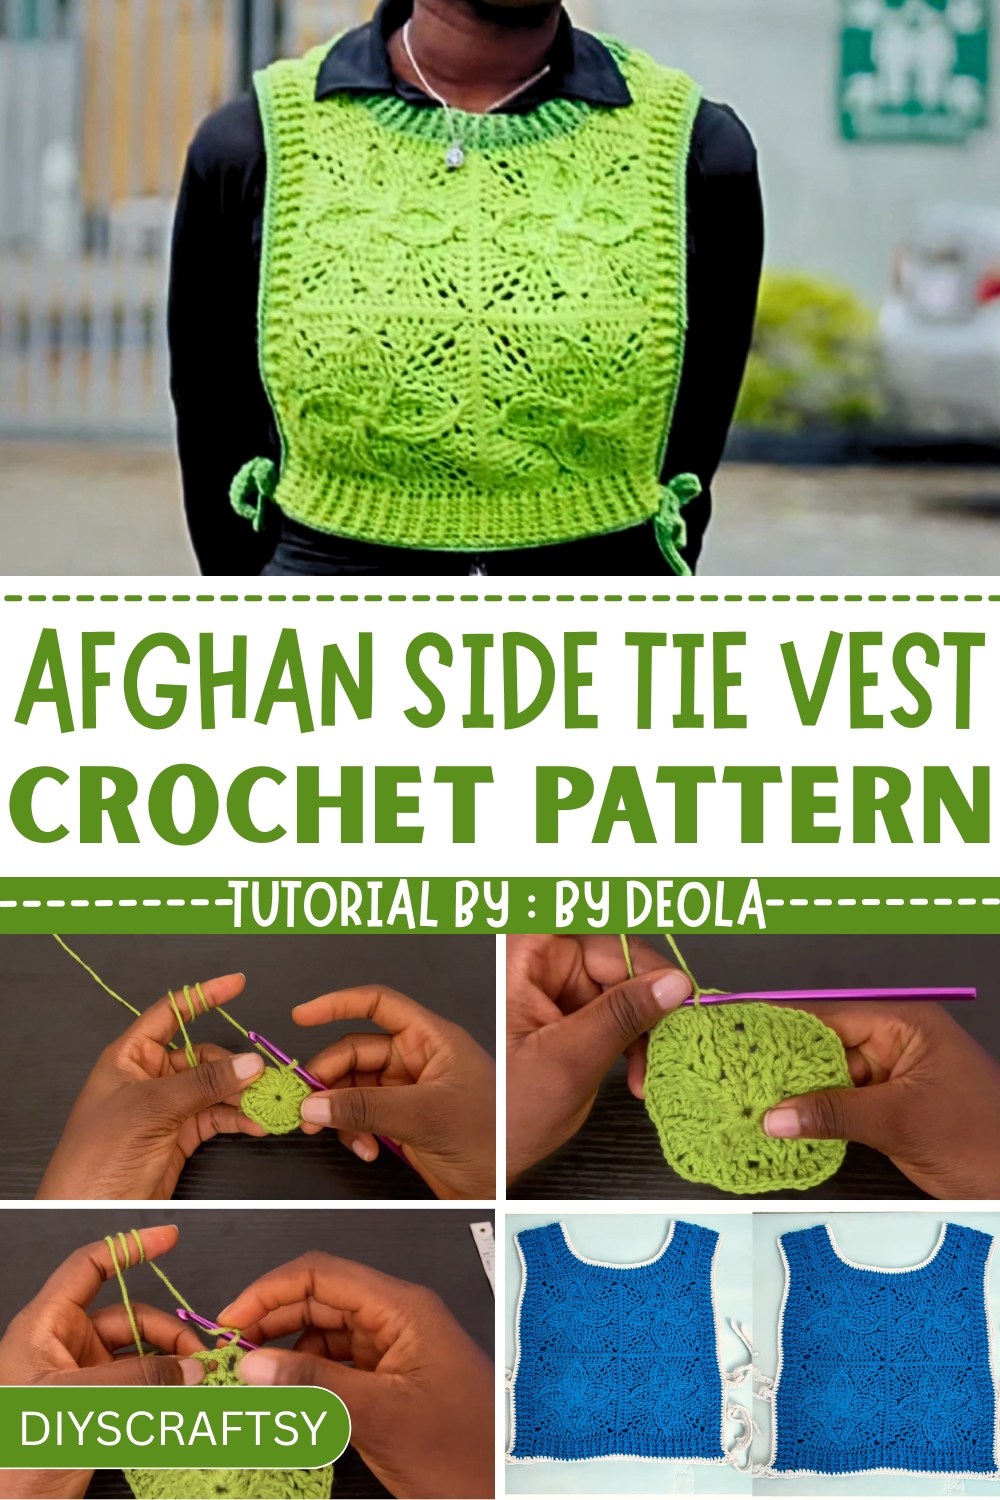
The construction features afghan-style textured blocks, giving it a handmade charm while also offering excellent warmth without bulk. This makes it suitable for unpredictable weather or indoor wear where comfort and mobility matter. The pattern allows flexibility in yarn choice, accommodating lightweight cotton for spring or thicker blends for fall. Whether used for casual wear, outdoor strolls, or travel layering, it provides both visual interest and utility.
With a fit that adapts to multiple sizes and styling preferences, this vest works well in minimalist wardrobes or as a thoughtful handmade gift. Its adaptability, ease of wear, and touch of tradition wrapped in modern structure make it a standout piece with long-term usefulness.
Part 1 YouTube
Part 2 YouTube
Materials Needed
- Milk cotton yarn (soft and durable, ideal for garments).
- 5 mm crochet hook.
- Darning needle (used for weaving in ends).
- Stitch markers (help to keep track of stitches).
- Measuring tape (to maintain precise sizes).
Part 1
Step-by-Step Instructions
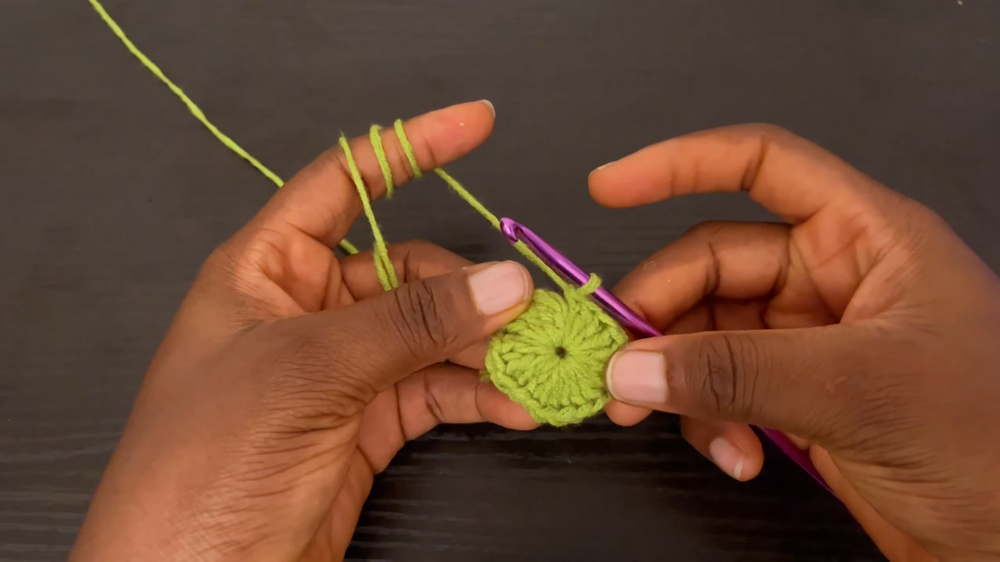
Magic Ring and Base Setup
- Create a magic ring and chain two (the chain does not count as a stitch in this pattern).
- Work 20 double crochets into the magic ring.
- Join the round with a slip stitch to the first stitch.
Part 2: Rows of Cable Design
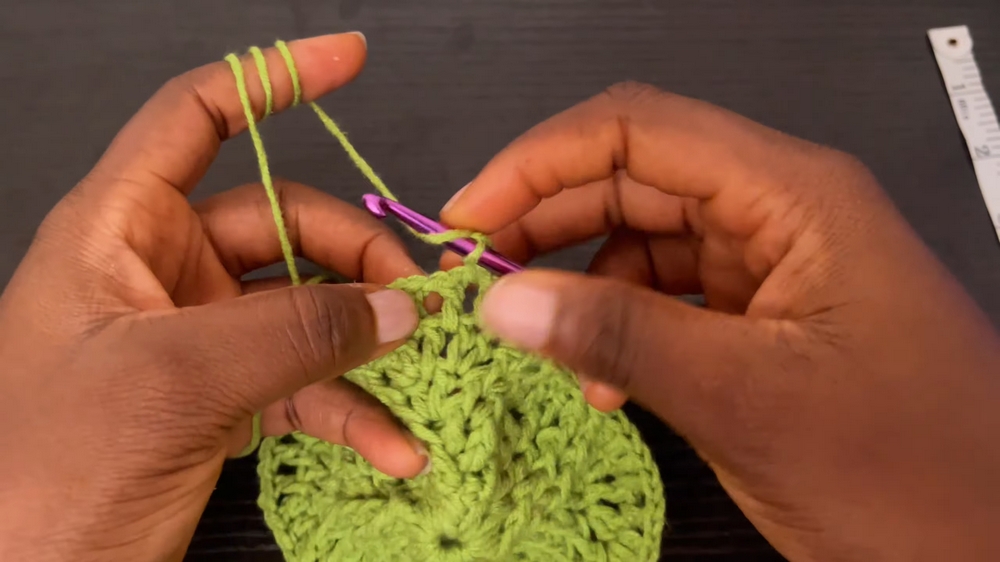
Row 1: Setting up the Cable Pattern
- Chain two (does not count as a stitch).
- Skip the first and second stitches, and work a front post triple crochet in the next two stitches.
- Work over the skipped stitches by making two front post triple crochets into them.
- Create a double crochet, chain one, and another double crochet in the next stitch.
- Repeat the pattern across the round and join with a slip stitch.
Row 2: Building on Cable Design
- Chain two. Work front post double crochets in the next four stitches (the triples from the previous row).
- Work pairs of double crochet, chain one into designated chain spaces. Skip stitches following the pattern.
- Continue to repeat and join at the end of the round.
Row 3–Row 6: Expanding the Square
- Rows involve strategic chaining, skipping, and layering double crochets alongside cables.
- Introduce techniques such as slip stitching over skipped stitches and maintaining the embossed cable alignment.
- Repeated stitches include two front post double crochets, double crochet pairs, chain one skips, and single crochets for stabilization.
- Creator highlights the tricky segments where working over skipped stitches becomes prominent.
Row 7: Advanced Cable Techniques
- Add complexity by introducing additional skipped stitches and multi-layered front post triple crochets that build upon prior rows.
- Carefully repeat the cable structures and ornamental crochet stitches for texture.
Row 8: Final Detailing
- Chain two and crochet evenly across five base stitches.
- Make two double crochets within chain one spaces for stability.
- Follow the cable structure, making 4 front post double crochets in the cable section for emphasis on texture.
- Repeat this pattern and join with a slip stitch to finalize the square.
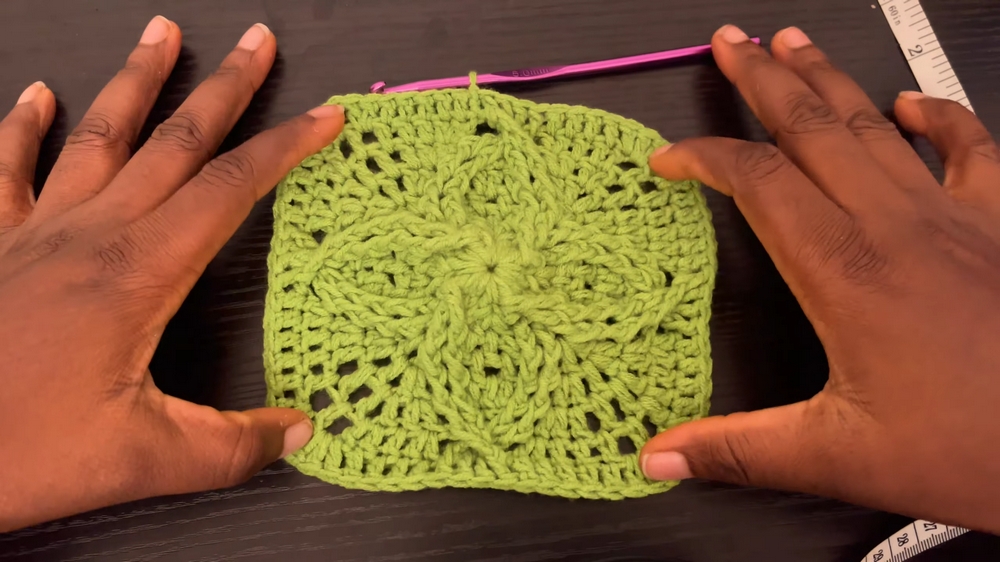
Special Features
- Cable Bloom Design: Combines front post triple and double crochets to create raised, embossed textures.
- Versatility: The square pattern is adapted into a vest, showing the potential for multifunctional crochet designs.
- Precision Blocking: Creator notes the importance of blocking the square to ensure it measures 7 inches for proper vest proportions.
Level of Difficulty
- Intermediate to Advanced: The design involves complex stitches like front post triple crochets and requires careful attention to skipped stitches. Adola emphasizes the challenging nature of embossed cable patterns and advises patience.
Tutor's Suggestions
- Use Stitch Markers: These are essential for keeping track of skipped stitches and sections.
- Blocking: Adola recommends blocking crocheted squares for uniform sizing and better shape retention.
Part 2
Step-by-Step Instructions
1. Preparing the Squares
- Special Features: Squares are the base of the vest, each crocheted and blocked for uniformity.
- Steps:
- Create a total of 8 squares (4 for the front panel and 4 for the back panel).
- Use yarn that matches a medium-sized fit, adjusting hook size to increase or decrease the vest size.
2. Joining Squares with a Flat Seam Method
- Technique: Flat seam involves a slip stitch made using the back loop of two squares.
- Steps:
- Seam squares vertically, first joining two, then repeat for all four in each row.
- Seam horizontally for a cohesive rectangular panel formation.
3. Joining Panels to Form Shoulder Straps
- Steps:
- Count 9 stitches (including the chain space at the corner) to align panels.
- Make double crochets on both sides, gradually decreasing stitches in row two. Continue decrement patterns into rows four and onward.
- Keep detailed patterns (e.g., cables on row three) consistent.
- .
4. Creating the Ribbing
- Steps:
- Add ribbing to the vest’s bottom edge, sides, and neckline by alternating between front post and back post double crochet.
- For ribbing, repeat the pattern to ensure symmetry in depth.
- Ribbing customization:
- Front Panel: 4 rows.
- Back Panel: 5 rows for extra length.
- Use two stitches per row for side ribbing.
5. Neckline Customization
- Steps:
- Begin at the back neckline using the flat seam space between squares as a starting point.
- Create rows alternating between front and back post double crochet (3 rows in total).
6. Adding Chains for Adjustability
- Steps:
- Crochet a long chain (approximately 26-30 cm) for tying the front and back panels together.
- Options:
- (a) Foundation half double crochet for flexibility.
- (b) Attach directly with a slip stitch.
Uses
- Fashion: Layer over casual tops or dresses.
- Practicality: Perfect for adding a warm yet lightweight garment to any wardrobe.
- Personalization: Adjust color schemes or sizes for diverse styles.
Tips
- Stitch Tension: Maintain consistent stitch tension for a clean, symmetrical project.
- Customization: Feel free to experiment with colors, especially for ribbing and edges, to make the vest uniquely yours.
- Foundation Crochet: Use the foundation half double crochet method for chains to allow easier adjustments later.
Conclusion
This crochet vest tutorial combines functionality and style, making it an exciting project for intermediate crocheters. With clear step-by-step directions, customizable features, and useful tips, you’ll not only master the techniques but also create a vest that’s both versatile and fashionable.


