Bloom in sunny style with the Free Crochet Flower Halter Top Pattern that adds airy comfort, playful charm, and handmade flair to your summer wardrobe.
On a sun-drenched afternoon by the beach, a gentle breeze carries laughter and the scent of salt air, perfectly matched by a top that feels as light and lively as the season itself. The Crochet Flower Halter Top embodies this spirit, combining airy comfort with playful charm, making it ideal for casual strolls, music festivals, or seaside gatherings. Its flattering silhouette pairs effortlessly with shorts, skirts, or layered over swimwear, adding versatility and style to any summer wardrobe.
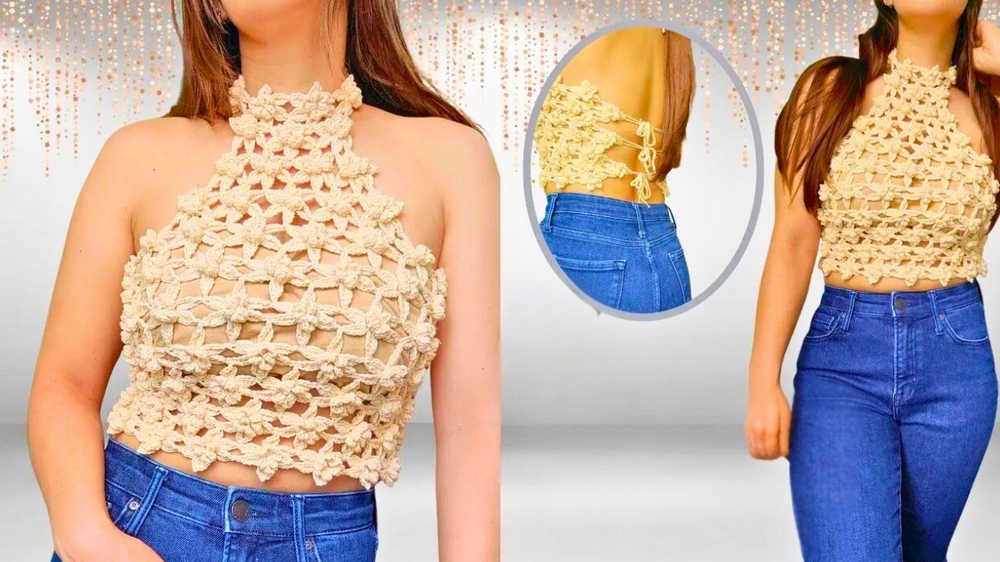
Soft Crochet Flower Halter Top Pattern for Polished Looks
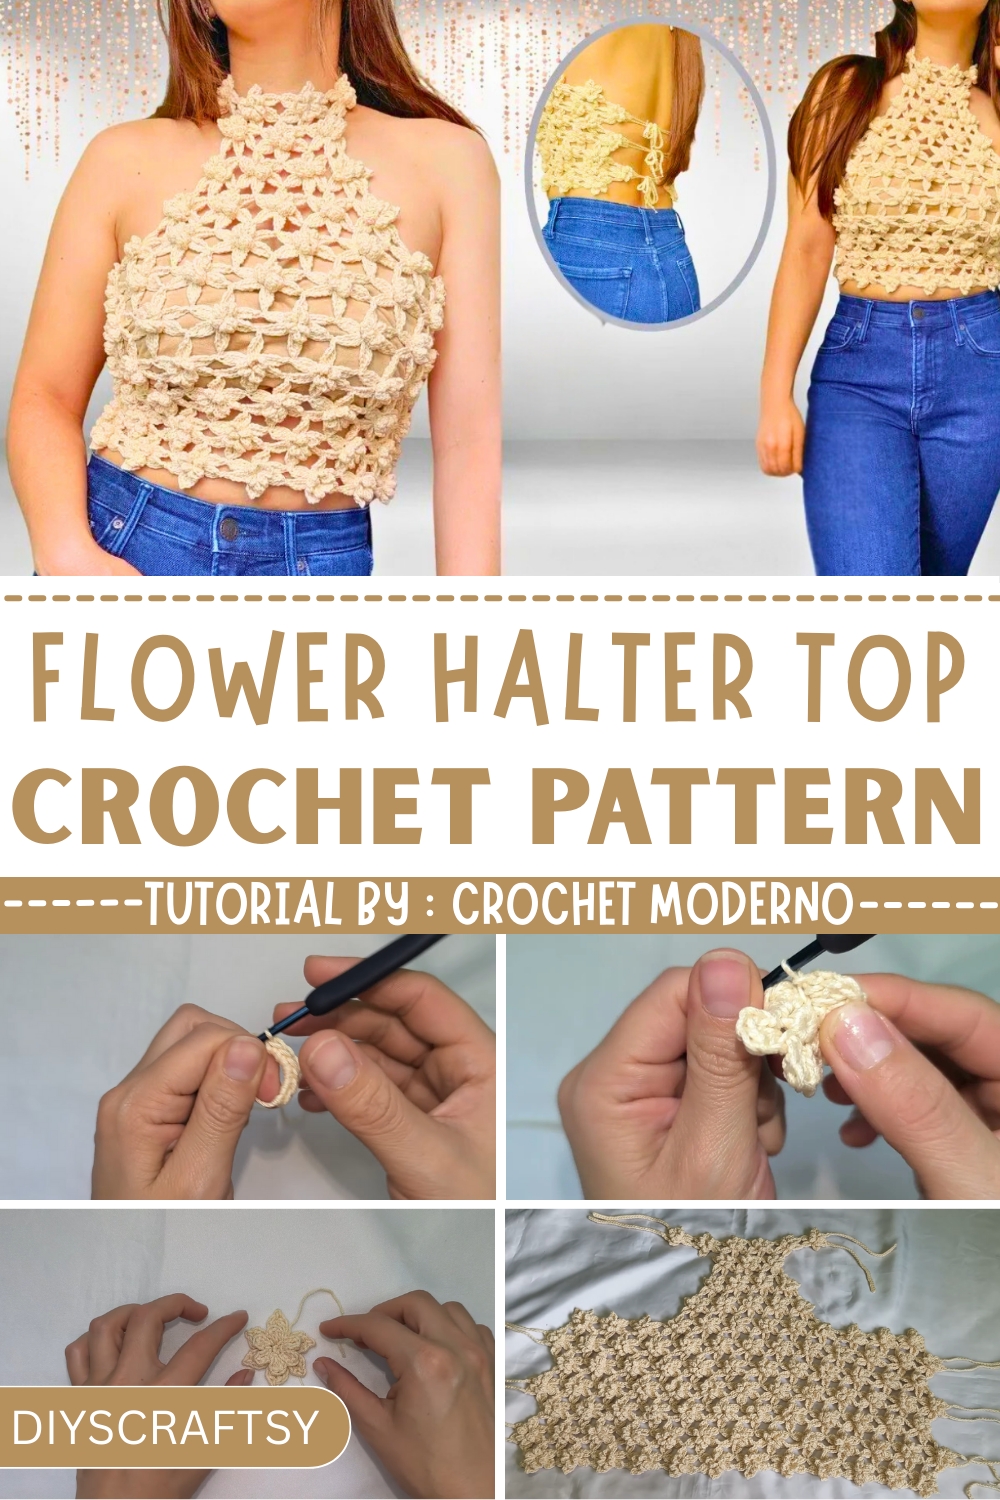
This halter top is created from individual flower motifs that interconnect to form a soft, breathable fabric. Each flower adds texture and visual interest while keeping the garment lightweight. Adjustable straps tie around the neck and back, allowing for a customized fit that ensures both comfort and confidence. Simple stitches, including chain, single, and double crochet, keep the top accessible to beginners while maintaining a distinctive handmade charm.
Beyond its aesthetic appeal, the Crochet Flower Halter Top offers practical benefits: the airy construction keeps you cool on hot days, the adjustable fit suits various body types, and the floral motif arrangement adds a delicate, handcrafted elegance. Perfect for summer outings, beach adventures, or as a thoughtful gift, this top brings charm, versatility, and effortless style to any wardrobe.
Special Features of the Blouse
- Floral Layout: The blouse is entirely composed of crocheted flowers pieced together. Each flower includes two layers of petals, giving it a textured, 3D look.
- Adjustability: The design can be adjusted to fit various sizes by adding or removing flowers.
- Versatility:
- It can be worn with an inner lining or left with an open weave.
- Ideal for casual or semi-formal settings.
- Materials: The blouse is made with lightweight mercerized cotton yarn for a polished and breathable finish.
Materials Needed
The tutor recommends the following materials:
- Yarn: Any yarn of your choice; the tutor uses Symphony mercerized cotton, 2mm thick.
- Crochet Hook: 3mm hook to match the yarn size.
- Others:
- A needle to hide threads,
- Scissors,
- A measuring tape.
Step-by-Step Instructions
The entire process is broken into clear sections:
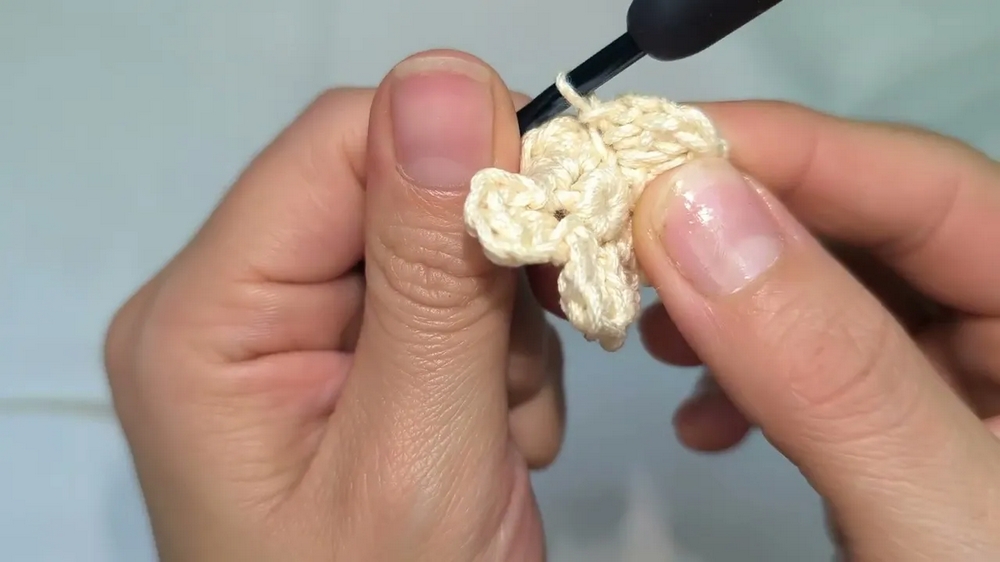
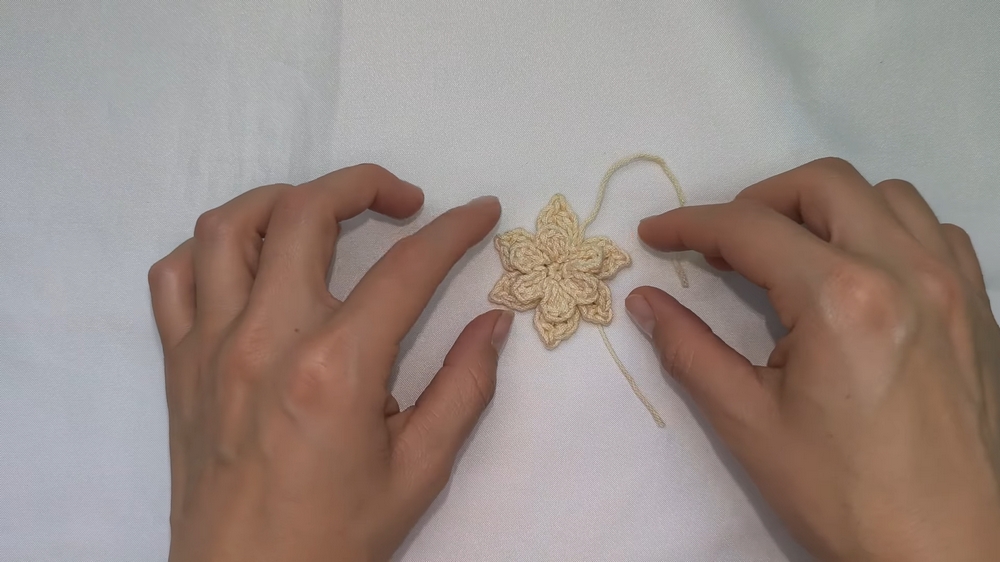
1. Knitting the Basic Flower
Each flower is created first, petal by petal.
- Foundation Circle:
- Hold the thread with two fingers, wrap it, and form a small initial chain.
- Knit six single crochet stitches into the circle to form the base.
- Pull the tail of the yarn to tighten the circle.
- Inner Layer Petals (6 Total):
- Work in the inner loops of the six stitches in the round.
- For each petal:
- Chain 2,
- Yarn over, create 2 double crochet stitches,
- Chain 2 again and slip stitch to close the petal.
- Repeat until six petals are made.
- Outer Layer Petals:
- Use the back strands of the stitches from the foundation circle.
- For each petal:
- Chain 3,
- Create a double crochet with a chain in the middle,
- Close the petal with a chain 3 and a slip stitch.
- Finishing the Flower:
- Tighten the center by pulling the thread from the back.
- Cut off excess yarn and hide loose threads.

2. Joining the Flowers Together
- Use the petals to connect individual flowers:
- Start with 6 flowers for the neckline—each flower is connected to the next using two petal edges.
- Progress downwards in layers:
- Layer 1: 6 flowers,
- Layer 2: 3 flowers,
- Layer 3: 4 flowers,
- Layer 4: 5 flowers.
- The tutor advises alternating positions of the flowers to create a seamless and symmetrical design.
3. Expanding the Blouse
- Once you’ve constructed the initial grouping of flowers, start expanding outward to create the back and sides:
- Add 6 flowers to the widest row for the back.
- Each row can be adjusted in width according to the blouse size.
4. Adding Straps & Finishing Touches
- Straps: Use the yarn to create cords (length adjustable):
- Insert the yarn into the edge flowers.
- Chain a long string of stitches, then slip stitch back through them for firmness.
- Flower Placement Considerations:
- Ensure the flowers are aligned for symmetry, especially on the neckline and shoulders.
- When finishing at the bottom, make small adjustments if necessary to achieve proper length.
- Tidying: Hide all loose threads using a needle for a polished finish.
Tutor's Suggestions
- Level of Difficulty: Beginner-friendly. Each step is straightforward, and the process is repetitive, allowing familiarity to develop quickly.
- Customization: Add extra rows or flowers for a more oversized fit. Adjust sizing by the measurements of your flowers.
- Recommendations:
- Use dyed cotton yarns for a playful, multicolor blouse.
- Add a fabric lining or bra cups to make the blouse less revealing.
Uses for the Blouse
This handmade floral crochet blouse is versatile and suits a range of outfits:
- Casual Wear: Pair it with shorts, skirts, or jeans for an airy, summer look.
- Semi-Formal: Add a slim-fit inner lining or wear it over a dress for a layered look.
- Beachwear: Style it as a lightweight cover-up over swimsuits.
Tip for Success
To make crocheting easier and results more polished, ensure your tension is consistent while knitting the petals and connecting the flowers. Consider pinning flowers together for alignment before joining.
Conclusion
This crochet blouse tutorial offers an accessible and rewarding experience for crocheters of all skill levels. It allows for creativity and personalization, resulting in a beautiful, handmade piece suitable for various occasions. With detailed instructions and tips for customization, this blouse can be tailored for your perfect fit.


