Noodle boards are also known as stove top covers. A noodle board is a type of cutting board that is made from wood and it looks like a rectangular tray with low sides. These items can be used for different purposes – to cover your stove-top, hide it or offer additional space on your kitchen counter. They are also perfect for making noodles and pasta because you can easily slide the dough off the board into a pot of boiling water. You can also build a noodle board and use it for other purposes like extra serving space on your dining table or a decorative accessory for your kitchen counter. This guide contains wonderful DIY Noodle Board Projects that are easy to build at home!
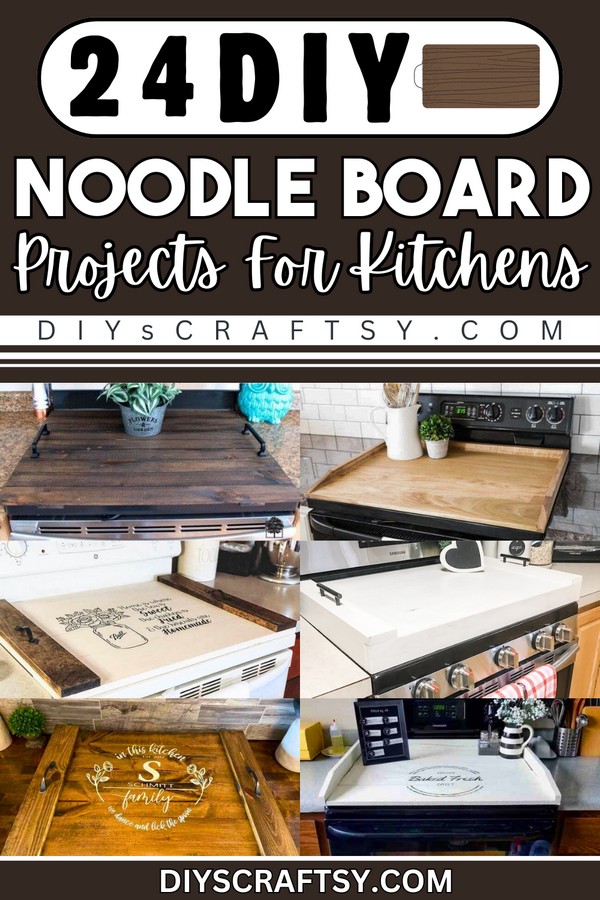
DIY Noodle Boards
We have included some excellent ideas that show how to make a stovetop cover. All of our DIY noodle board projects listed are beautiful and would be fun to make. You will get a great DIY noodle board project for your kitchen that you can use to cover the stovetop and also use as a decorative piece in your kitchen. Whether you are a beginner or advanced DIYer, these sunning noodle board projects are exactly what you need. You should check them out.
How To Build A Noodle Board
Not all of us have space for a full-sized entryway table. But that doesn't mean you can't create a drop zone for your stuff — you just need to get creative. This DIY project is a perfect example. And don't worry if you're not so handy with tools; this is an easy woodworking project that you can build from scratch with just a few supplies and some common sense. Materials needed to build this noodle board include boards, grit sandpaper, wood glue, a nail gun, and a pin. Glue the boards for the base together edge to edge, clamp them down and allow them to dry. Once the board is dried, the side pieces make it a little sloppy. Attach the side pieces to the board and stain/paint everything.
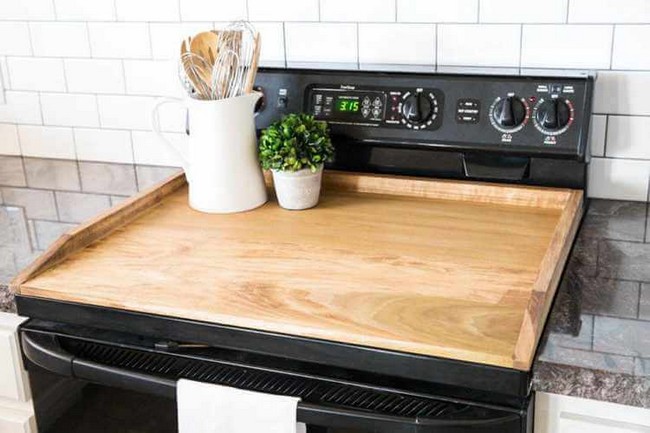
DIY Noodle Board
Our DIY Noodle Board is lightweight and sized to fit in the overhead bin of most major airlines, or pop easily onto a train or into a car. Made from scrap wood, a nail gun, and wood glue, start by measuring the size of your stovetop. Use the measurement to cut the dimension of wood to cut. Sand the wood down and glue them together then secure the side pieces on it with a nail and a nail gun. Sand the board again and paint it in your desired color.
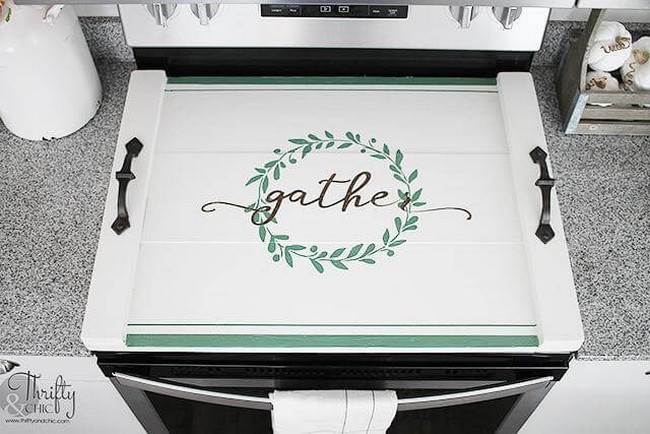
DIY Stove Cover
With this DIY stove cover, you can make sure that the surface of your stove is clean and hygienic. This hard-wearing, top-quality wood cover assembles easily and will last for years. Be sure to keep any foodstuffs and condiments close at hand on the convenient shelf above your burners. There are no more messy spills, no more greasy stains, just a clear workspace with a classic aesthetic. Easy to assemble, this cover is sure to last for years. Make sure you keep any foodstuffs and condiments close at hand on the convenient shelf above your burners.
How To Make A Stove Top Cover
Measure the stovetop, cut your pieces to fit, and join them with glue. You can add a piece of cardboard for extra support over your burners if you like. Use a couple of clamps or heavy objects to keep things in place until the glue has dried, and then sand the edges for a smooth finish. Remove all traces of dust before painting with a stain or paint suitable for use on wood. We’ll show you how to build a stovetop cover for your RV, which will free up counter space and add an extra dining surface. This project is inexpensive, easy, and only takes about an hour of your time.
DIY Easy Noodle Board
You can build your noodle board in a few hours with simple materials from the home improvement store. Just gather the materials needed for your project, as shown above, and measure the stovetop where it will live. Then join the board base pieces together with glue and dry. Next, attach the side pieces and make sure to sand before applying paint or stain." Measure the dimensions of your stovetop, and make sure the wood you've picked out for the board will fit within your kitchen space before getting started. Use a miter saw to cut the board base pieces to size, then join them together with glue. Sand everything down until the surface is smooth and wipes it clean.
DIY Noodle Board
You can use this DIY noodle board for anything from sanding to cutting dough. Just secure it atop your stovetop, plug in the sander and get to work. When you're done, flip the handle down, and the board is ready to be stored. Use the clips on either side of the board to store your sandpaper or cutters, or slip a rolled-up towel inside, and you have a second storage solution. This homemade noodle board is an inexpensive and useful cutting board for the kitchen. It is designed simply to make your job easier and faster. How about giving this multipurpose noodle cutter a try?
DIY Noodle Board Tutorial
Ready for a simple craft project that can be completed in under an hour? This DIY Noodle Board is a kitchen decoration that looks great and is easy to make. Just cut the wood, glue and nail it together, sand down any rough edges and stain or paint as desired for a beautiful addition to your kitchen. Although this board might not be suitable for professional use, it is ideal for beginners learning the craft and homeowners. The homemade noodle board can be a perfect gift to your loved ones by designing it in such a way that suits their taste and preferences.
How To Build A Noodle Board
Steps to construct a noodle board are to choose your desired materials, use a compound miter saw to cut pieces, sand the wood until you’re happy with its smoothness, use clamps to glue sideboards together, and stain the board according to your preference. Learn how to build a noodle board with this step-by-step guide. This is a simple project that will make your life easier when drying pasta. The video below shows you how to build one and the materials needed step by step in detail.
How To Make A Stove Top Cover
This is a wonderful tutorial for your safe and cozy home; this stovetop cover not only helps to protect your range but also helps to muffle the kitchen noises that sometimes you could get annoyed. Making one of these at home saves you quite much money on purchasing one in the store. However, if you are not comfortable with a specific method, you can easily customize it yourself at home. You will want to purchase wood that has been finished and sanded smooth and any other materials needed for the project. Once all of this is complete, it's just a matter of applying the proper stain or paint to the material and following the instructions from the tutorial to create your customized stovetop cover.
DIY Noodle Board of Directors
The DIY Noodle Board of Directors position has remained vacant for years. Many people have expressed interest, but none seemed capable or qualified. The solution? Create one based on your strengths and talents. The materials needed for this project are board designs, giant popsicle sticks, handles, and hand sanitizer. These can be found at your local grocery store paint department or in that room where you keep all the extra junk, including a hammer and staple gun, which will come in handy later. Paint the board design and allow it to dry. Sand it down with the sandpaper provided, then glue all the pieces together using wood glue.
Homemade Noodle Board

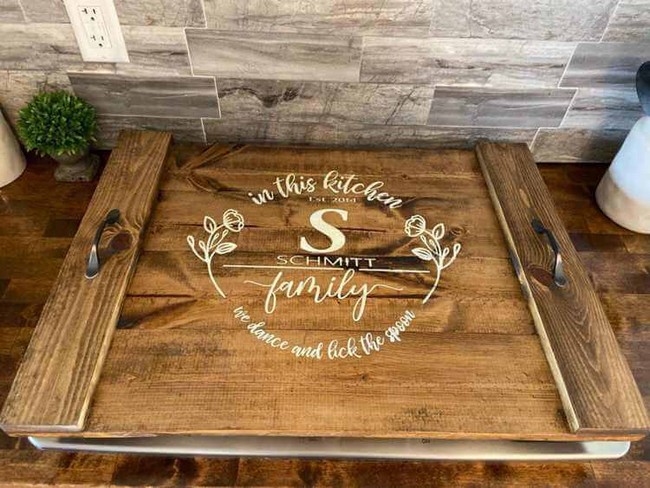
This Homemade Noodle Board is super functional and stylish for all those who prefer a traditional look, perfect as a gift for yourself or someone special. Comes as a Kit with Step by Step instructions on how to build. The Noodle Board can also be purchased already built, ready to use! This board also makes a great gift for the chef in your life or for anyone that makes homemade pasta often. Cut the board base pieces, the side pieces, and the back piece. Drill a decorative hole on the two side pieces, then secure all the boards together using the pocket hole screw.
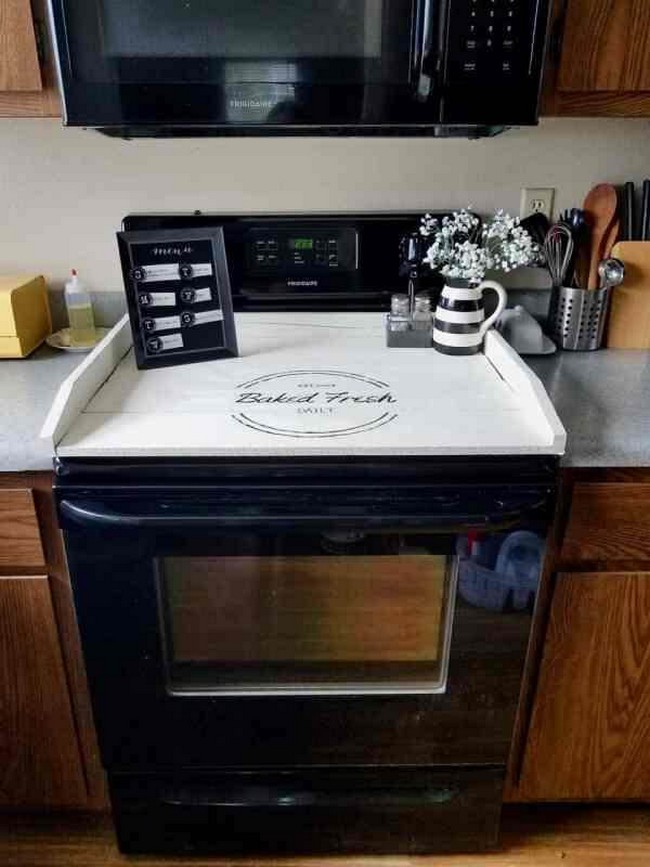
DIY Farmhouse Noodle Board
Farmhouse signs are everywhere, and for good reason — they're simple to make and look great in almost any home decor. But there's a new trend on the rise that looks just as good and is even easier to DIY: noodle boards! These oversized cutting boards are perfect for displaying recipes or propping up a favorite cookbook in your kitchen. Cut all the pieces of wood needed for the project, lay the 4 pieces for the base close to each other, and glue them together. Place two pieces of wood at each edge of the base and nail it down. The process is short and the result is worth it.
How To Make A Noodle Board
The noodle board is a handy piece of furniture that can be used in many different ways. It can be used as a side table to place your drink, it can also be used as a writing surface for your laptop or iPad, and it's also great for when you want to eat in bed. In this tutorial, we are going to show you how to build your own noodle board. Watch the video to learn where to start and what the materials are needed.
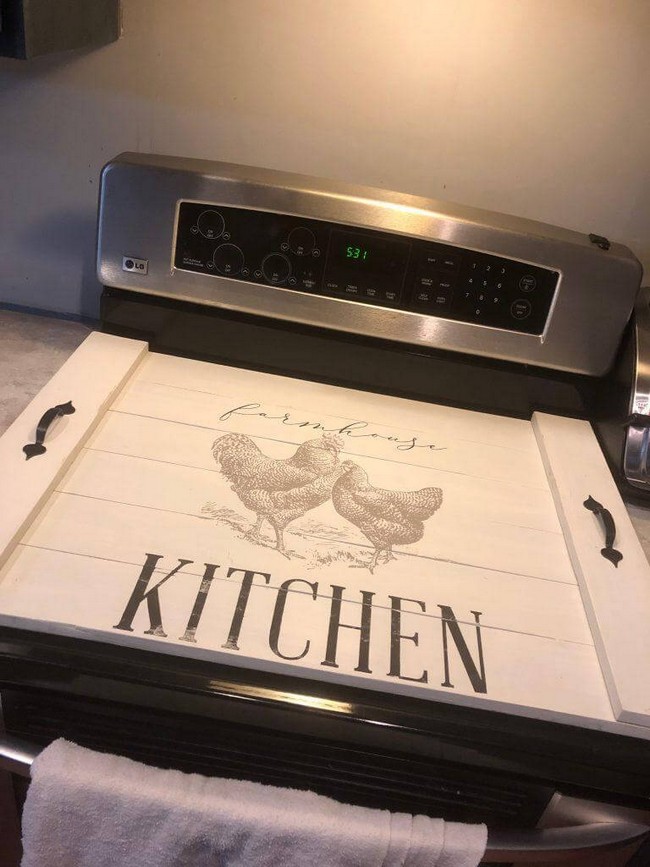
DIY Farmhouse Noodle Board
This easy DIY is ideal for any farmhouse kitchen. Use salvaged picket fence materials and a label maker to help keep your noodles organized in style. To make, measure and cut picket fence boards to fit over your stovetop, then screw them together with a crossbeam. Once assembled, stain the board, add labels above the sections for style and functionality, then mount the board on your wall! This DIY Farmhouse Noodle Board is the perfect size to fit over a stovetop and hang on a wall. It's the perfect project to add some farmhouse charm to your kitchen while looking great.
How To Make A Stove Top Cover
When you are not using your stove, the top may seem like wasted space. There are so many other useful things you can place there. For instance, you can place a cutting board on top when you want to cut your fruits and veggies. You can also have plants, flowers, and photos of loved ones on it. There are so many interesting things you can put on your stock top cover that it would be a shame to leave it bare.
The materials needed for making this include a big board, miter saw, clamps, hinges, and yet. Gather all 4 pieces for the board and glue them together. Attach the two side pieces which elevate the board a little bit from the ground level. Smudge the board with paint and you have your stock top cover.
DIY Stove Cover
There are so many things you can do with a stove cover. From being a shelf for your spices and other ingredients to having the perfect place to put your trivet when you're done cooking, this is a simple project that will make your kitchen more functional. To create this amazing stove cover, you'll need lumber, countersink, screw handles, saw, and drill. Cut and sand all the lumber needed. Lay the lumber together and drill the countersink hole on them. Assemble the parts and attach the countersink. If you're not sure how to build this homemade stove cover see the instructions of this tutorial!
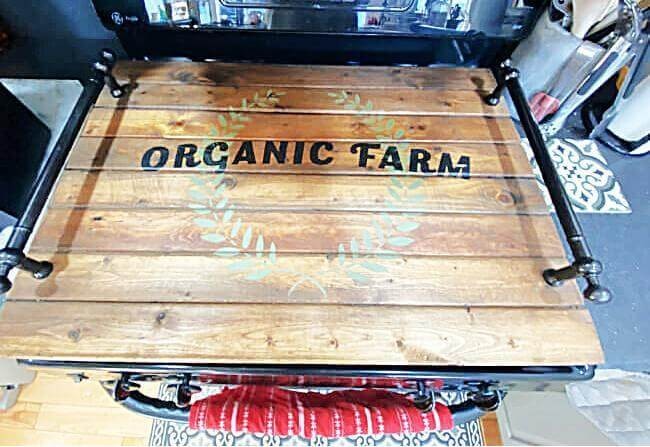
DIY Stove Tray For $30
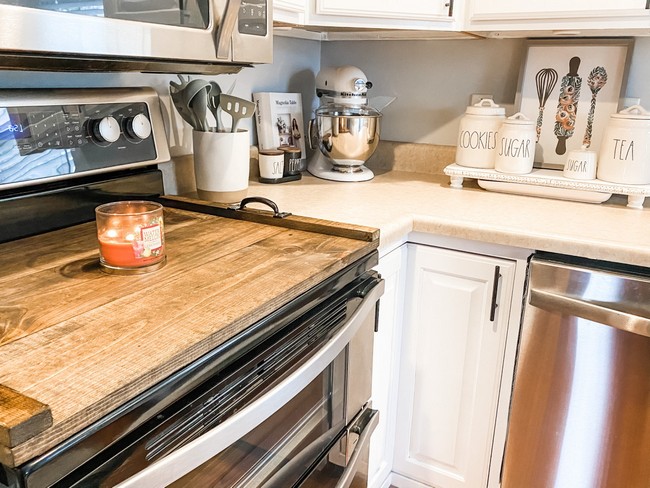
This DIY stove tray not only keeps your stovetop clean, but it's also an excellent place for keeping oils and utensils handy. It's an easy project to build with just a few supplies. Not only that, but it makes a great gift for any cook. The wooden DIY stove tray is handy because it's versatile; not only does it give you extra counter space, but it also works as a carrying tray for heavy items. Measure the stovetop and use the measurement to cut board base pieces. Glue these together and attach the side pieces with a nail gun. Secure the handle on the side pieces and stain your board for an even finish.
How To Make A Simple Stove Cover
This easy-to-follow guide will explain the many uses and benefits of the Stove Cover and help you understand the steps needed to construct your own. It will also show you how to prevent heat damage on your kitchen furniture with this simple Stove Cover. The materials needed are simple, and if you have these items on hand, you will be able to begin working right away! This DIY wood stove cover can keep your property safe from hot surfaces. Get started on this project today by gathering the materials needed and following these steps.
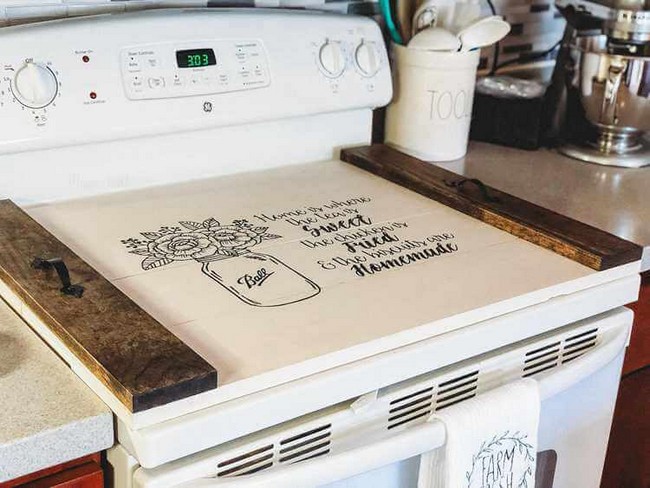
DIY Farmhouse Noodle Board
Make a rustic, farmhouse-inspired noodle board with poplar wood, handles, and acrylic paint. You’ll start by building the board using special techniques to make your final product lightweight and durable enough to store on the countertop or hang on the wall as decor. This project takes at least two days because of the drying time between steps. This DIY Noodle Board is made of wood, so your nails will stay in place. Add personality by mixing and matching different materials like a steel knife rack for a modern touch. And you can top your tool off with handles that go with the rest of the décor in your home. Go from dull to fun and colorful, and make something unique to you and your home!
DIY Noodle Board Tutorial
Give your home a rustic look with this tutorial on creating a DIY noodle board. It is a simple and fun project that only requires a few supplies, and it also makes for an excellent gift. Please place it in the kitchen or living room, and display family photos, keys, notes and other small items. Learn how to make your noodle board by following this DIY tutorial. This step-by-step guide covers the whole process of making a noodle board, from gathering materials and tools to sanding the entire piece smoothly. Find out how you can be creative in making your noodle board by shaping and decorating it according to your preferences.
DIY Wooden Stove Top Cover
According to the predrilled measurements, cut all the wood pieces you will need using your power miter saw. Start by gluing the board base pieces together and allowing them to dry, then glue the side, front and back pieces to it. Do not forget to sand the board and make notches all around the board's surface. Using a screw and screwdriver, watertight screws into the parts of your wooden stove top cover. Add some extra counter space to your kitchen with these wooden stove top covers. They are made from hand-drilled drill bits, woods, stains, and screws, making this wooden stove top covers highly durable and long-lasting.
DIY Oven Cover
The DIY Oven Cover is easy to assemble as no parts need to be screwed together. Your board should be finished in under an hour using a glue gun. To advance the paint, soak in water or tea. After your oven cover is complete, you can easily transport it from the oven to your stovetop when you need to cover leftovers. This DIY oven cover will be a beautiful and unique handmade piece that you can give as a gift or treasure in your own home. You will have the freedom to use any decorative paper that you wish. Follow along with our step-by-step tutorial to customize your oven cover.
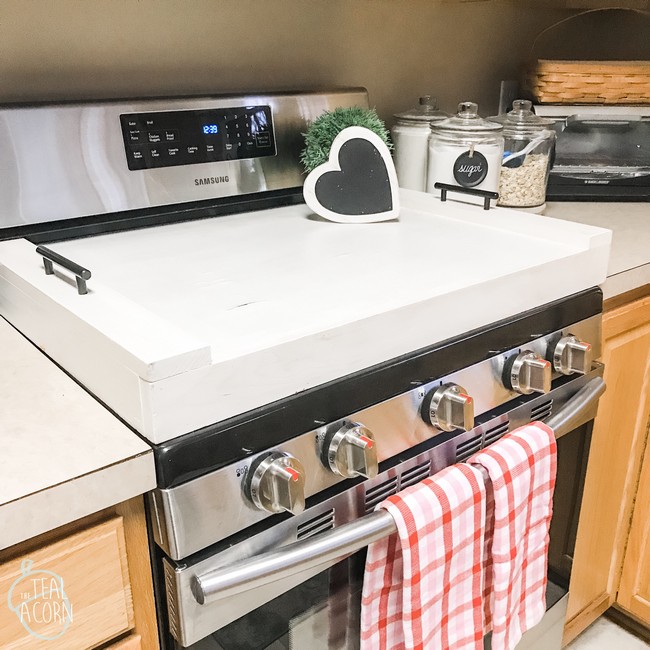
DIY Stove Top Cover
The DIY stovetop cover is available in a range of finishes, allowing you to mix and match with your kitchen. The custom detail makes it compatible with your stovetop. When in place, it will hold sturdy. Drill hole at each end of one of the short side pieces through the cabinet. The hole size should be small enough so that the screw doesn't split the wood but large enough so you can fasten it easily with a screwdriver.
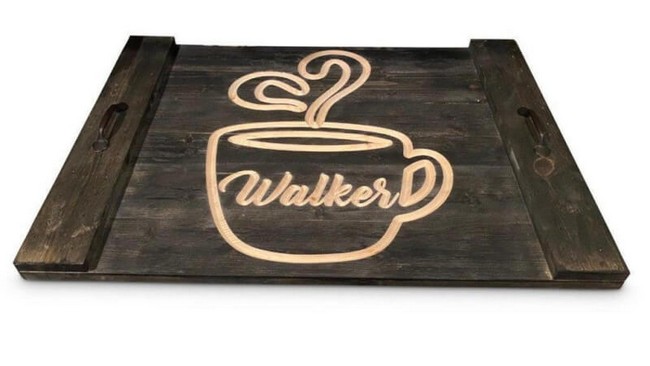
DIY Stove Cover Tray

This rustic cover tray is created from our rustic walnut pallet. This pallet will add a unique style to your living space with its built-in handles, making it easy to move around. This long piece will transform your stovetop into a useful counter space and is an amazing addition to your kitchen. It's a perfect cover and tray combo that sits over the stove to increase surface area while protecting the stovetop when not in use. It features smooth edges, rustic style, and foldable construction for easy storage.
Discover Additional DIY Projects
- DIY bumper plate storage: Discover the benefits of DIY bumper plate storage. Save money and create a custom design that provides easy and efficient access to your plates while organizing your space.
- DIY ladder shelf plans: Elevate your organization game with DIY ladder shelf plans that make it easy to access and display your items. Create a custom design that fits your needs and space.
- DIY noodle board: Create a personalized and versatile DIY noodle board easily! Discover creative ideas that cater to your needs and enhance your kitchen décor.
- DIY camper awning plans: Save money and enhance your camping experience with DIY camper awning plans. Create a custom design that provides shelter and style on your outdoor adventures.


