When you think of ottomans, what comes to mind is probably a piece of furniture that can be used as a footrest. Nowadays, this type of furniture has many other uses as well. For example, if you want an extra seat in your living room, you could get an ottoman that stores your pillows. Some of them even turn into beds when you pull out the hidden bedding. And if you are an avid reader, you’ll love this storage ottoman. It looks like a regular coffee table but has storage below for books, magazines, blankets, and other items you want to keep close at hand. If you’re looking for a way to create storage in your home, a DIY Storage Ottoman is a perfect item to use as a base.
DIY Storage Ottoman Ideas
There’s a wide range of styles and designs available, so we have put together 27 DIY Storage Ottoman Ideas that are amazing and easy to make at home. To get started on making your own cushions with a storage function, all you have to do is select a pattern that you like and then use the instructions provided in that guide. In addition to these functional ottomans, there are also decorative ones in all shapes, sizes, and colors that add a splash of color to your home decor. Choose a pattern and start according to your style!
DIY Leather Upholstered Storage Ottoman

You don't need to throw out your old, worn-out furniture; you can just update it with a few new pieces. You can easily make this leather upholstered storage ottoman from scratch. This is a great DIY project. In fact, it's so easy that the only tools you'll need are a hammer and a screwdriver. It has a simple wooden frame and is covered in beautiful, luxurious leather. The storage space inside of it will absolutely make your life easier!
DIY Rolling Storage Ottoman

Have a lot of stuff? Need to get it off the floor, but not quite ready to invest in a true furniture piece? Here's an easy way to create your own rolling storage ottoman. This is an especially great project if you have a smaller space or limited funds. You can customize the dimensions to fit your needs, and the storage space is big enough to hold plenty of items. In fact, since it's mobile, you can move it out of the way when you don't need it.
How To Make A DIY Ottoman Storage
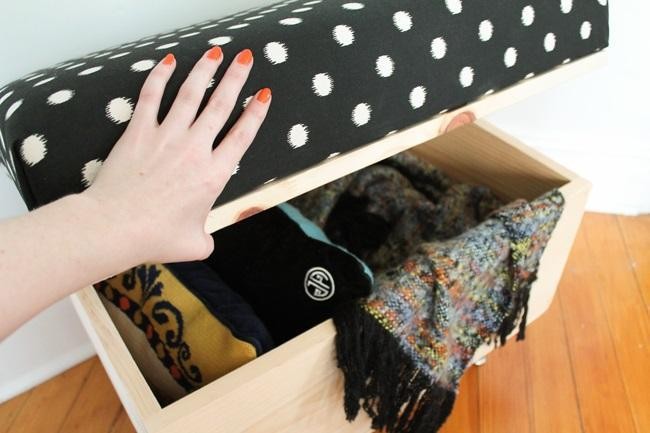
The idea of making DIY ottoman storage is not so hard and you can do it by yourself. In order to be able to do it, you just need to know the basic carpentry techniques and which tools are needed to do it. The first step is to measure the foam and cut it according to the measurements you have taken in advance. The next step is to make sure that both the side panels are of equal height and then you can start nailing them together.
You can use clamps if needed but try not to use too much force or you might break or bend the panels. Once you have assembled the panels for your DIY ottoman storage, make sure you cover them with fabric, preferably denim or leather as these fabrics are heavy duty and will also give your storage a nice look. After this, all you have to do is lock in the bottom part of your DIY ottoman and your furniture is ready!
How To Make A DIY Storage Ottoman

A storage ottoman is an easy and budget-friendly DIY project that you can do in less than a day. The materials needed for this storage ottoman include high-density foam, fabric, felt, hot glue gun, and sewing machine. Assemble the cubic box for the storage base then wrap the foam around it. After that, glue the fabric to the foam and attach the buttons to the lid. Enjoy your new storage ottoman and add it to your living room area!
Ottoman With Storage

This is a very simple DIY project. You will not just have an ottoman but also a storage box where you can put your magazines, books, and other items. Cut the pieces of plywood needed for the cubic box, assemble them and prepare the foam and fabric, then wrap them around the box. The materials used include plywood, glue, staple gun, fabric, and foam. It is relatively easy to make, and perfect for those who like the convenience of added storage space. If you have time to spare, this is a great project to do with your friends or family members.
Upholstered Storage Ottoman

Plywood is a good material to use for this project because you can easily cut niches in it to hold the foam. You'll need a table saw for this job, so if you don't have one, you'll have to find a friend who does. This project calls for foam that is 1-inch thick and is wrapped in fabric. The foam should be at least 2 inches larger than the box on all sides.
Work out where the niches will go on each side before cutting the foam. Make sure they are aligned with each other and are even with the front of the box. Cover each niche with upholstery fabric and staple it into place, making sure that you stretch the fabric tightly over the top of the foam and leave no gaps between it and the frame of the box. If your staples aren't long enough, use finishing nails to secure them. Take your time, check your work frequently and make sure nothing is creased or bent before moving on to something else.
How To Make A No-Sew Storage Ottoman
This no-sew storage ottoman is the perfect size to fit under a table or desk and is a great way to store blankets, pillows, and other items. The materials needed for this DIY project include a tape measure, miter saw, foam adhesive, batting upholstery fabric, and a hot glue gun. Cut the pieces of wood needed for the base. Attach some strips of wood to a large circular piece at intervals with screws then cover it with another circular piece. Wrap it up with batting then fabric and you're good to go. This project is easy to make and will provide you with much-needed storage space for your shoes, coats, hats, and bags. The best part? It doesn't require any sewing skills at all!
DIY Crate Storage Ottoman
This ottoman is made of wood and foam, which are both pretty cheap. The only material you will have to pay for is the upholstery fabric. You can use any color or pattern you want, so this is a great way to recycle old pallets and create something unique. All you have to do is measure and cut the pieces of wood needed for the storage boxes. Then, assemble them using screws. After that, cut the foam for each side of the box and attach it using glue. Finally, prepare the upholstery fabric to cover it up. You can pick any fabric or color you want and customize this piece of furniture to your taste.
16. DIY Storage Ottoman
Sofas are great for relaxing and watching television. But, they take up valuable floor space in small living spaces. A DIY storage ottoman can give you extra seating and serve as a storage unit. You can use it to store blankets and pillows for when you have company over, or just use it to hide clutter so that your living room looks neat. You can build this storage ottoman with basic tools such as a circular saw and a hammer. It's also relatively easy to build this ottoman, even if you're not the craftiest person in the world. The hardest part is cutting the wood panels to size, but you can ask someone at the hardware store to do that for you.
Storage Ottoman Using Cardboard
An ottoman is a versatile piece of furniture that can be used to add extra seating and can function as a coffee table, footrest, or serving tray. If you need some extra seating but don't have the budget for a new piece of furniture, you might consider making your own!
First, you will need to cut out two oval-shaped pieces from cardboard. These should be about twelve inches in length and ten inches in width. You will also need to cut a long triangle out of the cardboard that measures about fourteen inches in length and eight inches in width. Next, glue the triangle onto one of the ovals. This will form a circle. Then, using fabric and foam, cover the remaining portion of the ovals with a layer of padding so that they are more comfortable when sitting on them. When finished, place them together to form an ottoman that has an inner storage compartment as well as a seat!
How To Build A Cardboard Ottoman With Storage

Here is a tutorial that shows you how to make a cardboard ottoman with storage. This ottoman has a storage space in the base and can be used as a table beside your sofa. The materials used for this project include cardboard, hot glue, scissors, pencil, and measuring tape. The height of the box will be equal to the height of the cushion you want to use on top of it.
You will need to cut out two squares from one side of each piece of cardboard that will act as the legs of the ottoman. The size of these squares depends on how thick you would like your legs to be. Once you have these pieces, place them on top of each other and fold them inwards at right angles. Then glue the ends together to create a box. Make sure that this box fits into your cushion when placed together. This will ensure that there is enough room to place your cushion and store things inside the ottoman.
Upcycled Ottoman With Storage

Have you ever needed a storage ottoman that can store the things like magazines, blankets, toys, and other stuff? If yes then you need to build one. You can build one with the help of your DIY skills. Here we have gathered some plans that you can use to make this beautiful Ottoman. You can build it with an old cable spool. This is a very simple and easy project. You just need basic power tools and time for building it. All the instructions are very clear and easy to understand so you don't need any experience to build it at home. Every step has a picture so you will not get confused while making it.
How To Make A Storage Ottoman
You will need to cut out a rectangular piece with a trapezoid on one end for the lid. The bottom of the lid should be at least three inches longer than the top of the box itself. Cut another strip of wood for the handle and attach it to the box using nails or screws.
Tightly fit in the pieces and then secure them using glue and nails. Cut four pieces of wood from ¾ inch plywood to create your storage spaces. Attach them to each other using their edges, allowing for about an inch difference for each space. Attach them to the front side of the box as seen in picture 6. Cover your ottoman with fabric. Make sure that you have enough fabric to cover all sides of your ottoman, plus a few extra inches around it so that you can secure it tightly with staples or nails.
DIY Storage Ottoman

Having a stylish storage unit, which can also be used as an ottoman is a great idea. So we present you a tutorial by the name of DIY Storage Ottoman. You need to gather the materials of the project: An old plastic crate, thick plywood, ribbon, fabric, rope staple gun, and hot glue. Attach one end of the rope to one end of the crate at the bottom then, start wrapping the rope around it till it reaches the top. After that prepare the lid and your storage unit are ready.
How To Make A Storage Ottoman Using A Bucket
There are many ways to make a storage ottoman using a bucket. This guide will walk through one of them. First, get a plastic bucket and remove the lid. Trace out the edges of the lid then place a piece of fabric down, place a pillow stuffing on it, then a circular wooden board, staple them together and attach it to the lid of the bucket. Place your feet on the lid for comfort and support. This is an easy-to-make storage ottoman that costs $10 to make at home. You can leave it by your front door or use it in your bedroom if you want to store pillows, blankets, and other things you might need. This is one way to save money and keep your home tidy.
How To Build A Storage Ottoman

Storage ottoman tables are all the rage these days, and they are basically an upholstered box with storage inside. They're great for small living spaces like apartments, condos, and dorm rooms where you need to maximize space. They can store extra blankets and pillows or any other extra furniture items that you may have.
To start this project, first, take a piece of plywood and cut it into 4 pieces. Join the four sides of the base, making sure they're flush. You can use glue or screws to connect the corners. Cut out a rectangular piece of plywood to serve as the bottom of the ottoman. Attach support and cleats to the inside of the base using 2 ½" screws. Join two pieces of plywood to make a lid for your ottoman. Attach them with glue and nails or screws. Now you can attach upholstery to the top part of your storage ottoman. Use zippers, buttons, or even just your hands to fasten it to the base and lid. Now, you can say you have your own storage ottoman table.
Storage Ottoman Made With Cardboard
Are you looking for a fun and easy project to do? We have the solution! In this article, we will teach you how to make an ottoman fabric with cardboard. This project is very easy and inexpensive. You only need a few materials to get started: cardboard, staple gun, glue gun, scissors, fabric, and foam. The first thing to do is cut the cardboard in the shape of an ottoman. You can also add reinforcement to each piece of the box by doubling it. After you've done that, you can glue the foam to the box and then glue the fabric over it. Be creative and have fun with this project. You can paint or stain your finished ottoman for even more detail!
How To Build A Storage Ottoman
Making a storage ottoman is a great DIY project because it's a functional piece of furniture that adds interest to any room. You can make it as big or as small as you want, and since it's completely upholstered, you can change the fabric and color to fit your interior decorating scheme. The base of the storage ottoman is made with plywood, so you can design it to be any size you want. The top and bottom are upholstered with foam and upholstery fabric, so this DIY storage ottoman is an easy project for anyone who has some sewing experience.
DIY Storage Ottoman

This storage ottoman is a great project to do if you are interested in learning more about upholstery. If you are not a skilled carpenter, but you want to learn more about building furniture, this can be a perfect project for you. This Storage Ottoman is designed to give a rustic look, with beautiful wooden legs and a wooden top. The cushions on the seat and back have an interesting diamond quilting pattern. The entire project can be completed in just two days and it requires a few basic tools. You should be able to complete the project without any difficulty as long as you have some experience working with tools.
How To Build A Padded Storage Ottoman

Padded storage is a great way to keep your home looking tidy, especially if you're short on space. The best way to store items that don't have a permanent place in the house is to get an ottoman or a storage chest. But if you want that cozy, padded look, it's not as easy as just buying a storage box and putting some fabric on top. Creating this type of storage can be tricky, but it doesn't have to be. With the right materials and a little bit of elbow grease, you can create your own padded storage box that's perfect for keeping clutter at bay. So, grab your tools and start along with the project.
4. DIY Leather Storage Ottoman

If you are looking for something to store your things like magazines and books, then a storage ottoman is something that you should consider. You can get one for your living room or other rooms in your house.
The first thing that you need to do is to cut the wood properly. To make this DIY storage ottoman, you will need four pieces of wood cut into 24-inch pieces, two pieces of wood cut into 10-inch pieces and one piece of wood cut into 14-inch pieces. After cutting the wood, you will have to use glue to put them together. Then, clamp them till they are completely dried up and ready for use. Once the base is ready, you can apply leather and foam to it to cover it completely. Use some nails to secure the leather and foam at the corners of the ottoman so there will be no problem when using it later on.
DIY Storage Ottoman Made Of Plastic Bucket
This project is both economical and simple to do. You can make this storage ottoman from a new or used plastic bucket and it will be sturdy. Measure the size of the three partitions on the upper part of the bucket with masking tape. Use the masking tape to cut three strips of foam. Glue the three strips of foam to the partitions. This makes the whole buck balance in size and looks smooth. The best part is that you can use it as a footrest when you are watching television or as a table to put your drinks on while you are lounging around.
DIY Ottoman Storage
Storage for your living room can be a pain. You have so much stuff that you don't have enough places to put anything! We have a pretty good solution for you, though. It involves a plastic bucket, hot glue, fabric, and foam.
To make this ottoman storage unit, start by gluing a long triangular foam to the lower part of the bucket. Then, glue some strips of foam to the partition on the upper part of the bucket then add another layer of foam to the upper part to level up with the rest of the bucket. Repeat this process for the lid and attach the fabric to it. If you want to carry even more stuff in your ottoman, just fill up as many plastic bags as you can fit and put them in there! This is such an easy project and it's also very affordable. A big plus about this project is that you can use whatever fabric you want so if you don't like what we used, then change it up! Perhaps a nice faux leather or patterned fabric? The possibilities are endless!
DIY Decorative Storage Ottoman
This is a unique storage ottoman that is actually made out of buckets. The bucket itself has foam wrapped around it and fabric glued to it. The top part of the bucket has fabric attached to it. This is so you can place your feet on it and the fabric will not get dirty easily. Around the outside of the bucket, decorative buttons are attached to add a bit of flare. The idea behind this creation is to have an ottoman to put your feet on but still have room to store stuff in it as well. It's creative and functional!
DIY Storage Ottoman

To make this storage ottoman, you will need an old ottoman and fabric. This particular tutorial uses an old ottoman and a colorful Mexican fabric. You'll need foam to cover the lid and inside the box of the ottoman for some cushioning. You can also use any fabric for this project. However, be sure to choose one that is thick and durable enough to withstand wear and tear. If you don't have an old ottoman, there are many places that sell affordable, new ones that would work well for this project as well.
DIY Storage Ottoman From Wooden Crates

If you are looking for an easy project to work on this weekend, try this DIY storage ottoman. It is a great way to upcycle old crates and make something useful in the process. This is a DIY project that will allow you to create a modern storage ottoman that can be customized to fit your room and decor. There are countless options when it comes to crate storage ottomans, so feel free to experiment with the color scheme, design, and materials.
DIY Tufted Storage Ottoman

This tufted ottoman is a great DIY project, and it's easy to modify the dimensions and make it larger or smaller by changing the size of your foam piece. The template is simple: Cut a hole in your foam big enough for your storage box to fit through, then cut out the shape using a serrated knife; trace what you've cut on the fabric; and finally, sew up the sides. You could get super fancy and line it with batting too if you wanted to make it extra cushy.
Uncover More DIY
- DIY kalimba projects: Craft a beautiful and soothing musical instrument with these DIY kalimba projects, perfect for adding a touch of melody and personalization to your life.
- DIY compost bin designs: Create an eco-friendly garden with these innovative DIY compost bin designs, designed for effortless composting and a flourishing outdoor space.
- DIY pantry cabinet projects: Organize your kitchen like a pro with these inspiring DIY pantry cabinet projects, designed to suit any style and maximize storage potential.
- DIY resin tray projects: Unleash your creativity with these DIY resin tray projects, guiding you through the process of crafting a stunning and functional work of art.


