Stay cozy and stylish with a crochet granny sweater that’s soft comfortable and perfect for keeping you warm while showcasing timeless charm for any look.
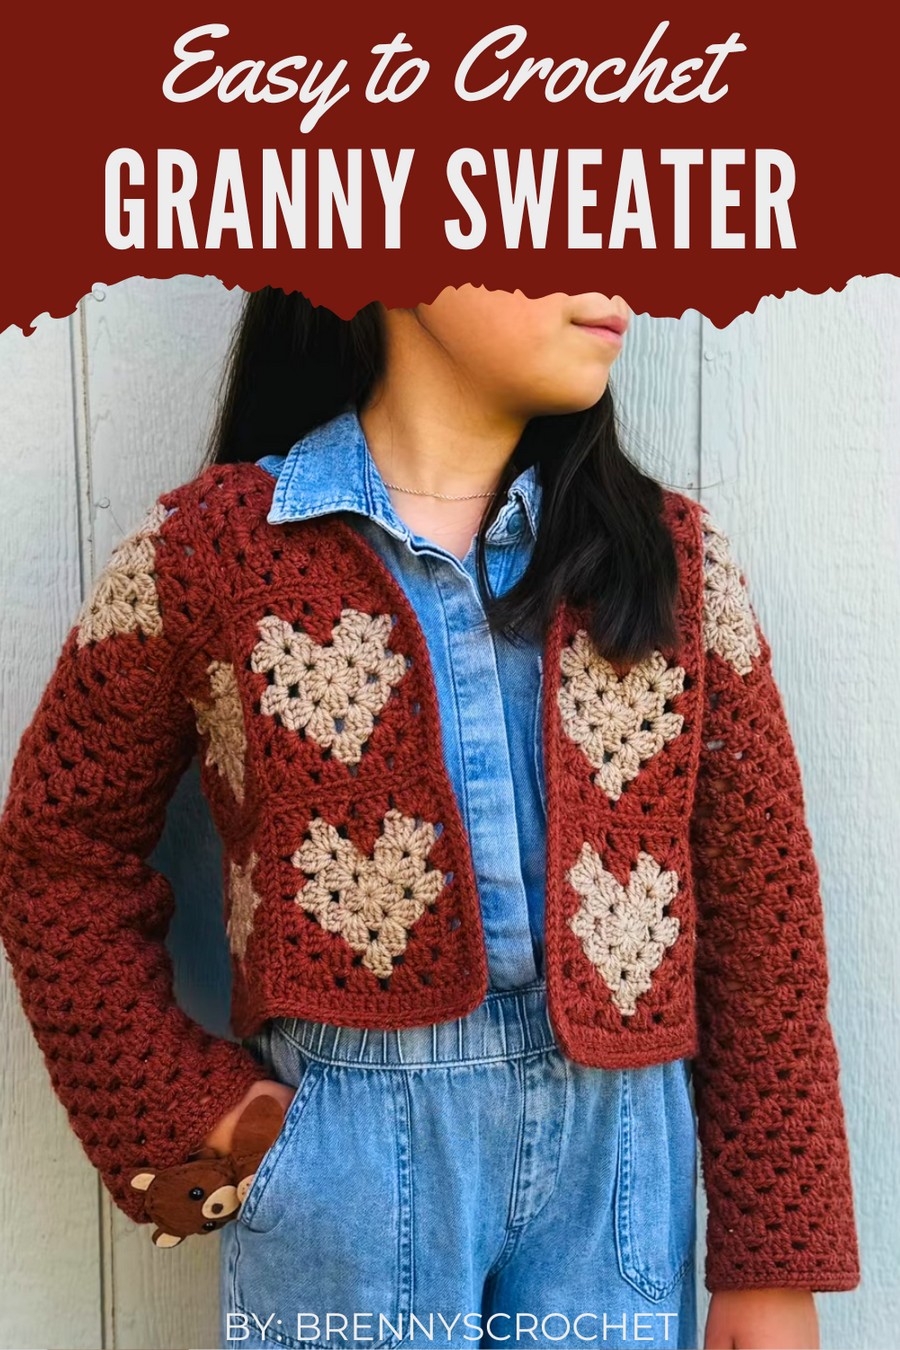
Soft, colorful, and full of charm, this cozy handmade sweater is perfect for adding warmth and style to your everyday outfits. With its vibrant patterns and classic look, it stands out beautifully and feels comfortable to wear all day.
Simple Crochet Granny Sweater Pattern That Looks Like a Masterpiece
You can pair it with jeans, skirts, or dresses for casual outings, relaxed gatherings, or even chilly evenings. Its unique and eye-catching designs make it a thoughtful gift for loved ones or a chic addition to your wardrobe. Whether at home or out with friends, this sweater keeps you warm while showcasing a timeless and playful touch that everyone will adore.

Materials Needed
- Yarn:
- Medium-weight yarn (Category 4, 100% acrylic).
- Recommended yardage: Approx. 1500–2200 yards depending on the size.
- Crochet Hook:
- 4.5mm (G-7 or H-8 depending on tension).
- Scissors.
- Tapestry Needle: For weaving ends and joining granny squares.
- Stitch Markers: Optional for securing granny squares before sewing.
Skill Level:
Intermediate to Advanced – Crocheters should have experience working granny squares, sewing pieces together, and organizing garment construction.
Key Abbreviations (US Terminology)
- ch: Chain
- sc: Single Crochet
- dc: Double Crochet
- sl st: Slip Stitch
- yo: Yarn Over
Special Notes
- Granny Square Options: The cardigan design allows for customization with two different types of granny squares:
- Heart-centered granny squares (recommended for intermediate/advanced crocheters).
- Classic granny squares (recommended for beginners).
- Tutorials for both types of squares can be followed separately and integrated into this pattern.
- Customizable Sizing: Measurements and square counts can be altered depending on the required size. For reference:
- Each square measures 10 x 10 cm.
- For smaller or larger sizes, crochet larger squares or add additional squares to achieve the desired size.
Pattern Instructions
Step 1: Crochet Granny Squares
- Decide Granny Square Type:
- Choose between heart-shaped granny squares or regular granny squares.
- Follow separate tutorials to crochet the number of squares needed (explained below).
Recommended Quantity:
For a size 10–12 child cardigan:
- Back Piece: 12 granny squares.
- Front Pieces: 10 granny squares total (5 per side) plus 2 half-squares for the neckline shaping.

Step 2: Joining Granny Squares
- Lay Out the Squares:
- For the back, arrange 12 granny squares into a 4 x 3 rectangular grid.
- For the front sections, arrange 5 granny squares per side, ensuring 2 half-squares are positioned near the neckline.
- Use Markers:
- Place stitch markers to secure squares together before sewing. This ensures correct alignment before final assembly.
- Important: Ensure heart motifs (if used) face the correct direction, especially in the back piece, as they fold over to form the cardigan shape.
- Sewing Process:
- Vertical Seams: Use a tapestry needle to sew granny squares together vertically.
- Horizontal Seams: Once vertical seams are complete, sew horizontally.
- For joining edges:
- Insert your needle into one strand only of the corner chains from both squares, ensuring an invisible seam.
- Leave Spaces for Sleeves:
- Do not join the sides completely; stop sewing when leaving an opening for the sleeves. Refer to measurements below.

Step 3: Sleeves
Once the body is assembled:
- Determine Sleeve Width:
- Fold the cardigan and measure how wide the sleeve openings should be. For a size 10–12 child, leave a width of 1 granny square plus 3 points of adjoining chains on each side.
- Use stitch markers to secure where the sleeve ends and ensure identical widths on both sides.
- Crochet Sleeves:
- Attach yarn to the sleeve opening and start crocheting in rounds of granny clusters.
- Each cluster consists of 3 dc, separated by 1 ch.
- Attach yarn to the sleeve opening and start crocheting in rounds of granny clusters.
- Joining Granny Sleeve Rounds:
- After each sleeve round, join the round using a sl st into the starting chain.
- Remember to crochet additional rounds until the sleeves reach the desired length.
- Optional Edging:
- Add a finishing edge using single crochet (sc) stitches around the sleeve cuff to tidy the finish.

Sample Sleeve Sizing:
For a child’s size 10–12 cardigan:
- Crochet 29 rounds for sleeves. Each measures approximately 35 cm (13.8 inches).
Step 4: Front & Bottom Edge
- Work Edges:
- Attach yarn at the bottom corner of the cardigan and crochet 1 round of dc stitches around the entire body edge.
- Start from the bottom, move upward toward the neckline, continue across the neckline, and proceed down the other front panel.
- Attach yarn at the bottom corner of the cardigan and crochet 1 round of dc stitches around the entire body edge.
- Single Crochet Border:
- Turn work and begin crocheting 1 round of sc stitches across the newly added layer to tidy the edge.
- Crab Stitch Edging (Optional):
- Add crab stitch edging (reverse single crochet) for a decorative final touch.
- Finish:
- Weave in all remaining ends using a tapestry needle.

Conclusion
The completed Heart Cardigan is a cute and customizable piece perfect for children or adults. With its unique granny square construction and optional heart motifs, it’s stylish and functional. Additionally, finishing touches like decorative crab stitch edging add sophistication to the garment.
Pattern Corrections
- Be careful to orient squares with specific motifs (e.g., heart squares) correctly, ensuring uniform direction for the back and front pieces.
- Always check alignment before sewing seams—use stitch markers for assistance.
Tips for Success
- Stitch Count Consistency: Carefully count stitches/clusters for sleeves to ensure both are identical in width and pattern.
- Customizing Size: If making an adult-sized cardigan or for larger children, increase the granny square size to 12 x 12 cm (or larger) and adjust the total square count accordingly.
- Color Variations: Add stripes or use multicolored granny squares for unique design options.