Unlock the charm of a crochet one-piece blouse pattern that delivers style and comfort perfectly while offering a timeless wardrobe staple everyone will love.

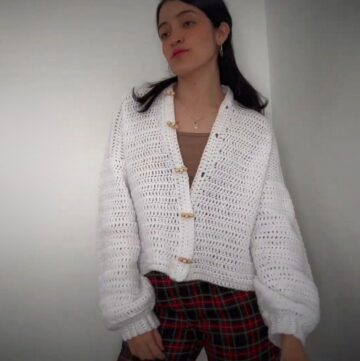
A one-piece blouse made with crochet is a stunning example of handmade beauty that combines simplicity with elegance. Its seamless design makes it comfortable to wear, and it fits beautifully for casual outings or special events. This blouse can be worn alone or paired with skirts, jeans, or trousers to suit different occasions.
Crochet One-Piece Blouses Pattern for Everyday Wear
Featuring intricate crochet textures, it adds a touch of sophistication to your wardrobe. Whether crafted with bold or soft colors, its unique patterns effortlessly enhance any outfit. Perfect for anyone who loves personalized fashion, it’s a versatile piece that stands out while remaining practical and stylish.

Top-Down Crochet Blouse Pattern
Materials Needed
- Yarn:
- Thin cotton yarn (approximately 1mm thick). Suggested brands can vary depending on your local supplier.
- Approximately 160 g of yarn for a size Small. Adjust yarn quantity based on desired size and length.
- Hook Size:
- Recommended 3.5 mm crochet hook for thin yarn. Use a larger hook size if using thicker yarn.
- Other Supplies:
- Stitch markers (to mark division sections of the blouse).
- Measuring tape (to size your blouse accurately).
- Scissors (for cutting yarn).
Skill Level
Intermediate
Key Abbreviations (US Crochet Terminology)
- ch: Chain
- dc: Double Crochet
- sc: Single Crochet
- sl st: Slip Stitch
- st(s): Stitch(es)
Special Notes
- This pattern uses top-down construction: starting at the neckline and working down in one continuous piece.
- Adjustments can easily be made by altering the chain length, number of rounds, or adding increases to expand the body width or length as desired.
- Turning the work after each round ensures rows align correctly and follow a balanced rectangular shape.
Pattern Instructions
Step 1: Neckline (Foundation Chains)
- Measure Your Neckline:
- Crochet chains to match the measurement around your head or neckline. For example: 100 chains for a size Small.
- Ensure the chain fits loosely around the neck when slightly stretched.
- Foundation Chains:
- Crochet 100 chains (or your needed amount).
- Do not stretch tightly; gently hold them as you measure for accurate sizing.

Step 2: Division of Sections
- Divide the chains based on five sections:
- Back: Divide chains by 5 (e.g., 100 ÷ 5 = 20 chains).
- Arms: Two arms (same count as each back section).
- Front: Remaining count after subtracting arm sections (e.g., 50 - 40 = 10 chains).
- Ensure Balance: Divide the front chains equally (e.g., 30 ÷ 2 = 15 chains each front section).
- Total chains (back + front + arms) must equal the original chain count. If the count doesn’t align, adjust chains to prevent errors.
- Mark Sections: Use stitch markers for dividing:
- Back 1 → Arm 1 → Front → Arm 2 → Back 2.
Step 3: First Round
Foundation Round:
- Place finger on the last chain made and crochet 2 chains for height.
- In the next chain, begin your dc stitches, following your division notes:
- Back 1: Crochet 15 dc (or as per your size chart for this section).
- Place Stitch Marker after completing the back section.
- Work Each Section:
- Arm 1: Crochet 20 dc, place stitch marker.
- Front: Crochet 30 dc, place stitch marker.
- Arm 2: Crochet 20 dc, place stitch marker.
- Back 2: Crochet the remaining 15 dc.
- Separate with Chains: At section dividers marked by stitch markers, crochet 1 chain before moving on to the next section.
- Close the Round: After finishing the Back 2 section, slip stitch into the first dc and ensure fabric isn’t twisted.

Step 4: Yoke
Building Round 2:
- Begin the next row by chaining 2 (counts as a dc) and either:
- Continue in the same direction OR
- Turn your work to alternate rows (optional; ensures a polished finish).
- Increase Areas: At each stitch marker (where you placed chains):
- Remove the marker, crochet 1 dc, 1 ch and 1 dc in the chain.
- Replace stitch marker to avoid losing placement.
- Continue crocheting 1 dc in every stitch and repeat increases at each marker for a total of 4 increases per round.

Building the Yoke Until Desired Length:
- Continue rounds with increases at stitch markers. This creates a rectangular shape with longer front/back sections and shorter arm sections.
- For the yoke, crochet until it reaches below the armpit or mid-bust area. Fold the fabric in half and check fit measurements for accuracy.
Step 5: Body
- Once you’ve reached the length of the yoke, fold it in half and join the front and back with dc stitches, leaving the armholes open.
Armhole Adjustment:
- To widen armholes, crochet extra chains at the underarm seam.
- Example: 4-6 chains to expand width.
- In the subsequent round, crochet dc stitches into each chain to integrate them into the structure.
Body Rounds:
- Continue crocheting dc stitches in rounds for the body length.
- Work until you reach your desired length for the blouse.
Step 6: Decorative Bottom Trim
Switch to New Yarn (Optional):
- Attach yarn at the starting slip stitch area.
- Decorative Pattern:
- Skip 2 stitches, then in the next stitch: 2 dc, 2 ch, 2 dc (creates decorative clusters).
- Repeat clusters every 2 stitches.
- Close the round with a sl st. For subsequent rounds:
- Work the same cluster pattern in every cluster space (2 ch gap) from the row below.
- Crochet as many rows as desired to achieve the desired blouse length and style.


Pattern Variations
- Colors: Use color changes for different sections (e.g., neckline, yoke, body, and trim). Bold contrasts or ombré yarn create unique looks.
- Sleeves: Add decorative sleeves using the bottom trim pattern or extend sleeves with dc rounds.
- Lengths: Adjust body length to create a cropped blouse, sweater, or even a dress.
Tips for Success
- Tension Control: Work consistently to avoid uneven stitches. For a snug fit, use smaller hooks; for a looser fit, use larger hooks.
- Fit Testing: Measure the yoke to ensure proper fit at the bust and armhole areas before continuing the body rounds.
- Neckline Stretch: Avoid over-tight chains at the neckline to create a comfortable fit.
Conclusion
This seamless blouse is versatile, stylish, and customizable to any size or design preference. You can personalize the pattern with creative color combinations, decorative elements, or extensions to suit your needs. Whether you make it as a gift or for yourself, this project showcases the beauty of crochet’s flexibility.
Pattern Correction & Final Notes
- Ensure accurate division of chains and test fit frequently for the best final look.
- If the neckline feels tight, add extra chains or adjust tension.
- Block the final blouse to achieve a polished and professional result.