Learn to whip up a stunning crochet curtain holder pattern that boosts charm and keeps your home stylishly organized for a cozy and inviting space.

Add a touch of charm and elegance to your home with a beautiful crochet curtain holder that blends style and functionality effortlessly. This lovely holder keeps your curtain neatly pulled back while also serving as a handmade, decorative accent to any room.
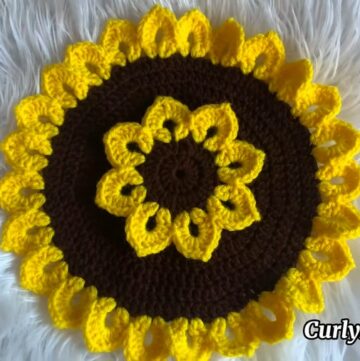
Amazing Crochet Curtain Holder Pattern for Any Window
Perfect for the living room, bedroom, or even the kitchen, it can feature designs ranging from simple and classic to intricate and colorful. With its soft texture and unique pattern, the crochet holder enhances the appearance of your window, creating a warm and inviting feel. It’s a practical and artistic way to elevate your home décor with minimal effort.

Materials Needed
- Yarn:
- Flower: Amigurumi yarn (use double strands for a structured and larger look), or thicker yarn such as Baroque No. 4, Baroque No. 6, or Bell Charme.
- Cord and Tassel: Use matching or contrasting yarn for the tieback cord and tassel.
- Suggested color combination: Light and dark contrasting shades to create dimension.
- Hook Size:
- Recommended hook size: 2.0 mm for tight and structured stitches.
- Optional Items:
- Tapestry needle for sewing.
- Scissors for cutting yarn.
- Other Supplies:
- Measuring tape for accurate lengths.
- Glue (optional) for additional security.
Skill Level
Intermediate
Key Abbreviations (US Crochet Terminology)
- ch: Chain
- sc: Single Crochet
- dc: Double Crochet
- tr: Treble Crochet
- sl st: Slip Stitch
- dtr: Double Treble Crochet (loop yarn twice around the hook before starting the stitch).
- st(s): Stitch(es)
Special Notes
- Work starting with the center of the flower and outward.
- For a larger flower or tieback, use thicker yarn or double strands.
- Maintain tight and consistent tension for structured stitches, especially for the petals.
Pattern Instructions
Step 1: Flower Center (Yellow Yarn)
- Start with Magic Ring:
- Create a magic ring and secure.
- Work the Center:
- Ch 2 (counts as first sc).
- Work 5 sc into the magic ring for a total of 6 sc (including ch-2).
- Pull the tail to tighten and close the ring.
- Join with a sl st to the first sc.

Tip: Use thick yarn for the center to keep the shape dimensional.
Step 2: First Layer of Petals (Dark Yarn)
- Attach Dark Yarn: Join the yarn at any sc in the center.
- Petal Structure:
- Ch 2 (counts as starting height). Inside the same stitch:
- Work 1 dc.
- Work 1 dtr.
- Move to next sc of the center:
- Work 1 dtr, 1 dc, then finish with a sl st in the same st.
- Ch 2 (counts as starting height). Inside the same stitch:
- Progress to the Next Petal:
- Sl st into the next st and repeat the petal structure above.
- Complete Remaining Petals:
- Repeat structure for a total of 3 petals.

Step 3: Spaces Between Petals
- Create Spacer Chains:
- Rejoin dark yarn at the base space between two petals.
- Ch 3, sl st into the next space between petals.
- Repeat around, creating 3 chain-spaces in total.
Step 4: Second Layer of Petals (Dark Yarn)
- Work into Spacer Chains:
- In each ch-3 space, work:
- Ch 4 (counts as height).
- 4 dtr.
- Ch 4, sl st in the same space.
- In each ch-3 space, work:
- Repeat for Remaining Spaces: Complete petal structure in the remaining two spaces.
- Finish: Sl st at the end of the round, securing the dark yarn. Bind off and weave in ends.

Step 5: Third Layer of Petals (Light Yarn)
- Attach Light Yarn: Rejoin at the first dtr of any dark petal.
- Petal Increase (for Bigger Petals):
- Ch 2 (counts as height).
- At each dtr of the base petal: Work 2 dtr.
- Increases shape the petals for a fuller appearance.
- End of Row: Work dtr in last st, ch 2, and sl st into the base.
Step 6: Optional Embellishments
- Light Yarn Center Accents:
- Go back to the flower’s original center. Work small contrast stitches using light yarn, such as 1 dc or picot in each sc.
- Texture Add-ons: Consider adding more rows of petals for a lush appearance.
Step 7: Tassel and Cord
Cord
- Chain 50-60 chains (or until desired cord length).
- Attach to the base of the flower using a tapestry needle for secure placement.

Tassel
- Cut 20-25 pieces of yarn (matching the cord or complementary).
- Wrap yarn around a flat surface (e.g., a book) roughly 20 times for fullness.
- Tie at the top, cut at the bottom loops, and secure to the end of the cord.
Tips for Success
- Yarn Selection: Use Baroque No. 6 or doubled thinner yarn for sturdy and structured flowers.
- Contrasting Colors: Choose light and dark yarns for a dimensional look. Popular examples include sunflower colors (yellow, dark brown center) or Christmas tones (red, green).
- Needle Size: Opt for smaller crochet hooks to maintain tight and stiff petal structure, avoiding floppy results.
Final Look
Your finished project should feature a beautifully layered flower with dimensional petals, a matching cord for a curtain tieback, and a tassel for added flair. The tieback not only serves as a functional household item but also elevates your home décor with a handmade touch.
Pattern Variations
- Colors: Adjust the color scheme to match your room or the season. For example:
- Spring Vibes: Pastel shades (light pink, baby blue, soft yellow).
- Fall Décor: Rust orange, maroon, mustard yellow.
- Holiday Themes: Traditional Christmas red and green or icy winter tones of blue and silver.
- Size Adjustments: For larger flowers, use thicker yarn (e.g., Baroque No. 4 or No. 6) and add extra rounds of petals with similar patterns.
- Uses: Attach to more than just curtains—consider using it as an embellishment for handbags, headbands, or decorative wreaths.
Conclusion
This crochet curtain tieback flower is an intricate yet rewarding project that allows for infinite customization. Whether you’re crafting for home décor or as a thoughtful gift, this design is sure to impress.