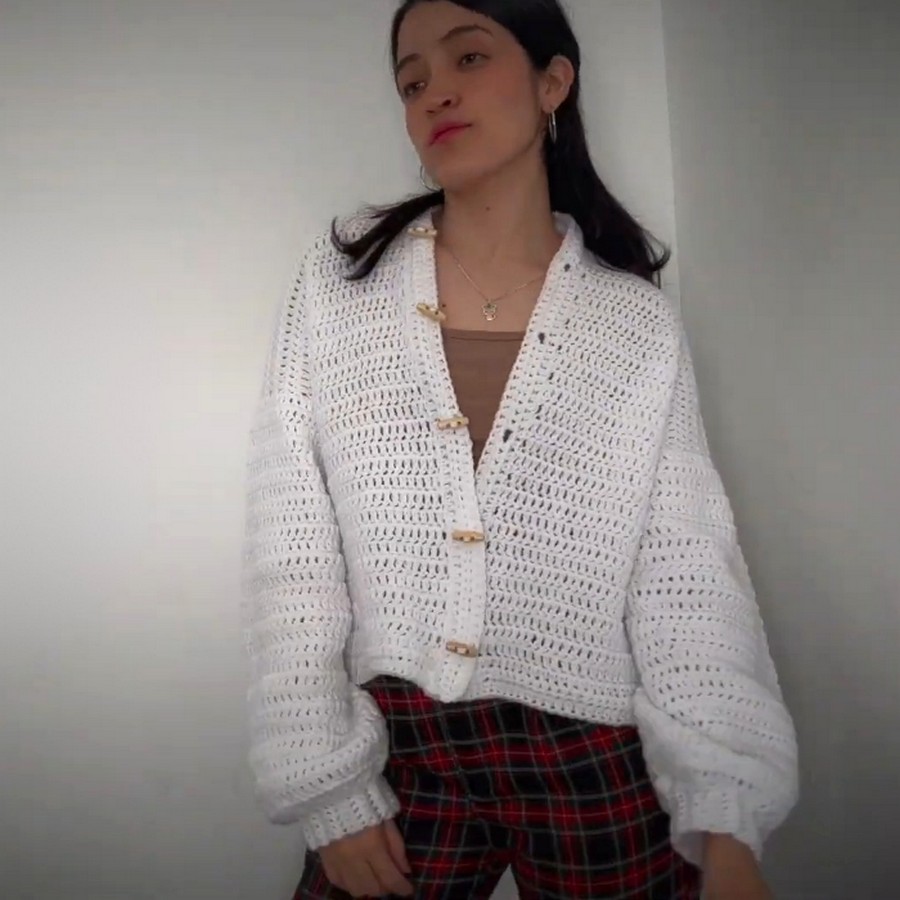
Style yourself with cozy crochet cardigan pattern that bring effortless charm and comfort to your wardrobe for every season and occasion all year round.

Soft and cozy comfort is always in style. A crochet cardigan brings that perfect blend of warmth and elegance to any outfit. Its light and breathable design make it great for cooler days or breezy evenings, while still feeling comfortable all year long.
Master Crochet Cardigan in Just a Few Simple Steps
You can wear it at home, to work, or even to casual outings, pairing it effortlessly with jeans, dresses, or skirts. The intricate patterns and textures add beauty and charm, making it more than just clothing—it’s a statement piece. With endless designs and colors to choose from, it’s a must-have for a stylish and timeless look.
Materials Needed
- Yarn:
- 100% acrylic yarn, approximately 3 mm thick.
- Suggested quantity: Approximately 500-600 g for a large size.
- Other yarn options: Cotton or wool blends for a lighter or warmer garment.
- Hook Size:
- 5.5 mm crochet hook suitable for thick acrylic or medium-weight yarn.
- Other Supplies:
- Buttons: Suggested size: 3 cm diameter (use as many as needed based on preference).
- Stitch markers for tracking sleeve openings and sections.
- Measuring tape for accuracy in sizing.
- Scissors for cutting yarn.
- Tapestry needle for weaving in ends and sewing buttons.
Skill Level
Intermediate
Key Abbreviations (US Crochet Terminology)
- ch: Chain
- dc: Double Crochet
- sc: Single Crochet
- sl st: Slip Stitch
- hdc: Half Double Crochet
- st(s): Stitch(es)
Special Notes
- This cardigan is crocheted in sections: the back panel, front pieces, sleeves, and edging. Each section is assembled at the end.
- Customize the length, width, and sleeve size to suit your preference by adding or subtracting rows or stitches.
- Turning the work after each row ensures an even, structured fabric.
Pattern Instructions
Step 1: Back Panel
Foundation Chains
- Measure Shoulder Width:
- Measure from shoulder to shoulder, ensuring a slightly loose fit for a comfortable cardigan.
- Example measurement: 47 cm wide.
- Foundation Chains:
- Crochet 64 chains (for a 47 cm wide back panel).
- Adjust the number of chains based on your shoulder width.

Back Panel Rows
- Row 1:
- Chain 2 to begin. Crochet 1 dc into the 3rd chain from the hook. Continue crocheting 1 dc into each chain across.
- You should have the same number of dc stitches as foundation chains (64 dc, plus the 2 starting chains = 65 dc).
- Rows 2-32:
- Begin each row by ch 2, turn your work, and crochet 1 dc in each stitch (including the last stitch, which is the starting chain of the previous row).
- Continue for 32 rows, or until the back panel measures approximately 40 cm in length.
Step 2: Front Panels
Divide Back Panel Sections
- Divide the Back Panel evenly:
- Find the center stitch by dividing the rows into two equal sections:
- Example: 65 total dc stitches ÷ 2 = 32.5.
- Round down to 32 stitches on one side, leaving 1 stitch as the center.
- Find the center stitch by dividing the rows into two equal sections:
- Mark the sections:
- Use stitch markers to separate stitches for the left front panel and right front panel.

Front Panel Rows
- Repeat the same process as Step 1 (Back Panel), but only crochet 32 stitches instead of the full row.
- Rows 1-32: Crochet 1 dc in each stitch, starting with ch 2 and turning after each row.
- Complete 32 rows on one side, ensuring the rows are equal in length to the back panel.
- Repeat for the second front panel.
Step 3: Assemble Body Panels
Side Seams
- Lay the front panels on top of the back panel, aligning the stitches. Determine how far up you want to sew the side seams, leaving space for the sleeves:
- Example: Leave 19 cm open at the top (for large arms) and sew the bottom seam closed (27 cm).
- Use single crochet or a tapestry needle to join the side seams:
- Insert hook/needle into the corresponding stitches of the front and back panels, ensure even stitches, and crochet/sew along the edge.
- Repeat on the opposite side.

Step 4: Sleeves
Sleeve Opening & First Round
- Pick up yarn in the center stitch of the sleeve opening (seam area).
- Begin with ch 2, then crochet 1 dc into each stitch around the sleeve opening.
- Ensure uniform spacing: For example, 62 stitches total for the first round.
Sleeve Decreases (Optional)
- To create a tapered sleeve, you can decrease at the start of every other round:
- At the beginning of the round, crochet 2 dc as a decrease (crochet 2 dc together).
- Alternate rounds (one with decreases, one without) until the sleeve reaches desired tapering.

Sleeve Length
- Continue crocheting rounds until the sleeve reaches desired length:
- Example: 28 rounds = 40 cm for long sleeves.
- Finish the wrist area with 7 chains and work sc into 6 stitches to create a tighter wristband.
Step 5: Edging
Add edging to the bottom hem, neckline, and button area to create a neat finish.
Bottom Hem Edging
- Attach yarn at the bottom edge.
- Work 3 rows of hdc, turning after each row.

Neckline Edging
- Repeat the bottom hem process along the neckline and front edges.
- Add buttonholes by skipping a stitch and chaining 1 as a placeholder. Continue the row and ensure stitch counts remain consistent.
Step 6: Buttons
- Sew buttons evenly on the opposite side of the buttonholes using a tapestry needle.
- Example: Place buttons every 5-6 rows for uniform spacing.

Pattern Variations
- Colors: Alternate yarn colors for stripes, ombré effects, or color-blocking.
- Length: Adjust the number of rows for a cropped or longer cardigan.
- Sleeves: Create short sleeves with fewer rounds or flared sleeves by avoiding decreases.
- Decorative Stitches: Use filet, shell, or fan stitch patterns for a unique look.
Tips for Success
- Keep Stitch Counts Consistent: Ensure the same stitch count for every row to keep panels even.
- Use Stitch Markers: Mark key areas, such as sleeve openings, buttonholes, and seam alignments.
- Choose a Larger Hook for looser fabric or a smaller hook for tighter stitches.
Conclusion
This gypsy-style crochet cardigan is versatile, comfortable, and timeless in its design. Its loose fit is flattering and can easily be customized for any size or style preference. Whether you make a vibrant statement piece or a neutral everyday garment, this pattern offers endless possibilities for creativity.