You need a new lounge chair for your patio, but you don't know how to make one. You want to build something that is both comfortable and stylish. And you need an affordable lounge chair that will fit into your small apartment. All these problems can be easily fixed with DIY Lounge Chair Plans. There are so many lounge chair plans available on the internet, but most of them are difficult to follow. They use complex woodworking tools such as a table sawhorse, radial arm saw, etc. Those tools aren't easily available to beginners, and they aren't crucial for a simple lounge chair. With this list, you'll find easy-to-follow projects that will allow you to build a beautiful lounge chair for your patio or backyard.
DIY Lounge Chair Plans

This collection of 28 DIY Lounge Chair Plans is great if you're looking for an affordable and stylish addition to your backyard or patio. After all, everyone wants a nice place to sit with their friends and family. But building a lounge chair can be a very frustrating process if you don't have the right plans or instructions. This article will provide you with everything you need to know about building a DIY lounge chair of your own.
How To Make A Lounge Chair
A lounge chair is a comfortable seat that is often placed by the pool, on a porch, or in a garden. This chair is comfortable and serves a lot of uses from relaxing to reading, watching TV, or even as a bed. It provides a place to sit, relax and enjoy the scenery. Making your own lounge chair is not difficult. The only tools you will need are a saw, drill, and screwdriver. If you want to make it look professional, you will have to have some carpentry skills and you may have to buy some parts.
Fascinating And Elegant DIY Lounge Chair
Many people love to spend their time reading a book at home, watching TV, or playing games. They actually can spend their time with the family in front of their fireplace and they do not have to be bored anymore. In this article, we will show you how to make an elegant lounge chair that looks really amazing and comfortable. This amazing lounge chair can make it with just one piece of wood and some nails if you will follow our instructions precisely. Moreover, you can also paint the chair in different colors so that it matches your home interior design.
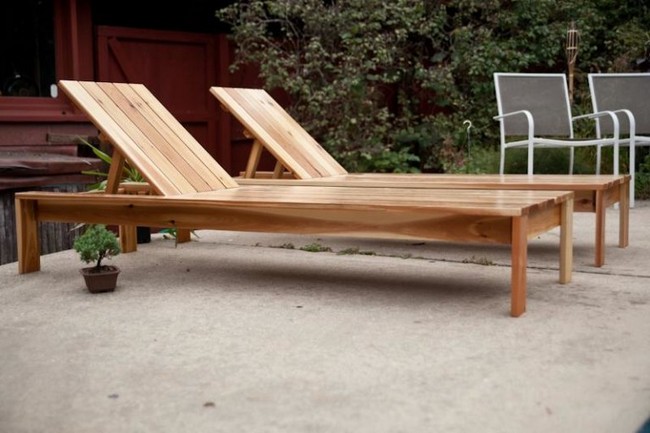
DIY Outdoor Chaise Lounge
Are you a DIY enthusiast who loves to spend time outside? You've probably dreamed about building your own outdoor chaise lounge. However this project is quite a challenge since it's difficult to find the perfect size and shape of wood for the frame, and you also need to figure out how to attach the fabric. Trying to build an outdoor chaise lounge from scratch can be overwhelming. That's why we've put together this step-by-step guide to help you build your own.
DIY Wooden Lounger With Book Storage

DIY Wooden Lounger With Book Storage. If you're looking for a super easy and cheap DIY project, try this one! For this project, all you need are 4 wooden pallets, some screws, sandpaper, paint, a drill, and a book.
You can easily make this lounge with your own hands. The pallets will serve as the frame of the furniture item and the remaining materials will be used for covering it. The design of this lounger is quite simple and it can be completed within just a few hours. This DIY wooden lounger with book storage is a great way to add a modern and unique piece to your living space. Perfect for reading, napping, or just hanging out!
How To Turn TV Boxes Into Lounge Chairs
When you have some spare time and junk lying around, you can make some useful things from them. Here's a great example of that – a lounge chair made from cardboard boxes and other junk materials. This is made from cardboard boxes, glue, scissors, and a cutter. Outline the shape of the chair on a piece of a cardboard box, trace the shape and cut it out, make 10 of this shape and glue them together. You can make more copies if you're not satisfied with the durability of the cardboard. Then make a long triangular piece for the seat of the lounge.
Next, insert two wooden planks in between two pieces of cardboard to serve as the back support and seat support respectively. Cut two slits at one end to give space for your head in front and your legs in the back. Then use some strings or rope to tie up the chair and fix it in place. This can be used as a regular lounge chair or carried along when you go camping or on picnics. Stuffing it with cotton balls will give you extra cushioning while using it on hard surfaces like concrete.
DIY Outdoor Lounge Chair
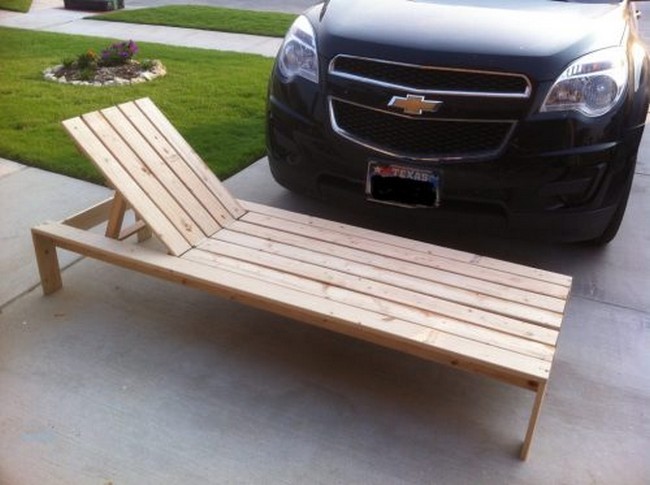
If you want a comfortable outdoor lounge chair and are willing to spend the time and effort, there are many ways that you can make your own. The most basic thing that you will need is some heavy wood. What you use will depend on what kind of environment you live in and what kinds of wood are available where you live.
A basic design for simple outdoor furniture involves four pieces of wood, two pieces at the top as the backrest and two at the bottom as the seat base. As your design gets more complicated, you might need to add additional support under the seat to keep it from wobbling or breaking under stress.If you really want to be comfortable, take into account how far apart the legs of your chair should be based on how tall you are so that your legs are not hanging over either side. Once you have made all of your cuts, sand everything thoroughly so that there are no splinters or rough edges.
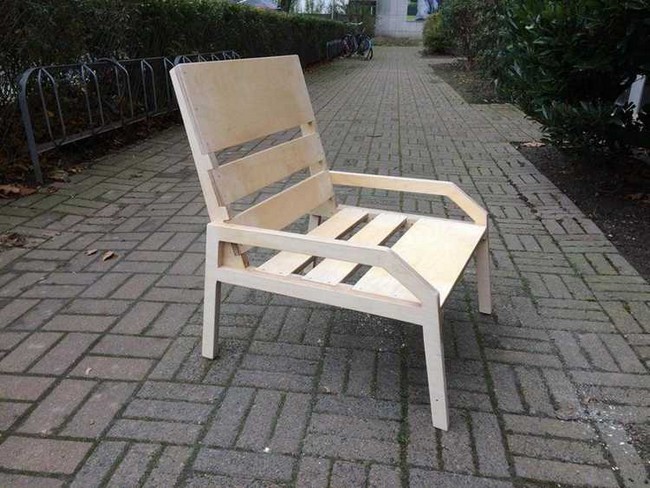
How To Build An Outdoor Lounge Chair
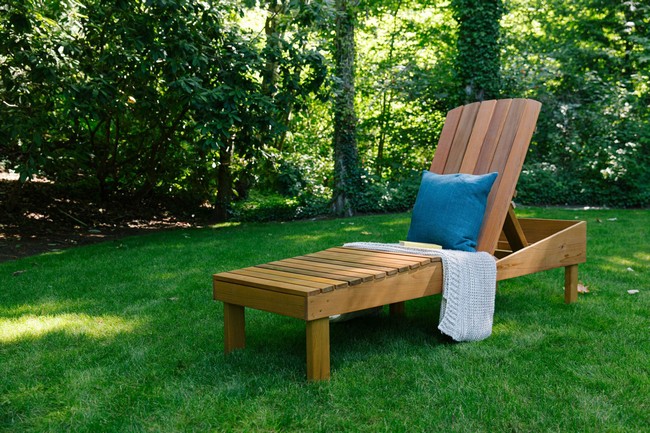
The base of the chair is an angular structure made from one long piece for the upper, then a shorter piece for the bottom, and both joined together with a short piece to form an angle. These pieces were prepared with an angle gauge. The joints were made using a variety of joinery methods, such as finger joints, dovetails mortises, and tenons. The frame was assembled using glue and The backrest is a linear element made from two slats at the top and one at the bottom. The backrest is attached to the frame using screws through pre-drilled holes.
This seat is made from slats that are screwed to the frame. The seat sits on four legs that are attached directly to the frame or on supports that are attached to supports inside the frame. The seat had a cushion added to it which was cut from foam, covered in fabric, and then stapled into place. This wooden lounge chair can be used indoors or outdoors. It would look great on a patio or by a pool!
DIY Outdoor Chaise Lounge Chair
Creating this outdoor chaise lounge chair is difficult to do if you have no knowledge of woodworking. You will need a lot of woodworking tools and types of equipment to build this beautiful lounge chair. All the materials and tools needed in building this chaise lounge chair are easily available in a hardware store. If you decide to create this amazing lounge chair, you may also need some basic carpentry skills too. This guide will walk you through all steps to make this lounge chair.
How To Build A Lounge Chair
Building a lounge chair is a straightforward process that doesn't require much expertise. Yet, it can be tricky if you don't have the right tools. Read this article for detailed instructions and the necessary materials to build one. The materials needed for this lounge chair include wood, a miter saw, a table saw, screws, foam, fabric, and glue. Cut the pieces for the legs and armrest then assemble them. Prepare the frame for the backrest and seat, then cut out the foam and fabrics to cover the seat and backrest.
Lounge Chair For $5
Who says that nice and inexpensive don't go together? Build your own lounge chair for the patio and you'll get to relax in style - all for a fraction of the price that most store-bought chairs cost. This project is inexpensive and can be set up for just $5 in less than 24 hours. The materials needed include sandpaper, wood glue, plywood, tape measure, wood screws, a jigsaw, a table saw, and wood stain. Start by cutting all the pieces needed for the project then prep them and sand them down. After this, assemble the chair and join them with screws.
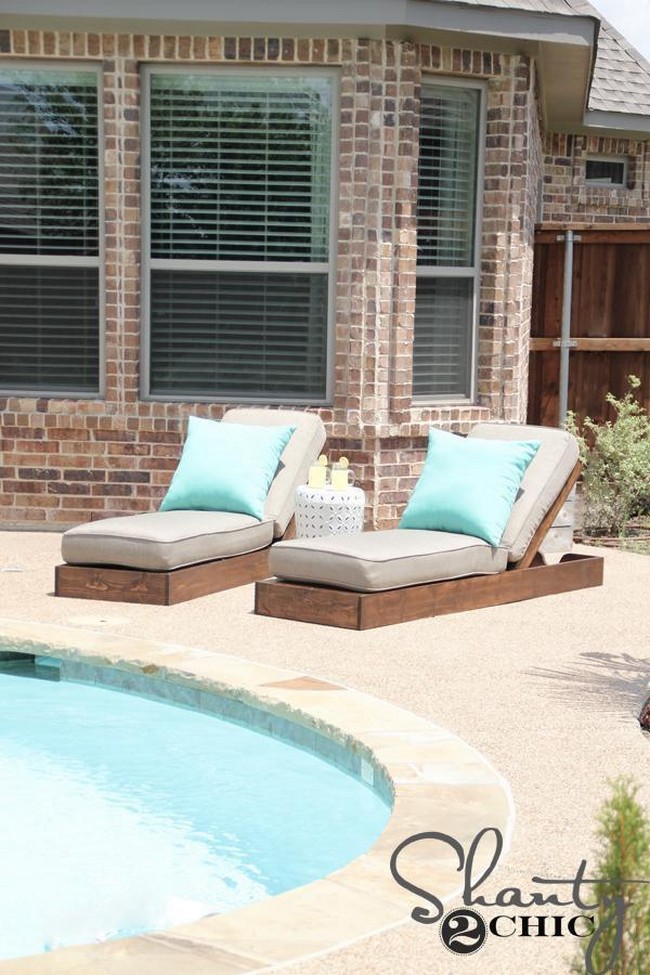
Modern Single Outdoor Chaise Lounge
The best thing about this DIY outdoor chaise is that you can adjust it based on the available space you have. If you want to create a lounge chair with armrests, you could use the same instructions and simply remove the two left and right legs, then attach two arms at the top of the backrest and two legs at the bottom. You can also customize the size of this furniture to your needs. Just follow our measurements and you'll be able to create a custom chaise lounge that fits your space perfectly.
DIY Chaise Storage Lounge
DIY Chaise Storage Lounge is made from two rectangular boxes. To start making this chair, cut the piece for the box, assemble them and secure them with screws then cover each of the boxes with foam and fabric. The most difficult part of this project is to cut the box. You can use a jigsaw or a circular saw to cut the top and bottom pieces of each box. But you need to make sure that you have enough space between the two pieces so you can fit your hand in there. See the tutorial video carefully, you will be able to make your own lounge chair.
DIY Lounge Chair
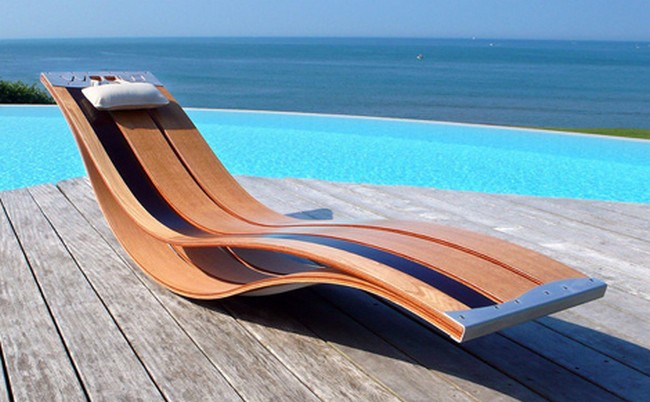
This is one of the easiest DIY projects to make. You don't have to be a professional carpenter in order to create your very own lounge chair. You can use different types of wood for this project, as well as other materials. For example, you can change the backrest and seat out for cushions if you want to go for a more modern look. This project is also really flexible so you can create different shaped chairs if you want.
Join 4-5 pieces of plywood together, stain it and bend it into a semi-circular form. Cut the pieces for the seat and the backrest from the curved plywood. Then move on to prepare the metallic stand. This will be used as a base for your new lounge chair. A metallic stand has strong support and is durable, making it ideal as a base for your new chair.
The color of your metallic stand will depend on which color you would like your chair to be. However, make sure it matches the wooden parts of your chair. If you are going for an elegant look, then black or brown metallic stands are good options; however, if you want a more playful look, then go for silver or gray metallic stands instead.
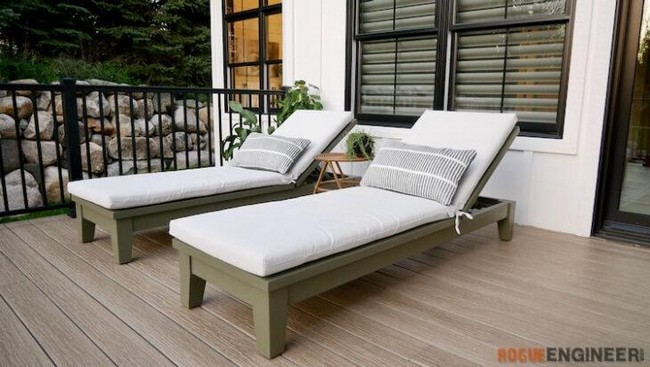
DIY Outdoor Lounge Chair
Getting the right outdoor lounge chair will change the way you spend your evenings. There is nothing like sitting outside in a nice lounge chair with a good book and a glass of lemonade. The quality of your outdoor lounge chair has a large impact on how much you enjoy your evenings. When you create your own outdoor lounge chair, you know that it is built to last and that it will comfortably support your weight. The best part is that when you make this chair yourself, you can build it exactly to fit your needs. This will ensure that it will be comfortable for years to come. Click the link below to get the plan for this outdoor lounge chair.
DIY Lounge Chair With Storage
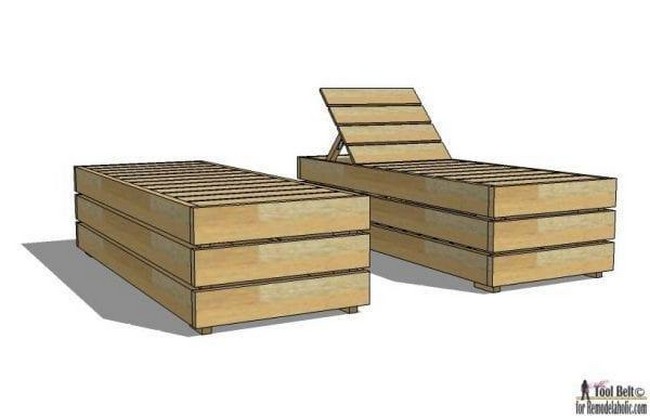
In this article, we will help you build a lounge chair with storage. This project can be completed in a day if you have all the materials and tools ready. The materials needed for this DIY lounge chair include plywood, boards, heavy strap hinges, screws, sandpaper, a miter saw, sealer, and a drill. Determine the length of the lounge and use the measurement to cut the pieces of wood. Then, assemble the base of the chair and attach braces to it for the seat. After this, attach a support to the back of the chair that will raise the backrest. This project is perfect for anyone with a small home or apartment. It takes less than a day to put together, uses materials you probably already have around the house, and can be customized based on your mood or style.
DIY Outdoor Chaise Lounge
If you love outdoor activities, you probably spend a lot of time lying in the sun to get a tan. However, lying on hard surfaces can be uncomfortable and expose your skin to harmful rays. You can create your own outdoor chaise lounge with items you already have around the house. This project is great for patio furniture because it can be disassembled and stored during the winter months. When spring rolls around, it will take only a few hours to reassemble your new chaise lounge.
The total cost of this project is about $20. You'll need basic tools to build this project, including nuts, bolts, and a power drill/screwdriver. The lumber you'll use for the frame is 1x4 boards of pine that cost about $2 each at any hardware store. If you don't have access to scrap wood from a friend or neighbor, buy enough lumber for the project from a home improvement center or lumberyard.
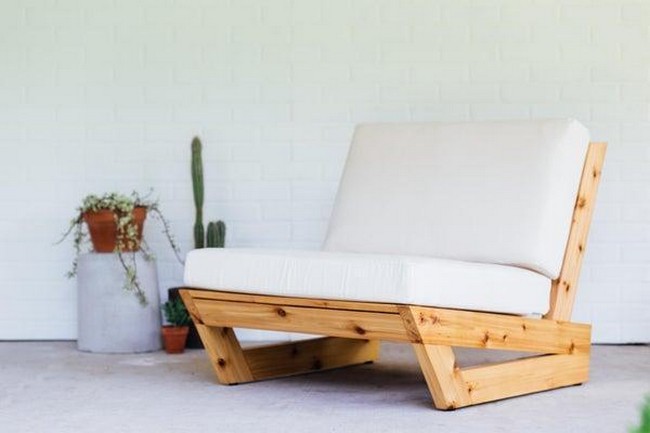
DIY Mid-Century Lounge Chair
A lounge chair is a great addition to your patio or deck. You can use it to sit and relax, read a book or have a cup of tea in the evening. As long as you have the right tools and materials, it's not hard to make one yourself. Tutorial on how to build your own mid-century lounge chair from scratch. This tutorial is suitable for beginner woodworkers and will lead you through all the steps required to complete this project including cutting the wood, sanding, assembling, and painting. This project uses standard tools and materials found at most hardware stores.
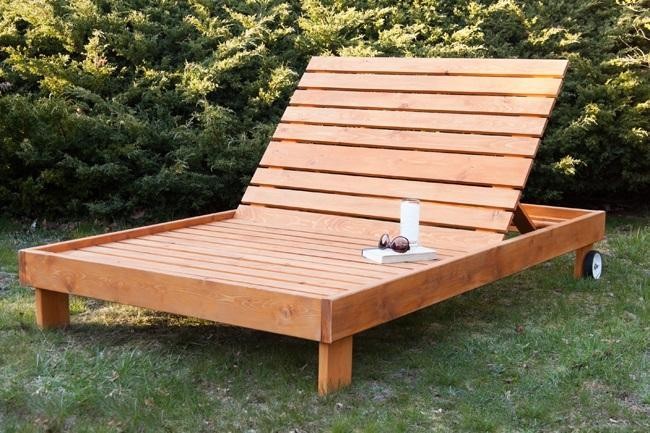
DIY Lounge Chair
Lounge chairs are a great way to relax, but if you prefer your relaxation to come with a little more exercise, try this DIY lounge chair. The structure of this lounge chair is very unique and somewhat complicated but once a template is ready. The structure is a human-shaped frame for the backrest and seats large wheels for the legs. It's made from plywood, which makes it strong and durable. The shape of the chair is also very unique with armrests, a high back, and a lower seat -- perfect for those who want to lay back and relax in style.
Cardboard Lounge Chair
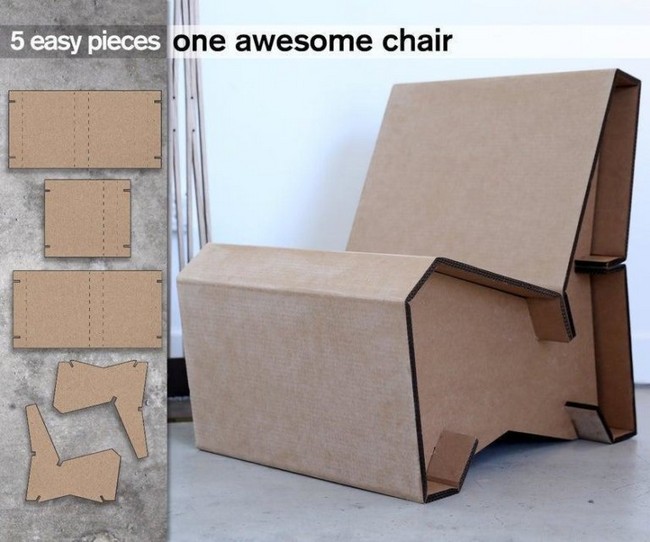
This lounge chair has a simple box shape, but it is made up of five pieces. The first piece is for the back. Follow the dimensions of the design and make sure the height is high enough for your comfort. The second piece is to be used for support. You can make it rectangular or square, depending on your preference. Just make sure that you have cut out enough room to fit your back in.
The third and fourth pieces are both legs. Take note that they are not exactly alike; one has a longer edge than the other. This is to make sure that they will fit perfectly together when you place them on top of each other. The final piece is an armrest, which you can make according to its dimensions in the design. To assemble these pieces, first, place the two legs together and then lock them with a bolt. On top of this, place another leg, and again lock them with a bolt. The back should be placed last and bolted at its two sides as well as at its bottom to lock it in place.
Chaise Lounge DIY
After cutting the pieces of wood needed to build the chaise lounge chair, it's time to structure them according to the plan. First, screw the front legs to the seat. Then, you can attach the back legs to the seat and trim it up with a jigsaw. The next step is attaching the front legs to the back and attaching them as well in order to have a stable structure. After this, attach the arms and take care of any gaps with wood putty.
After building the structure, you need to cut out fabric that will cover the lounge chair. The first fabric should be placed on the outside part of each leg and after that, you need to fill up any gaps on both sides with upholstery foam. By using upholstery fabric tape, you can cover any gaps between top fabric and foam. When all this is done, place the second layer of top fabric on top of it and finish off by making a decorative pattern or just a plain one.
DIY Outdoor Lounge
Many people have outdoor areas where they can place a chair and a small table, but it might be hard to find a product that matches your particular tastes. That's why it's best to consider making one yourself. Trying to find out how to build an outdoor lounge is easy if you know the basic steps that are needed for this type of project. As you'll see, it will not take long at all and when you're done you'll have a great piece of furniture that you can enjoy for years.
Of course, you can expect the materials to cost more than those for a plain chair and table, but it's still very affordable as long as you don't go overboard on the style. At least some of your materials should be recycled or re-purposed since that's always better for the environment. Once you get started on your project, there will be no stopping you once you see what an amazing job you did. You'll want to make more pieces of furniture in the future, like footstools or even an outdoor bar with stools. This is just the beginning of your success story!
DIY Lounge Chairs

This article will show you how to make a lounge chair, with a unique look and design. The idea came when the author was thinking about different ways of improving his office, to be more comfortable and practical. We have seen many DIY lounge chairs on the internet, but they looked like they might break easily or tip over. This is why we decided to make one myself, which would be sturdy and comfortable. The materials required to build this include piano hinges, sheets of plywood, drill, jigsaw, and screws. Cut the plywood into 2 pieces drill holes to the top of the plywood and join the two pieces together with piano hinges. This lounge chair has a simple design but it is very functional and it will surely enhance the appearance of any room in your home.
DIY Plywood Lounge Chair
Have you ever thought of making your own furniture? This plywood lounge chair tutorial will show you a simple and stylish DIY project that requires just some basic woodworking skills. To make this project you first need to cut the pieces for the frame and the dowels that are used for support. You can use a table saw instead of a miter saw if you prefer. These pieces will all be connected together with wood glue, screws, and clamps. Once all the pieces are assembled, you need to finish the wood by sanding it with an orbital sander. This will help you get rid of any splinters or rough edges that might catch your clothes or skin when sitting or laying on your lounge chair.
DIY Cardboard Lounge Chair

The cardboard lounge chair is made from thick cardboard, which is the perfect material for making a cozy chair. This kind of chair combines modern design with affordability and can be used anywhere in your home. Cardboard is quite sturdy and durable when it comes to making furniture pieces, and this lounge chair is totally worth it. The main reason why you should try it out is that it's easy on your pocket, and it won't cost you a fortune to make one. This lounge chair can also be a great addition to your kids' playroom.
All you need to do is get the right measurements of the cardboard and make sure that they're suitable for your purpose. You can use any cardboard available to make this chair easy, just as long as you measure properly so that it fits properly. You can use duct tape to keep everything together, and then cover the whole structure with vinyl so that it stays protected from any moisture or damage while also making it look more attractive.
Bamboo Chaise Lounge Chair DIY
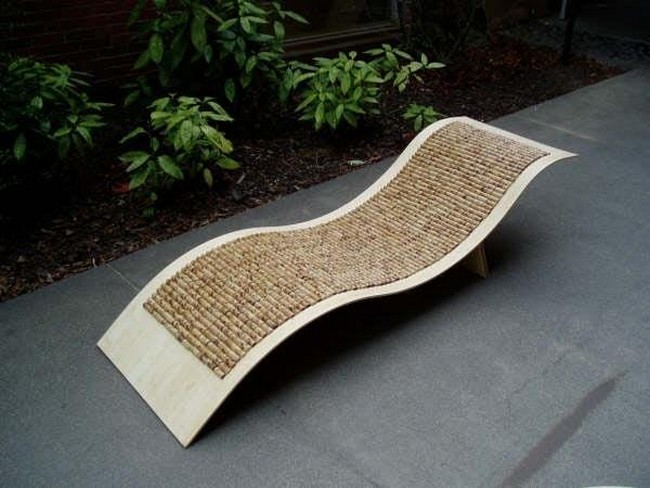
This is a DIY of an incredibly simple lounge chair, made from one piece of bamboo plywood. This is not only simple to make but it's also quite easy on the pocket. The design is inspired by the human body, which makes it look quite attractive as well as comfortable. We are going to show you how it's done using a few tools and easy steps. It might take a while but the results are going to be awesome. Let's get started!
DIY Zip Tie Lounge Chair
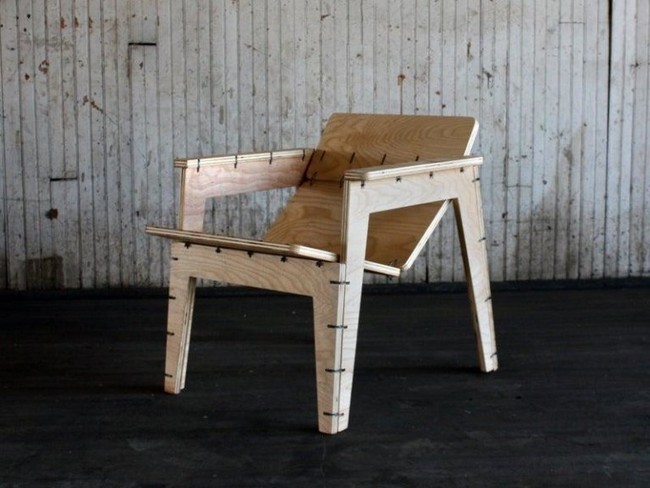
The Zip Tie Lounge Chair is a great example of how one can make any object using zip ties and bits of wood. Terence Guo, the designer of the chair, developed it as his final project at the University of California.
With this tutorial, you will learn how to create your own Zip Tie Lounge Chair. The tutorial is detailed and includes images and video clips that clearly show each step of the process. The chair is made from wood and zip ties. The zip ties are used as connectors by cutting their ends with scissors or by heating them with a torch and then bending them. This way they form hooks that fit perfectly into the holes drilled into the wood pieces. The finishing touches are done with red paint, which gives the chair a neat look and feel.
How To Build An Outdoor Lounge Chair
The first step is to cut the top, bottom, and side pieces. Each leg is made up of two long pieces of wood, which are joined together with a right-angle piece. The next step is to cut the pieces that form the armrests. The armrest is made up of a bottom piece and two long side pieces. Attach these to the back of the chair, making sure they are flush with the seat.
Next, cut the pieces for the backrest and attach them to the structure of the chair by drilling pilot holes and hammering in some screws. Attach the seat to the chair by screwing holes into it and securing it with small nails or screws. The final step is to attach the outside slats for your chair, which you can do by drilling pilot holes into them and hammering in some nails or using some screws.
See More: 13 Free DIY Chaise Lounge Plans
DIY Modern Outdoor Lounge Chair
A modern outdoor lounge chair is a great addition to any patio, balcony or garden. The shape of this lounge chair is somewhat complicated but once you get the design correctly you're good to go. Outline the shape on the floor then lay out the pieces of wood on the design. Glue them together and clamp them to dry, once they are dried cut out the shape and use that to cut the second shape. There are a few variations on these chairs, some have flat backs and some rounded backs. Some are painted and others are left natural. If you want a more rustic look, you can leave the wood unfinished or paint it with outdoor paint.
Find More DIY Inspiration
- DIY Dumbbell Rack Projects: Build your own DIY dumbbell rack with our step-by-step guides, perfect for home gyms or fitness centers. Discover customizable designs for space-saving & organized storage.
- DIY Outdoor Chair Plans: Discover our list of easy-to-follow DIY outdoor chair plans for your backyard or patio. Create comfortable, stylish seating with our step-by-step guides perfect for any skill level.
- DIY Deer Stand Plans: Elevate your hunting experience with these free DIY deer stand plans. Find detailed instructions for building sturdy, safe platforms to enhance your chances of success this season.
- DIY Rock Climbing Wall Plans: Create a thrilling play area with DIY rock climbing wall plans for kids. Easy-to-follow guides help you build safe, durable walls that will keep little adventurers entertained for hours.


