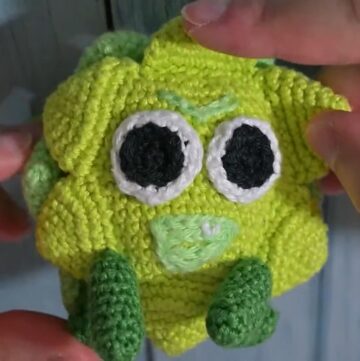
Add some handmade magic to your crafts with this charming crochet frog applique pattern, ideal for fun-inspired creativity anytime.
A delightful crochet pattern captures attention with its playful charm—a cute frog applique that adds a touch of fun and whimsy to everyday items. Perfect for personal touches, this design can enhance accessories like keychains or hair ties. With its versatile purpose and cheerful appearance, this frog applique combines practicality with a pleasant aesthetic, suitable for gifting or personal use.
Crochet Frog Applique Pattern

How to Crochet Frog Applique Free
The pattern involves crocheting a charming little frog, which can be used as a decorative accessory for hair ties or keychains. This creative and versatile design is fun to make and allows room for personalization. In the video, the creator also mentions adapting the frog to make a backpack design for Capybara amigurumi, which is available on their Patreon account. Follow this detailed guide to bring your own adorable frog creation to life!
Materials
To create this crochet frog, you will need the following materials:
- Yarn: Green yarn for the frog’s body, and optional additional colors for decoration (if desired).
- Crochet Hook: Select a size appropriate for your yarn (e.g., size 2.5mm or 3.0mm for tight and neat stitches).
- Stuffing Material: Fiberfill stuffing for shaping the frog (optional if making a flat design).
- Scissors: For working with yarn and trimming loose ends.
- Tapestry Needle: For sewing pieces together and weaving in loose ends.
- Stitch Marker (optional): To mark the start of rounds when working in continuous rounds.
Abbreviations of Stitches
It’s important to understand the abbreviations for crochet stitches used in this pattern:
- ch = Chain
- sc = Single Crochet
- inc = Increase (two single crochets in the same stitch)
- dec = Decrease (single crochet two stitches together)
- sl st = Slip Stitch
- hdc = Half Double Crochet (optional, depending on the design modifications)
Step-by-Step Pattern
Body of the Frog
- Create a Magic Ring: Begin with a magic ring and work your desired number of stitches to form a circular shape. Typically, people start with 6 single crochet stitches to form this base.
- Increase Rounds (Optional): Gradually increase the number of stitches in each round to widen the frog's body. For example:
- Round 1: Work 6 sc into the magic ring.
- Round 2: Work 2 sc into each stitch (total: 12).
- Round 3: Follow an inc pattern (e.g., 1 sc in the first stitch, 2 sc in the next).
- Base Body Shape: Continue in single crochet rounds to achieve the desired body size. You may opt to stop increasing after reaching your target diameter.

Eyes
Create the eyes using either white and black yarn (amigurumi style):
- Form a small magic ring and stitch a few sc stitches to create a flat circle.
- Optionally, add a contrasting color to the white and stitch over it with black to represent pupils.
- Attach the eyes to the frog’s head using a tapestry needle.

Legs
Work on the frog’s legs and toes:
- Crochet small cylindrical pieces for legs. Adjust the length depending on whether you want short or long legs.
- Add toe details by crocheting small extensions at the end of the legs.

Assembling
- Sew and attach the completed eyes and legs securely to the frog’s body.
- Use stuffing material to add shape to the frog’s body if you prefer a 3D amigurumi look.
Final Touches
- Embroider or crochet additional details like a smile or patterns on the body.

Conclusion
This simple frog crochet pattern offers flexibility for customizations. You can adapt it into different accessories, such as a hair tie decoration or keychain. Remember, the creator also mentions turning this frog into a backpack for Capybara amigurumi, allowing the design to pair beautifully with other amigurumi creations.