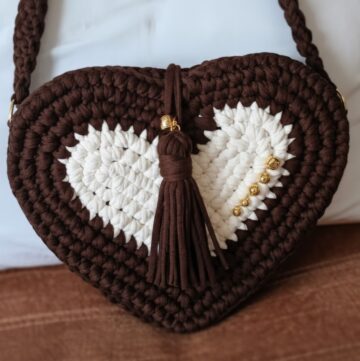
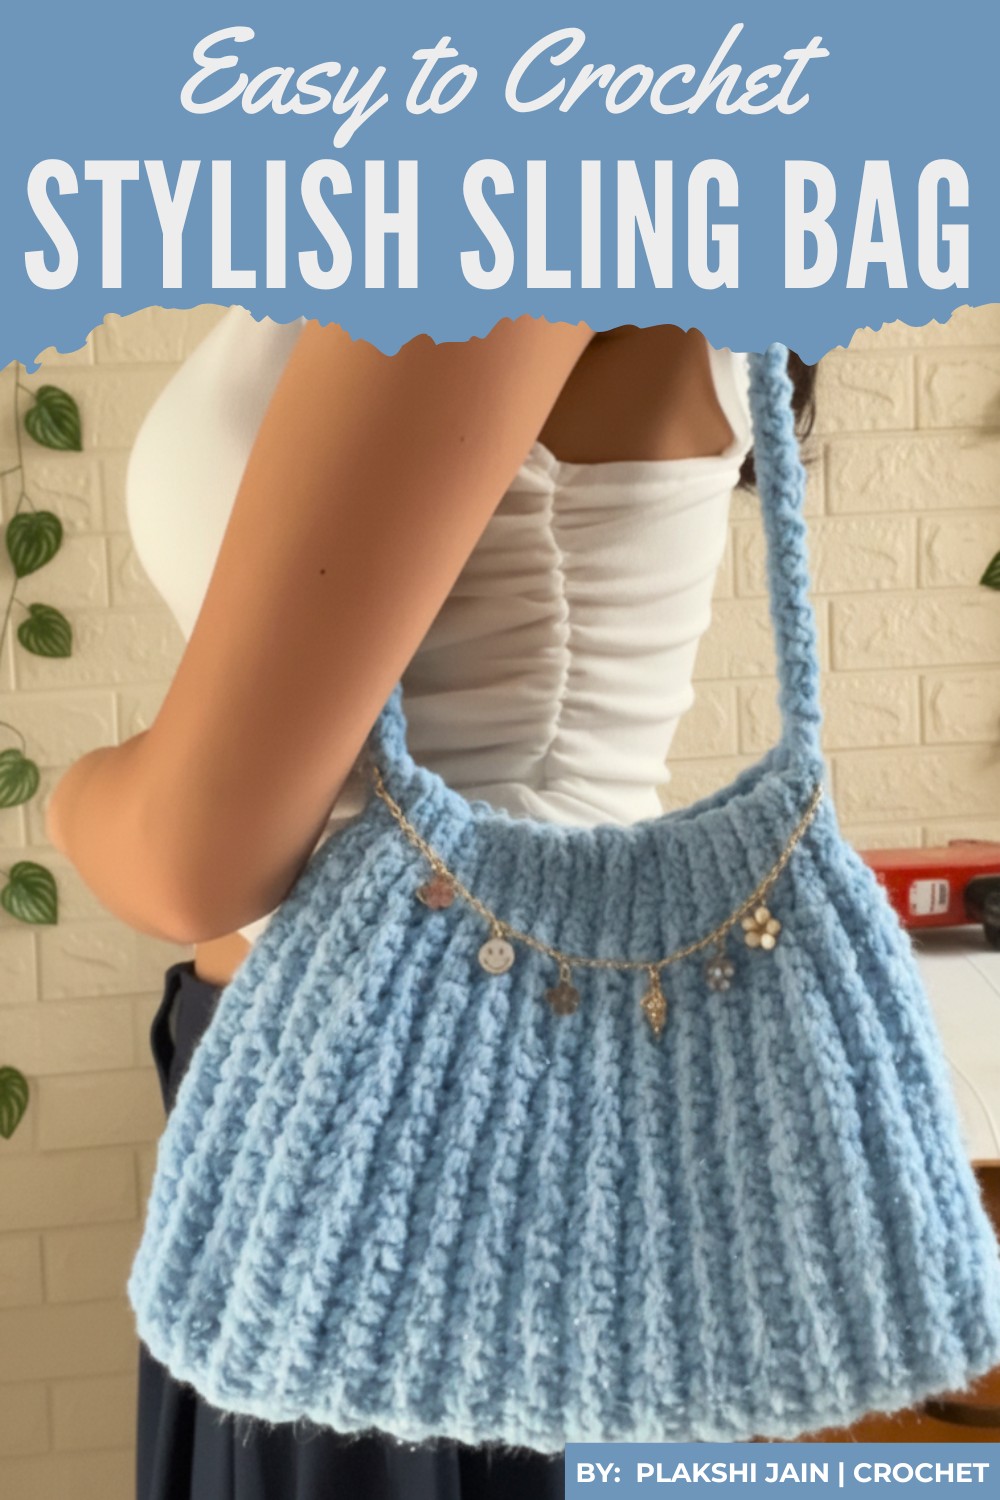
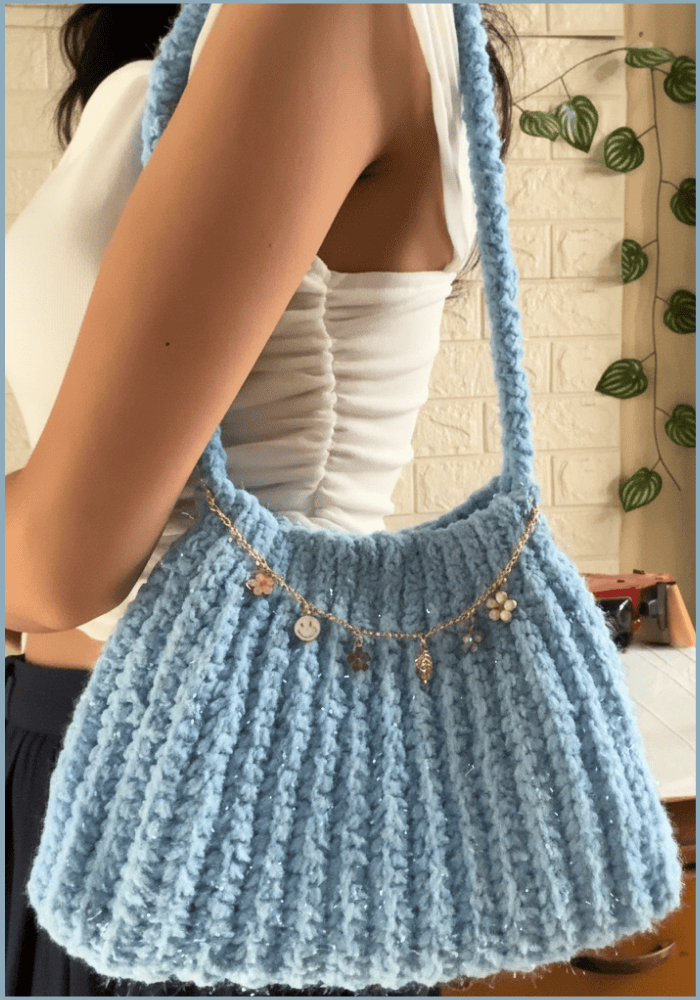
Carry your essentials in style with a lightweight and beautiful Crochet Sling Bag Pattern that adds charm to any outfit while being perfect for everyday use.
Everyone loves a stylish and handy bag that is perfect for carrying essentials. A crochet sling bag pattern brings together beauty and convenience, making it a unique and eye-catching accessory. These bags often have a trendy look, with colorful designs and soft, textured material that stands out.
Crochet Sling Bag Pattern That Look Totally Professional
Perfect for casual outings, shopping trips, or as a thoughtful handmade gift, it’s both practical and fashionable. The lightweight feel and convenient strap make it easy to carry. A crochet sling bag can match any outfit, adding charm and personality while keeping everything you need close at hand. It’s a must-have for all.
This pattern details how to create a stylish and functional shoulder bag using chunky yarn, complete with a strap and magnetic closure. Whether you’re experienced or new to crochet, this project combines simplicity with elegance for practical everyday use.
Materials
Main Supplies
- Yarn: Chunky yarn with a bit of glitter or sparkle for extra flair. Any medium or bulky-weight yarn (Size 5 or 6) will work.
- Crochet Hook: 4 mm crochet hook.
- Scissors: For cutting yarn neatly.
- Sewing Needle: Large-eye sewing or tapestry needle for sewing edges and weaving in ends.
- Magnetic Buttons: For the bag closure (2 pieces).
- Glue Gun (optional): To secure magnetic button placement.
Optional Supplies
- Measuring Tape: To adjust dimensions for custom sizes.
- Stitch Markers: To keep track of stitch placement if needed.
Skill Level
Beginner to Intermediate: Basic knowledge of chains (ch), slip stitches (sl st), single crochet (sc), and working in the back loops is required.
Abbreviations & Terminology
(All instructions use US crochet terminology.)
- ch – Chain
- sc – Single Crochet
- sl st – Slip Stitch
- sts – Stitches
Special Notes
- Customization: This bag is easily customizable. Adjust the chain length for the bag width or make more rounds for a larger bag.
- Back Loop Only: The design emphasizes using the back loops of stitches for a ribbed texture.
- Strap Length: Adjust the strap length by making additional or fewer chains.
Crochet Pattern Instructions
Bag Body
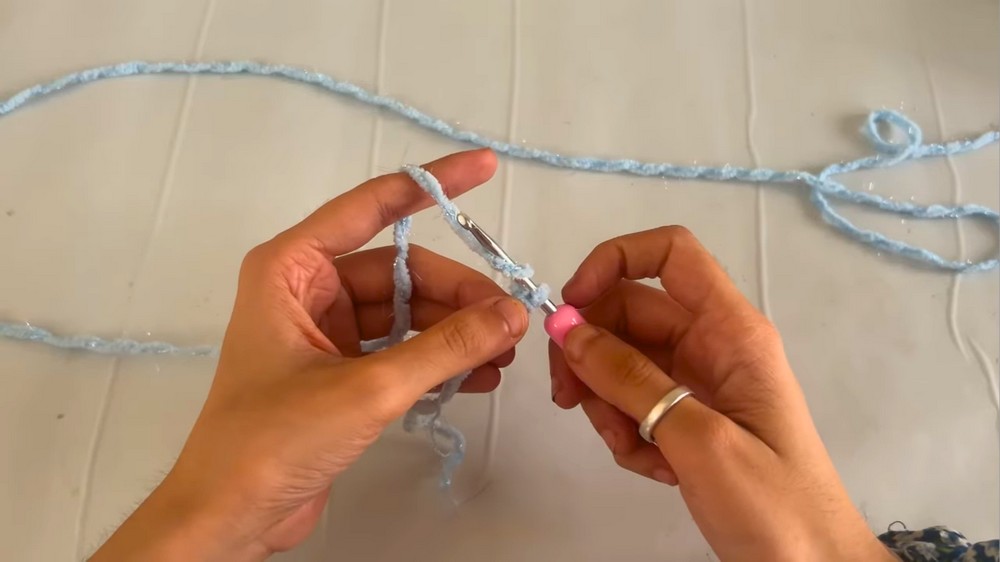
Step 1: Foundation Chain
- Make a slip knot on your 4 mm crochet hook.
- Chain 65 (ch 65) for the bag's base. If you want a wider or narrower bag, adjust the chain length accordingly.
Step 2: First Round
- Work the first row as follows:
- Slip stitch (sl st) into the first 8 stitches (8 sl st total).
- Work 48 single crochets (sc) across the next 48 chains.
- Slip stitch (sl st) into the last 8 stitches.
Step 3: Begin Second Round
- Chain 1 (ch 1) and flip your work.
- Work only in the back loop of each stitch for this and all future rows:
- Slip stitch (sl st) into the first 8 stitches (back loop only).
- Work 48 single crochets (sc) (back loop only).
- Slip stitch (sl st) into the last 8 stitches (back loop only).
Step 4: Repeat Rounds
- Continue repeating the rows outlined in Step 3 until you reach your desired bag height.
- For the sample size in the video, 34 rounds were worked.
- Adjust the number of rounds for a taller or shorter bag.

Sewing the Bag Sides
- Once you’ve completed all rows, fasten off and leave a long tail of yarn for sewing.
- Fold the bag in half, bringing the two slip stitch edges together to form the sides.
- Using the tapestry needle and the tail of yarn, sew along both edges (the two sides of the bag) to close them. Use a whip stitch or your preferred method.
- Fasten off and weave in the loose ends.
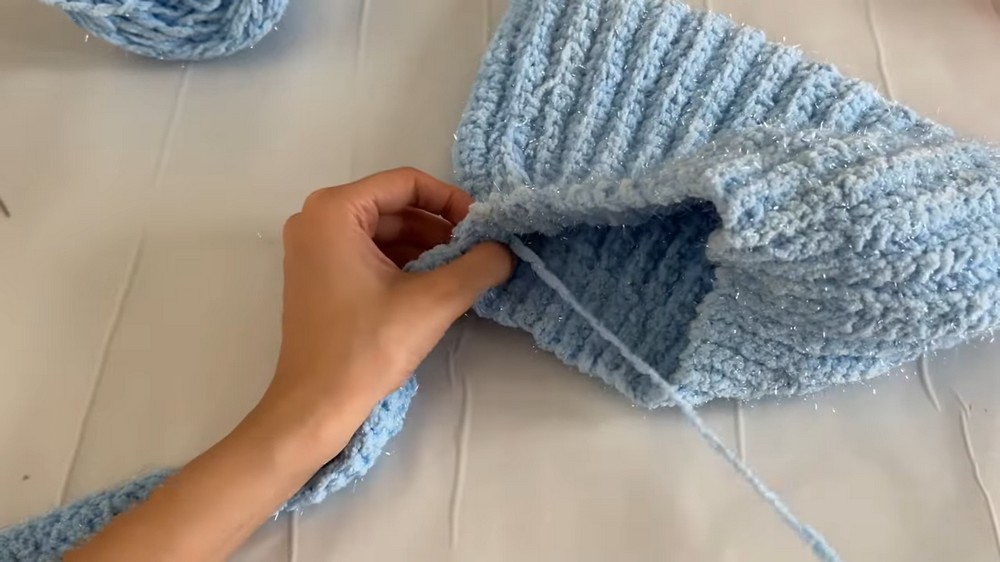
Tip: Make sure to align the ridged texture for a clean, professional finish.
Creating the Shoulder Strap
Step 1: Strap Foundation
- Make a slip knot on your hook.
- Chain to your desired strap length depending on personal preference and bag size.
- For the tutorial, 65 chains (ch 65) were used.
Step 2: Strap Rows
- Work 1 single crochet (sc) into each chain across.
- When you reach the end, chain 1, turn, and work another row of 1 single crochet into every stitch.
Repeat this process until the strap is as wide as you like. Two rows work well for a sturdy yet flexible strap.
Step 3: Attaching the Strap
- Leave a long yarn tail after completing the strap for sewing.
- Position the ends of the strap inside the bag edges, ensuring symmetry.
- Fold each end of the strap in half for durability and sew securely to the inside of the bag.
- Weave in or trim any loose ends.
Attaching the Magnetic Buttons
Step 1: Button Base
- Create a small crochet circle for each button using the chunky yarn:
- Start with a magic ring.
- Work 6 single crochets (sc) into the magic ring.
- Pull the ring tight and secure with a slip stitch.
- Fasten off the circle.
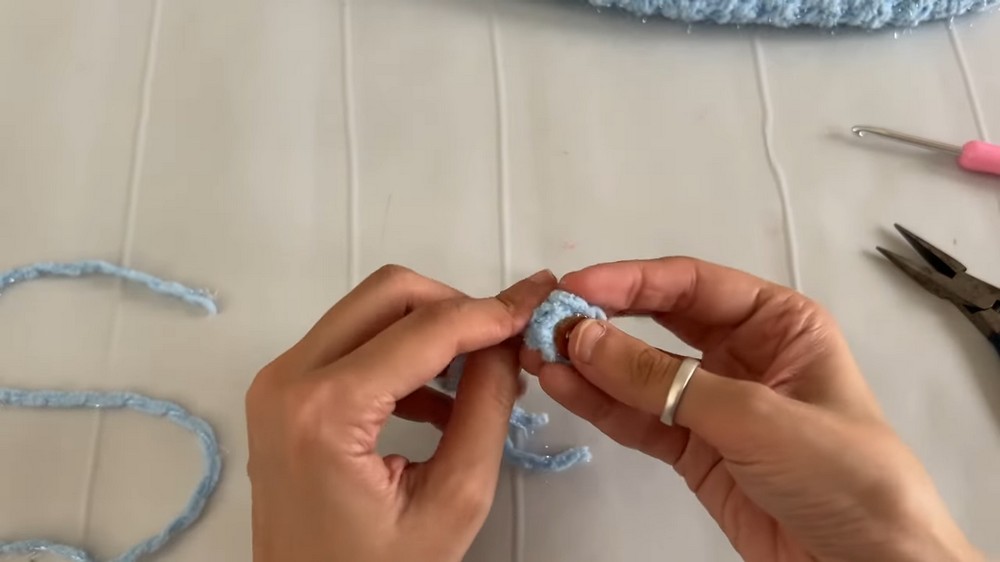
Step 2: Button Placement
- Insert the magnetic button into the crochet circle, ensuring it is snug.
- Secure the button inside the bag using a long yarn tail or fabric glue for extra hold.
- Attach the second magnetic button to the corresponding point on the opposite flap of the bag.
Final Touches
- Ensure all loose ends are woven in neatly.
- Straighten your stitches and block the bag if necessary for extra evenness.
Customization Ideas
Size Customization
- Wider Bag: Increase the foundation chain length beyond 65.
- Taller Bag: Add more than 34 rounds.
- Deeper Bag: Add width by increasing the middle single crochet count beyond 48.
Color Variations
- Experiment with color-blocking by changing the yarn color every 10 rounds.
- Use striped patterns with alternating colors every 2-4 rows for a fun, vibrant design.
- Add contrasting colors for the strap and edging for an eye-catching effect.
Conclusion
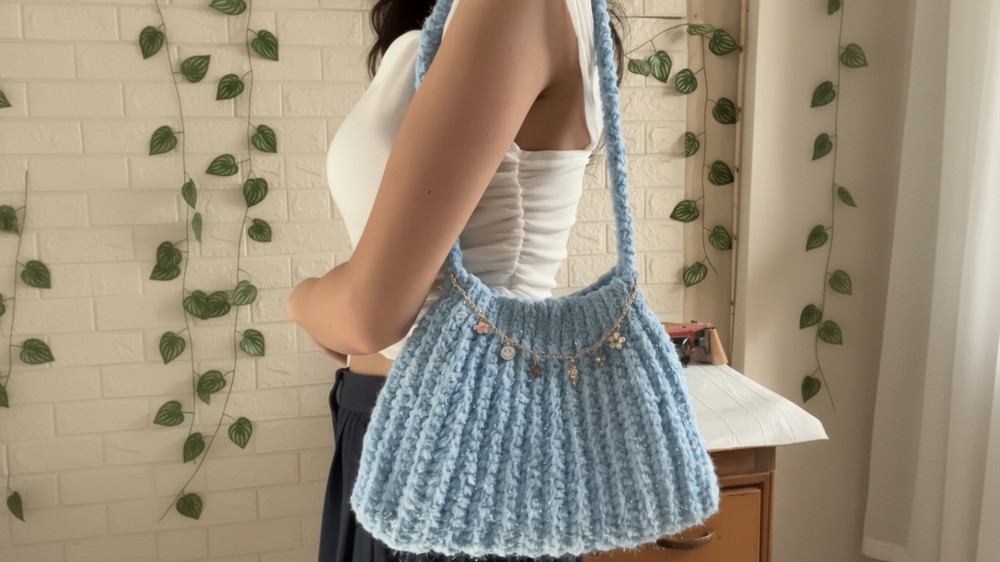
Congratulations! You’ve completed a practical and stylish chunky crochet shoulder bag complete with straps and a magnetic closure. This bag is versatile and can be customized for various sizes, colors, and embellishments. It’s perfect for casual outings, gifting, or as a functional accessory to complete any outfit.
Final Look
- A ribbed-texture bag with slip-stitched edges providing a sleek, elegant appearance.
- A sturdy strap attached securely for durability.
- Magnetic buttons for convenience and usability, adding a professional finish.
Tips for Success
- Even Stitches: Focus on keeping consistent tension throughout the project to maintain a neat, textured fabric.
- Test Fit the Strap: Before sewing it in, adjust the length by draping it on your shoulder to ensure comfort.
- Extra Durability: Sew straps and button areas securely to ensure the bag holds up well under regular use.