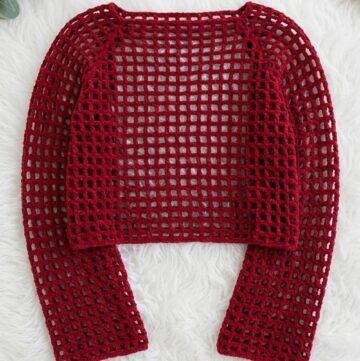
Add a playful twist to any outfit with this crochet mesh shrug pattern for girls that's a lightweight and elegant design that's perfect for stylish layering.
The Free Crochet Mesh Shrug Pattern stands out for its modern, breezy look and laid-back elegance. With its open, airy mesh design, this shrug instantly adds a fresh touch to any outfit. The eye-catching rows of open stitches give it a light texture that lets your clothing peek through, making the shrug feel as beautiful as it looks.
Stylish Mesh Shrug Crochet Pattern
Soft and relaxed, the mesh fabric drapes naturally over your shoulders and upper arms, creating a gentle silhouette that flatters every shape. The edges are simple, which keeps the overall style clean and effortless. Whether you prefer soft pastels or bold, cheerful colors, the mesh stitch will show off your chosen yarn beautifully, adding to the charm of your finished piece.
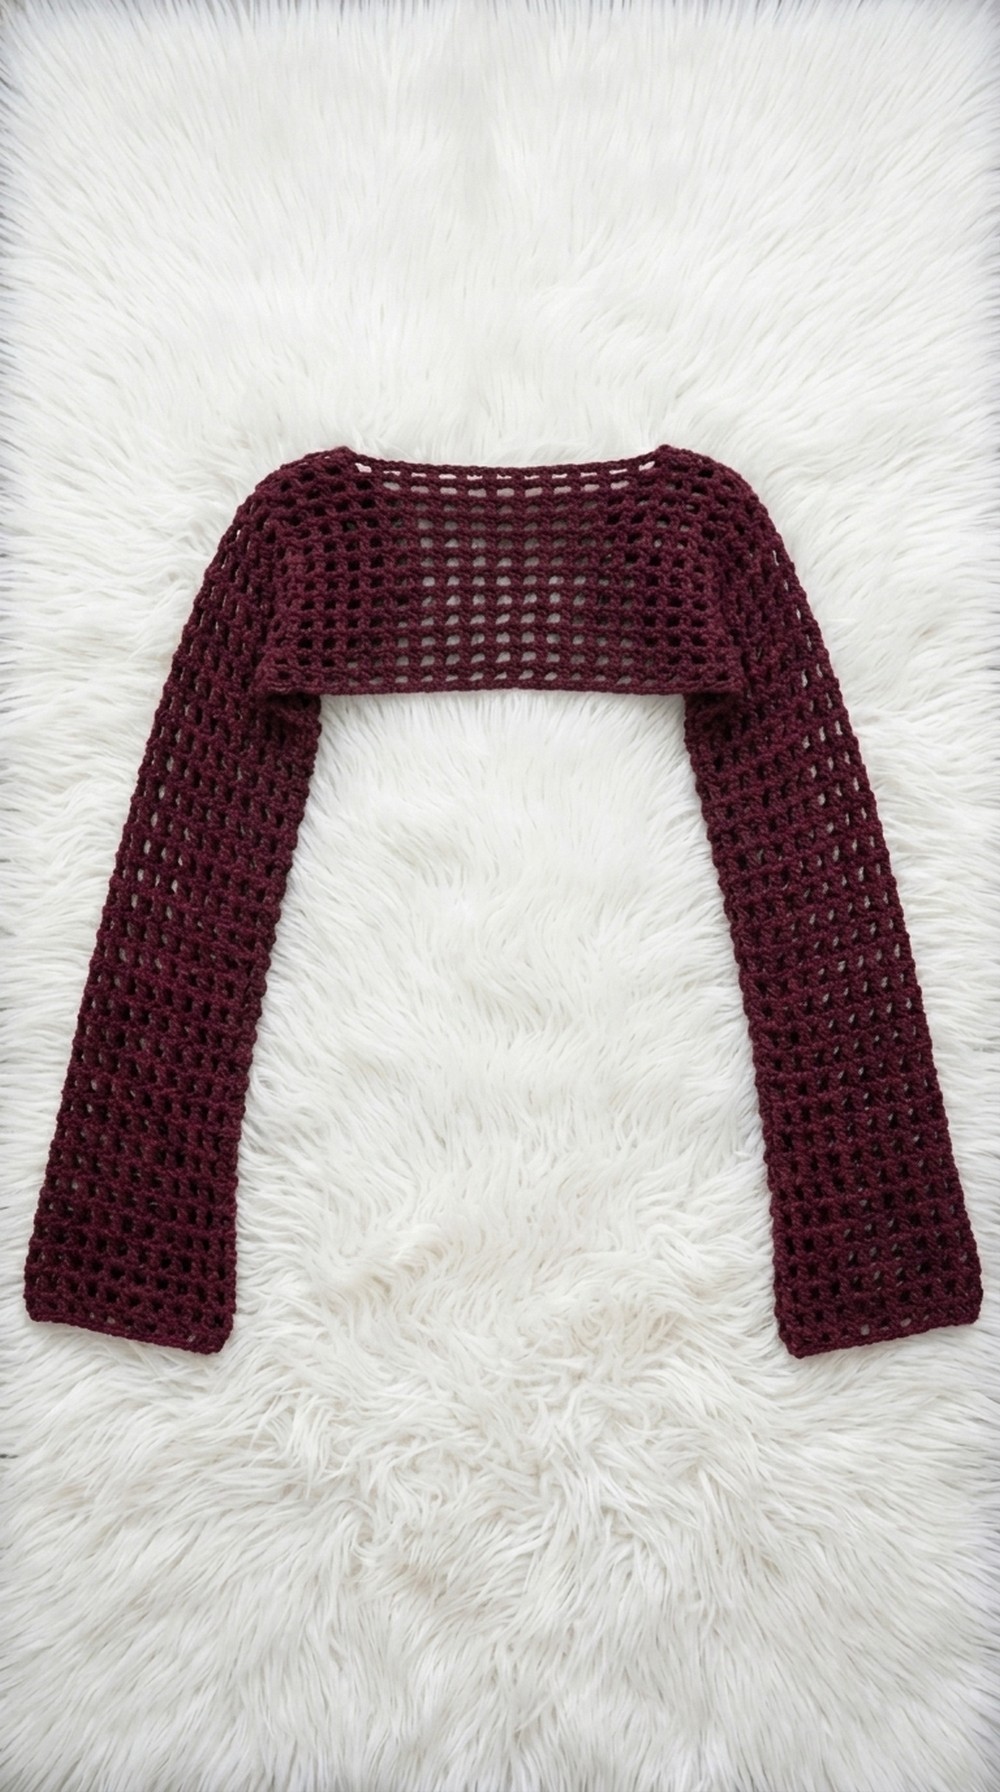
Versatile in style, this shrug is easy to pair with a sundress, a sleeveless top, or even a strappy evening dress. It brings a graceful layer of texture while keeping your arms lightly covered, making it great for spring and summer, or for layering indoors in any season.
The mesh pattern also brings out the beauty in simple stitches, so your handiwork really shines. This design-focused pattern is perfect for anyone who wants a garment that looks chic, handmade, and unique—all while being surprisingly simple to create.

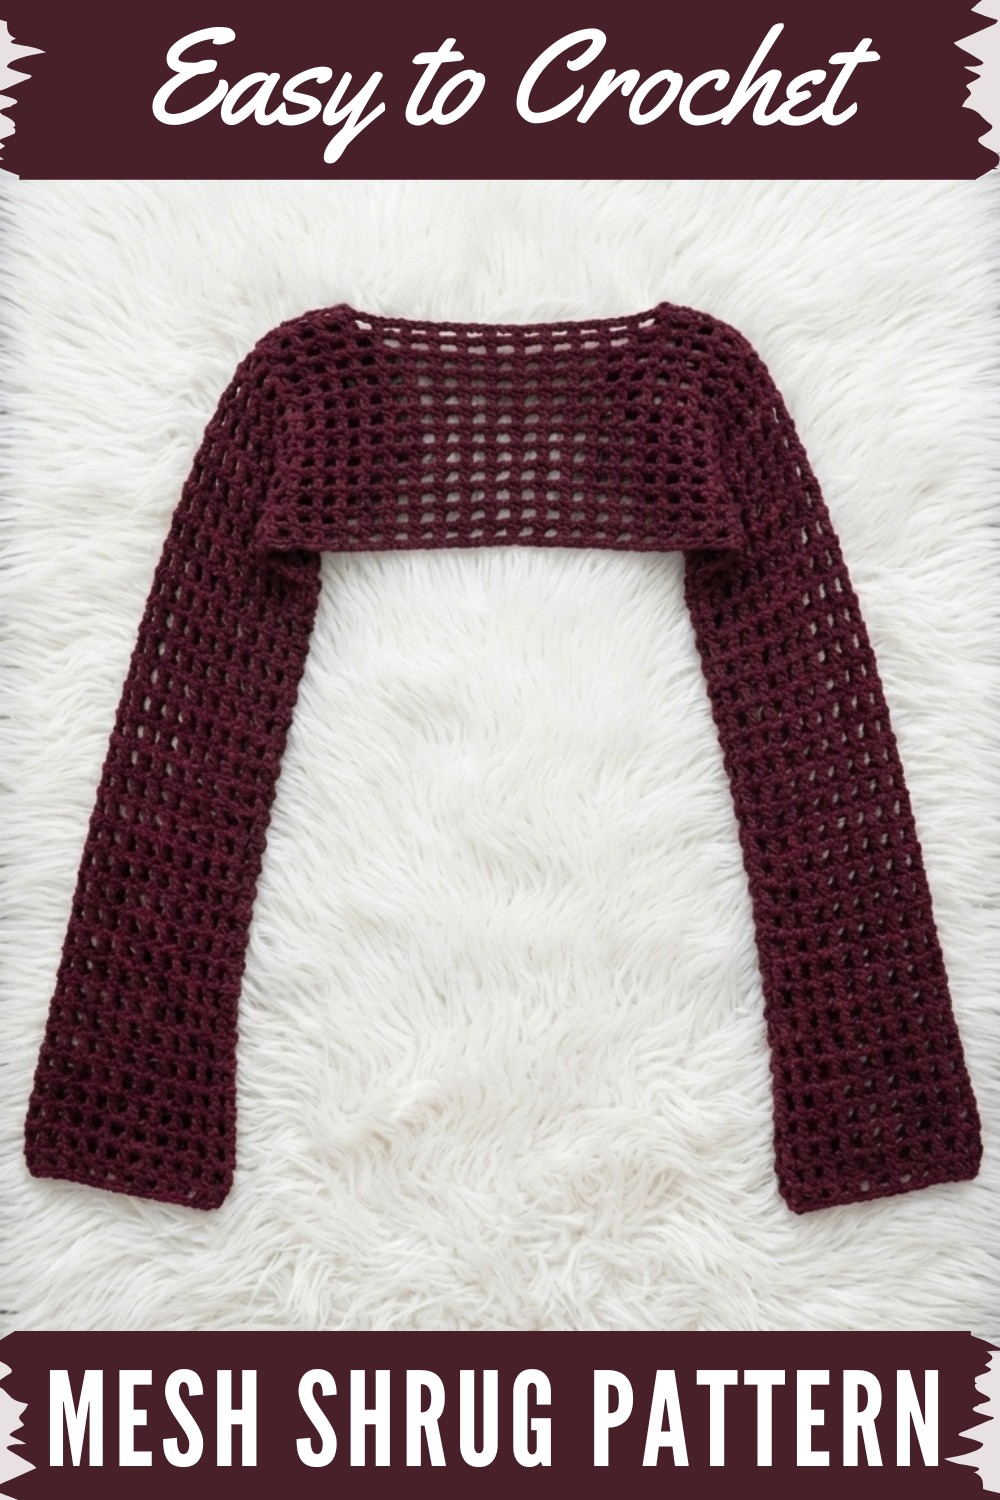
Simple Crochet Shrug Pattern (Beginner-Friendly)
Welcome! Today’s pattern guides you step-by-step as you crochet a trendy mesh shrug that fits a range of sizes—small, medium, large, and extra-large. Using basic stitches and straightforward techniques, this project offers an ideal first garment for new crocheters and a relaxing, quick-make pattern for experienced crafters. Chain, double crochet, and slip stitch are the foundation of this approachable, stylish design.
Skill Level & Terminology
Skill Level: Beginner
Terminology: US Crochet Terms
All instructions are written in easy-to-follow US terms. If you’ve mastered the chain and double crochet, you can complete this garment. Helpful for learning garment construction and mesh texture.
Materials & Tools
- Chunky acrylic yarn (Robin brand, or similar chunky weight; Kenyan brand used in sample)
- Crochet hook: 4.5 mm
- Tape measure (for accurate sizing)
- Scissors
- Tapestry needle (for weaving in ends)
- Stitch markers
Gauge
Gauge will vary by tension and yarn.
Gauge is approximately:
- Each mesh unit (dc, ch-2, skip 2) = 1 inch wide
- 72 chains (as in medium sample) measures approx. 20 inches, unstretched.
Tip: Always measure your chain to ensure proper fit, as different tensions may alter length.
Abbreviations List
| Abbreviation | Meaning |
|---|---|
| ch | chain |
| dc | double crochet |
| sl st | slip stitch |
| st(s) | stitch(es) |
| sp | space |
Special Stitch Instructions
- Double Crochet (dc): Yarn over, insert hook, yarn over, pull up a loop, yarn over, pull through 2 loops, yarn over, pull through remaining 2 loops.
- Mesh Stitch: Work a double crochet, ch 2, skip 2 chains (or spaces), and dc in the next. This creates an airy, lacy effect.
- Working Into Back Loop: For foundation chain, insert your hook into the single back loop (rather than the top two loops) for neater edges.
Finished Size
Width: Adjustable by chain count (shoulder-to-shoulder + 1–2 inches for ease)
Length: Adjustable by row count (usually 7–11" for cropped shrug, or more for longer style)
Sample: Medium, 20" wide x 7" long for the body panel, sleeves 20" long.
How to Start & Construction Overview
The shrug is made in three main sections:
- The mesh rectangle (body panel)
- The neck opening
- Identical back panel created from the neckline
- Two sleeves made in the round
Each part builds on simple mesh rows, joined with slip stitches for structure. The design is seamless, minimal sewing, and easily customisable.
Stitches Used: Chain (ch), Double Crochet (dc), Slip Stitch (sl st).
The Pattern Itself
1. Body Panel (Front Panel)
Step 1: Make a Foundation Chain
- Make a slip knot and insert your hook.
- Ch 72 (or as many as you need for your shoulder-to-shoulder measurement, in multiples of 3).
- Measure your chain. For medium, unstretched, 72 ch ≈ 20"; aim for your actual size + 2" for ease.

If you’re not reading patterns:
Make a long chain slightly wider than your shoulders, and check the measurement before proceeding.
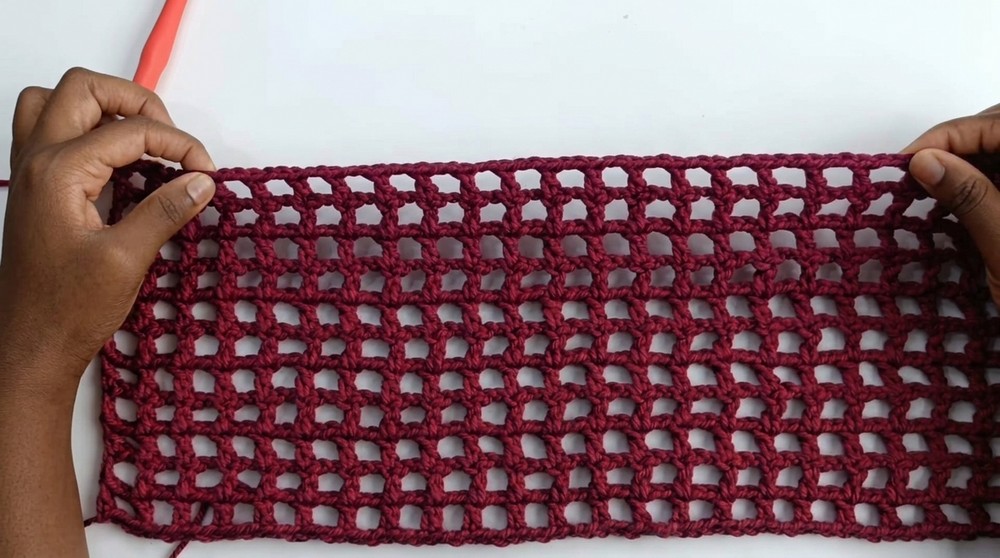
Step 2: Mesh Row (Row 1)
- For mesh effect, work into the back loop of the foundation chain.
- Count 6 ch from your hook, and work dc in the 6th ch (back loop).
- Ch 2, skip 2 ch, dc in next ch (back loop).
- Repeat: Ch 2, skip 2 ch, dc in next ch (back loop) across row.
- At the end, ch 2, skip 2, dc in last ch.
After this row, your work should measure slightly less than your chain, as some length is lost in the turning and skipped stitches.
Step 3: Repeat Mesh Rows
- Ch 5 (counts as dc + ch-2), turn.
- Dc in next dc from previous row.
- Ch 2, dc in next dc.
- Repeat: Ch 2, dc in next dc across.
- End mesh row: after last dc, ch 2, skip 2 ch, dc in third chain at end.
- Continue mesh pattern for 11 rows (sample size).
For non-pattern readers:
Repeat "ch 2, dc" in the mesh style, turning and chaining at the start of each row. Make as many rows as you want for the desired length.
2. Adding the Neck Opening
Step 1: Measure & Place Markers
- Decide neckline width (off-shoulder, boat neck, or standard).
- Use stitch markers to mark spaces for neck width on both sides.
For the sample shrug (medium), leave two mesh spaces on each side for neck.
Step 2: Create Back Panel Foundation
- To start next row (neckline row), ch 5, turn.
- Work mesh pattern (dc, ch 2, dc) up to first marker.
- At first marker, ch as many as you calculated (see: "space count × 3 minus 1").
- For sample: 19 spaces × 3 = 57, minus 1 = ch 56.
- Attach chain at second marker with dc to form the neckline bridge.
- Finish row in mesh pattern as before.
If not reading patterns:
Work up to your neck marker. Then chain across for the neck opening and connect with double crochet.
Step 3: Back Panel Rows
- Continue mesh rows (ch 5, turn, dc, ch 2, dc in next, repeat).
- Work into back loops of long chain across neckline for first row.
- Make number of rows equal to front panel (sample: 11 rows).
Non-pattern readers:
Work standard mesh rows, making sure back panel matches front panel in row count and mesh placement.
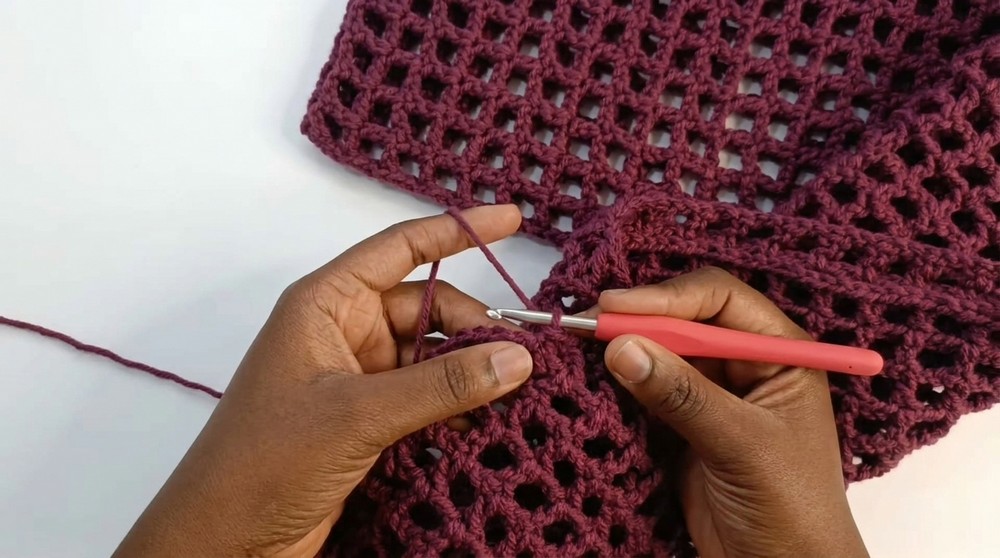
3. Assembly & Sleeve Construction
Step 1: Joining Panels for Sleeves
- Decide sleeve width: measure desired width (generally 5–6" for medium).
- Use markers to hold armhole placement (join panels together with slip stitches matching mesh spaces).
- To join, insert hook through corresponding mesh spaces, sl st, ch 2, sl st next mesh spaces. Join number of spaces based on desired fit.
If not reading patterns:
Slip stitch through mesh openings for armhole, matching both panels. Join as many spaces as you want your armhole to be.
Step 2: Sleeve Rows
- With joined armhole, ch 5, do NOT turn on the first round; work around the armhole.
- Mesh pattern: dc in next dc, ch 2, dc in next dc, repeat around sleeve.
- At end of round, sl st into third chain of initial ch 5.
- Next round: ch 5, turn. Repeat mesh pattern around.
- Work 20–22” length (or preferred sleeve length). For sample 29 rows for 20”.
Repeat sleeve pattern until you reach the length you want. Work second sleeve identically.
4. Finishing
- Fasten off all ends for both sleeves and panels.
- Use tapestry needle to weave in yarn tails neatly on wrong side.
- Flip garment right side out.
If not reading patterns:
After completing panels and sleeves, tie off all yarn and sew in ends. Turn the shrug to show the “good” side.
Conclusion
Congratulations! You’ve completed your simple crochet shrug, learning basic garment construction and mesh texture, all using chain, double crochet, and slip stitch. This pattern produces a stretchy, flowy garment with a modern look. Use different yarns, color blocks, or embellishments to personalize your shrug. With minor calculations and repeat patterns, it’s easily size-adjustable—just add or subtract mesh spaces for a perfect fit.
Pattern Summary for Quick Guidance
- Foundation Chain:
- ch to shoulder width + 2", in multiples of 3
- Measure for accuracy
- Mesh Rows:
- Row 1: dc in 6th ch (back loop), ch 2, skip 2, dc
- Row 2+: ch 5, turn, dc in dc, ch 2, dc in next dc
- Repeat for desired length (sample: 11 rows)
- Neckline:
- Placement with stitch markers
- ch for neck width (spaces × 3 – 1)
- dc to second marker
- Back Panel:
- Same mesh rows, row count matches front
- Sleeves:
- Join panels with sl st and ch 2 for armholes
- Mesh rows around sleeve, 20–22”/29 rows
- Finishing:
- Weave in yarn ends, flip to right side