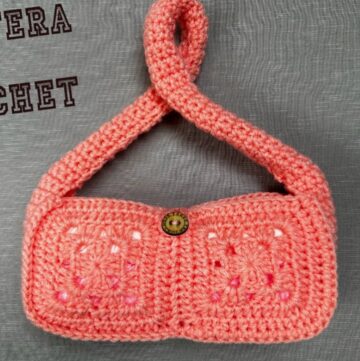
Create unforgettable fashion moments with this lovely crochet bag pattern that blends innovation, charm, and function in the most exquisite way.
This design offers a structured yet elegant piece that stands out with easy stitches and detailed craftsmanship. Its round body shape paired with an adjustable closure ensures convenience and securely holds everyday essentials. Designed with durability in mind, it remains compact while retaining a firm base – protecting its form even with heavier items inside. Whether out for errands or a casual outing, its versatility makes it an ideal accessory to complement any look.
Lovely Crochet Bag Pattern

How to Make Lovely Crochet Bag
This detailed step-by-step guide outlines the process of creating a stylish crochet handbag using double crochet and relief stitches. The pattern is designed to create a rigid and compact fabric while allowing for creativity in the overall structure and finishing touches. The end result is a beautiful and functional crochet bag made with your own hands—perfect for daily use or gifting. This pattern uses basic stitches, ensuring both beginner and intermediate crocheters can follow along.
Materials
- Yarn: #4 weight yarn (approximately 300 grams)
- Crochet Hook: 6.5 mm aluminum crochet hook
- Accessories:
- Wool needle (optional for securing and sewing cords or details)
- Rings (for attaching handles)
- Chain (approximately 1 meter, or you can crochet your own strap)
- Decorative beads (optional for the cord ends)
- Leather label (optional, to sew onto the bag for flair)
- Optional Reinforcement
- Thick cardboard or firm plastic circle for the base
Abbreviations of Stitches
- ch: Chain
- sl st: Slip stitch
- sc: Single crochet
- dc: Double crochet
- fp: Front post relief stitch (embossed stitch on the front)
- inc: Increase (two stitches in the same stitch)

Step-by-Step Pattern
1. Starting the Base of the Bag
- Begin with a magic circle: Using two strands of yarn, loop on your finger, pull out the strands, make a knot, and adjust tightly.
- Foundation Row: Lift 2 chains (these do not count as stitches). Crochet 12 double crochet (dc) into the magic ring. Tighten the stitches so the fabric is rigid yet workable.
- Add a slip stitch to join the round.
- Adjust the magic ring by pulling its tail to close the gap in the center tightly, forming a compact circle.

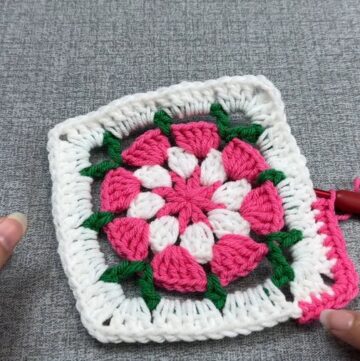
2. Forming the Pattern with Relief Stitches
- Start the next round by taking yarn in the air, inserting the hook in the first raised stitch from the front. Create a single crochet (sc) followed by a chain to lift the first stitch in relief (front post stitch).
- In the next stitch, make an increase (two stitches in one loop).
- Continue the sequence across:
- One relief stitch (fp)
- One dc
- One increase
- One fp relief stitch
- Repeat until reaching the end of the round.
3. Expanding the Base
Every new round increases the base size:
- In subsequent rows, increase the count of dc between increase stitches (e.g. Row 3: one dc, increase, one dc; Row 4: two dc, increase, one dc; Row 5: three dc, increase, one dc).
- Maintain the six relief stitches throughout each round.
- At the end of every round, check that the sections between relief areas have the same number of stitches for uniformity.
Pro Tip: Ensure precise stitch count at the end of every row. Missing or excess stitches will disrupt the symmetry of the bag. Stretch and shape the fabric as needed after every few rows.
4. Completing the Base
Stop increasing once the base reaches the desired diameter (approximately 24 cm wide). Begin working on the body of the bag.

5. Stopping Increases for the Bag Body
From this point onward, do not make any increases or decreases.
- Maintain the same number of stitches from the base.
- Continue crocheting point by point with 13 stitches, relief stitch, and another 13 stitches. Repeat this process for all the rows.
To ensure consistency, count the stitches in each section between relief stitches after every row. Repeat until the bag reaches the height you want (approximately 30 cm tall for this pattern).
6. Reinforcing the Base (optional)
- Cut a circular piece of thick cardboard or plastic (the same size as the bag’s base, ~24 cm diameter).
- Place the circle inside the base. This reinforcement helps maintain the shape and provide a firm bottom for the bag, especially when carrying heavy items.
7. Creating the Closure Cord
- Use two strands of thread together and make a knot.
- Start by chaining nine (9 ch).
- Join the chain into a closed loop using a sl st.
- Make sc stitches around the loop.
- Complete a total of three rounds or more (depending on your preference for thickness).
- Cut the thread with about 30 cm remaining for sewing.
- Place the cord inside the stitches of the bag's opening, alternating over and under every few stitches.

Optional: Add decorative beads to the ends of the cord and secure with a knot.
8. Attaching the Handle
- Place attachment rings at the sides of the bag.
- Use 3 points to secure them to thick areas of the bag's edge to ensure that it holds weight without pulling or stretching.
- Attach pre-made chain handle using ring clasps or make your own crochet cord strap.

9. Adding Final Touches (Optional)
- Sew a leather label with small stitching on the front corner for an extra decorative element. Ensure the label does not interfere with the bag’s usability.
- Hide any loose threads and secure the inner seams using the wool needle.
Conclusion
Congratulations! Your intricately crocheted bag is ready for use. With every stitch, you’ve created a functional and beautiful accessory, perfect for adding a handmade touch to your daily fashion. The relief stitches have added stylish details, while the reinforced base ensures durability. You can also make personal adjustments like selecting different colors, sizes, or decorative elements for a unique finish.