Celebrate your creativity with a crochet twisted top featuring gorgeous peplum ruffles, braided ties, and lightweight yarn perfect for chic and casual outfits.
A soft, stylish top with twisted details and an effortlessly elegant look can be the perfect addition to any wardrobe. The "Free Crochet Twisted Top Pattern" uses simple techniques like single and double crochet stitches to bring this piece to life, making it easy for beginners and advanced crocheters alike. Starting with accurate measurements from underarm to cleavage, the process is tailored to fit comfortably for medium sizes and can easily be adjusted for other sizes.
Twisted Top Crochet Free Pattern for a Flattering Fit
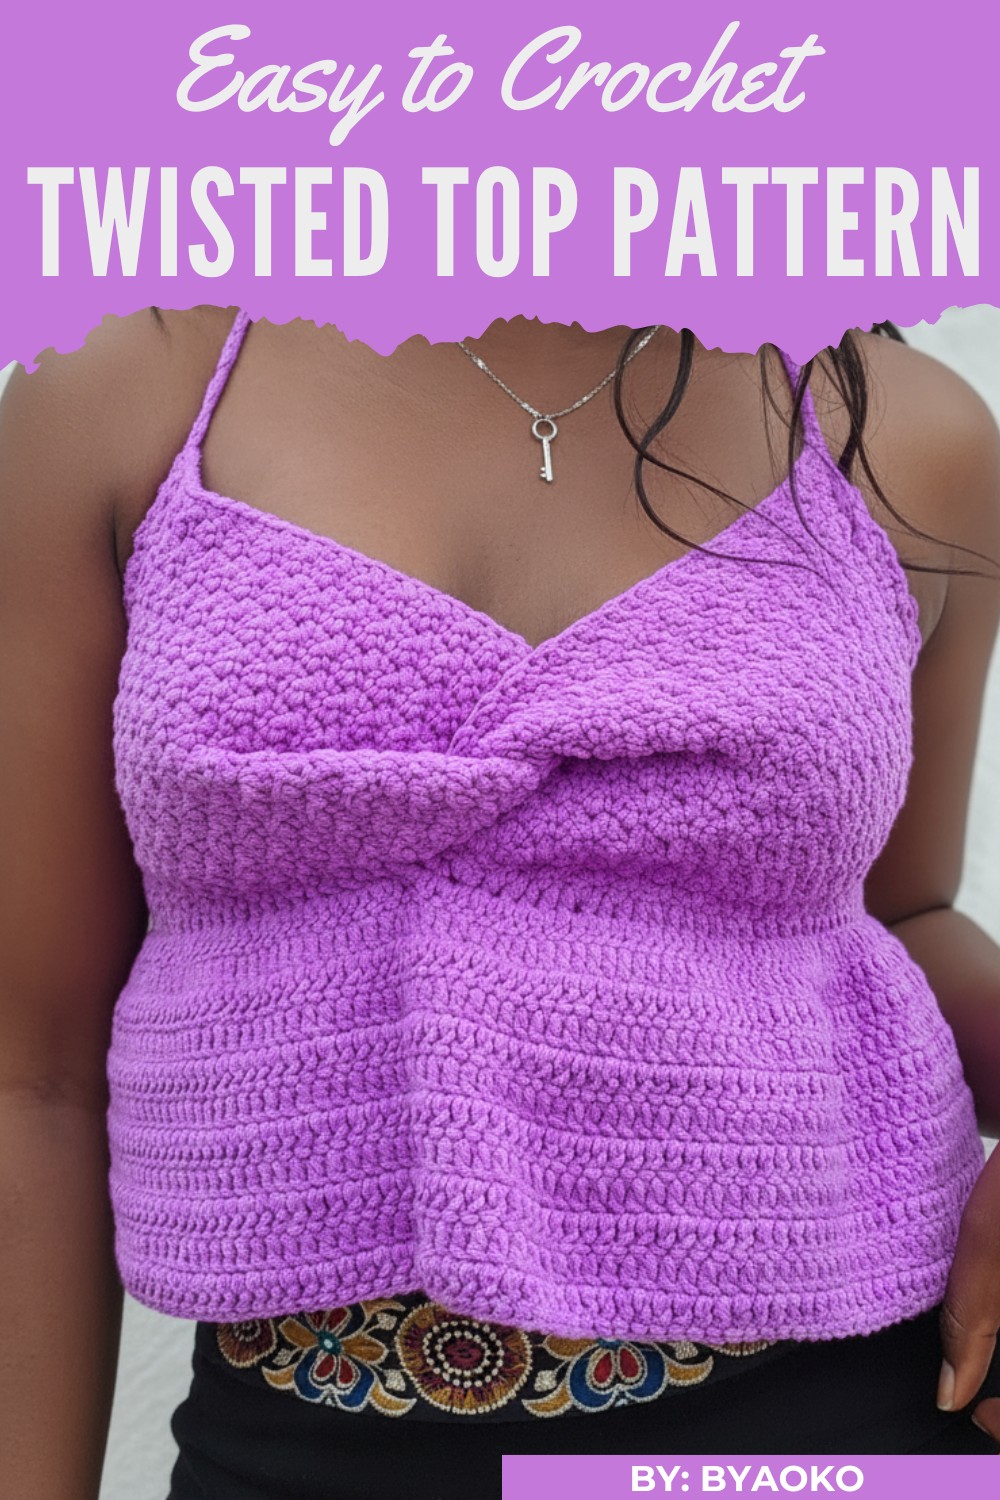
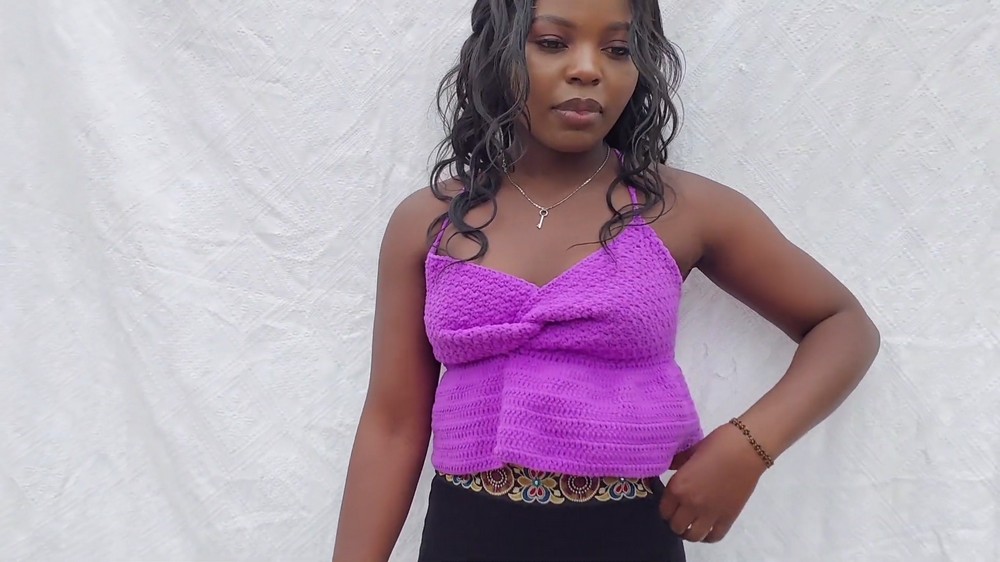
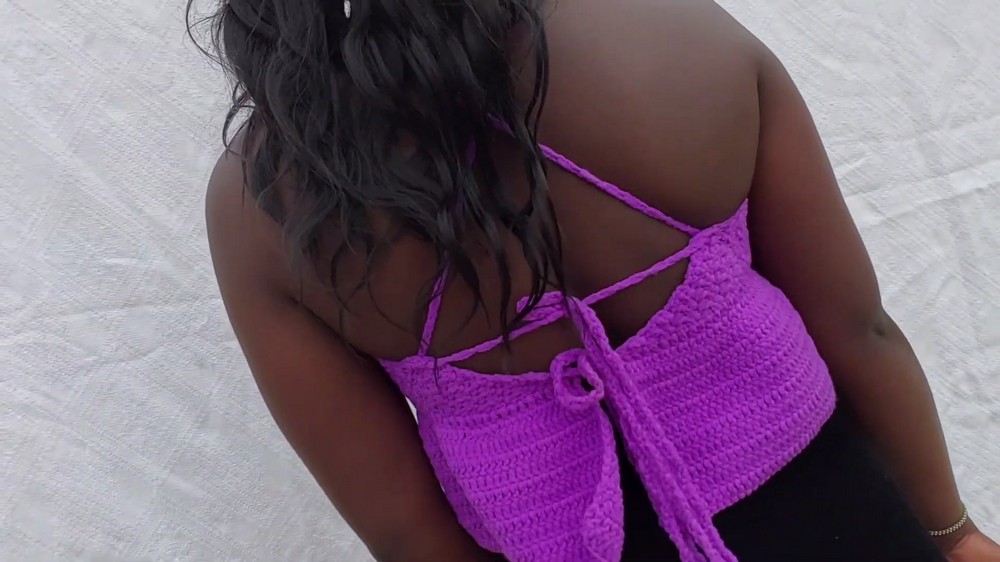
The twisted top stands out with its braided straps that tie gracefully at the back, creating a secure yet fashionable fit. The peplum-inspired ruffles around the waist give it a feminine and flattering shape, while the soft texture adds to its charm. Whether paired with jeans for a casual day out or dressed up for a special occasion, this top proves versatile and stylish.
Twisted Peplum Crochet Top Pattern
Made with 200 grams of medium-weight yarn and a 3.5mm hook, it’s lightweight yet sturdy, designed to last through seasons. The pattern highlights every step, including shaping and decreasing, which ensures a professional finish without complications. Its beauty, combined with functionality, makes it ideal for warm weather, offering style and comfort all in one.
Skill Level
- Intermediate to Advanced
This design is straightforward but requires attention to detail, particularly during the decreasing and assembly stages.
Materials List
- Yarn:
- 200 grams, 560 meters of medium-weight (Worsted/Category 4) yarn.
- Suggested yarn: Any soft acrylic, cotton blend, or lightweight medium yarn.
- Crochet Hook: 3.5 mm (US E-4).
- Other Tools:
- Measuring tape.
- Darning needle for sewing and weaving in ends.
- Scissors.
Optional:
- Stitch markers to keep track of rows or critical stitches.
Key Abbreviations (US Terminology)
| Abbreviation | Meaning |
|---|---|
| ch | chain |
| st | stitch |
| SC | single crochet |
| DC | double crochet |
| rep | repeat |
| dec | decrease |
Special Notes
- Ensure you maintain loose tension throughout to achieve proper drape in the peplum design.
- The pattern alternates between SC and DC stitches. Pay attention to placement (single crochet into double crochet of the previous row, and vice versa) to retain the texture.
- Customize length, width, or fit based on your measurements — the pattern is easily adjusted.
- The peplum effect is created with slight increases.
Finished Measurements
- The top is designed for a medium-size body (US size 6–8).
Customization:
- Bust coverage: Measured from the underarm to the cleavage midpoint.
- Waist: Adjust based on your personal waist circumference.
The Twisted Peplum Crochet Top Pattern
1. Start with the Bra Cups
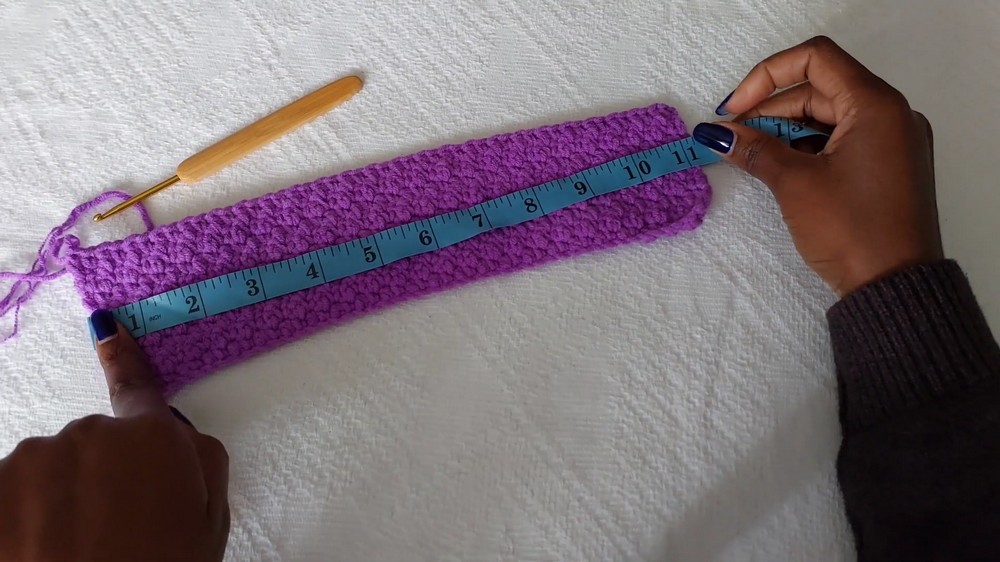
- Measure your cup length: From your underarm, over your bust, to the mid-cleavage point.
- For a size medium: 10 inches is recommended.
- Foundation Chain: Start with a multiple of 2 + 1 chains to fit your measurement.
- Example: 49 chains.
- Row 1:
- In the second chain from the hook, work 1 SC.
- Alternate between:
- SC in 1 chain, DC in the next chain.
- Continue alternating SC and DC across the row.
- End the row with 1 DC.
- Row 2: Chain 1, turn.
- Begin with a SC in the first stitch.
- Work SC into previous row’s DC, and DC into previous row’s SC.
- Alternate SC and DC across, ensuring you end with DC each row.
- Repeat the alternating SC/DC rows until the cup height from underarm to the cleavage measures 3 inches.
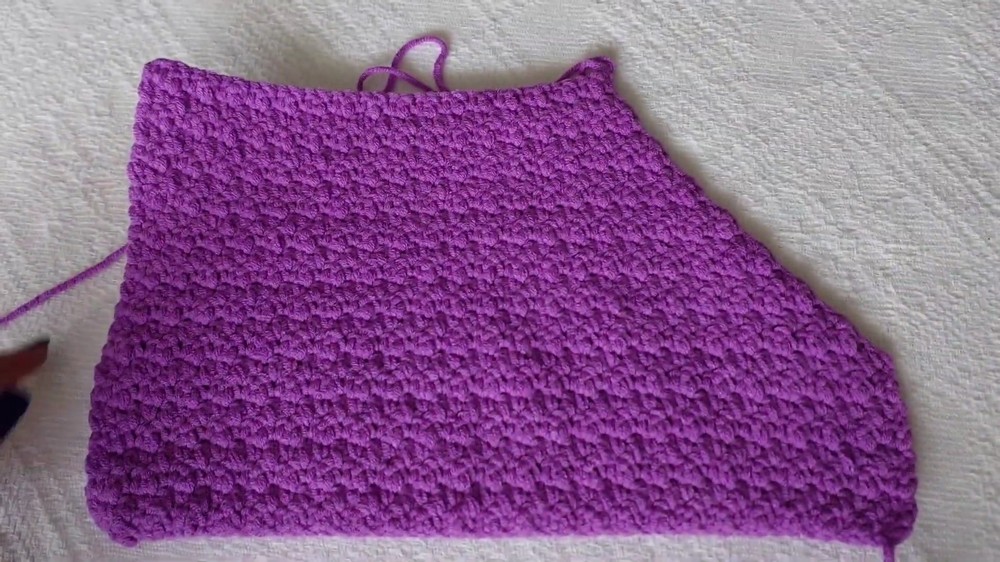
2. Decrease for the Bra Cup Shape
With one side of the bra cup decreasing (for shaping) while the other side remains straight:
- At the end of a row:
- Skip the last stitch (instead of working into it). Chain 1, turn.
- Work the next row by skipping the first stitch on the new row as well.
- Continue this decrease pattern, ensuring that:
- Where you have DC, place SC. Where you have SC, place DC.
- Stop decreasing when the cup reaches the desired shape and size for your body.
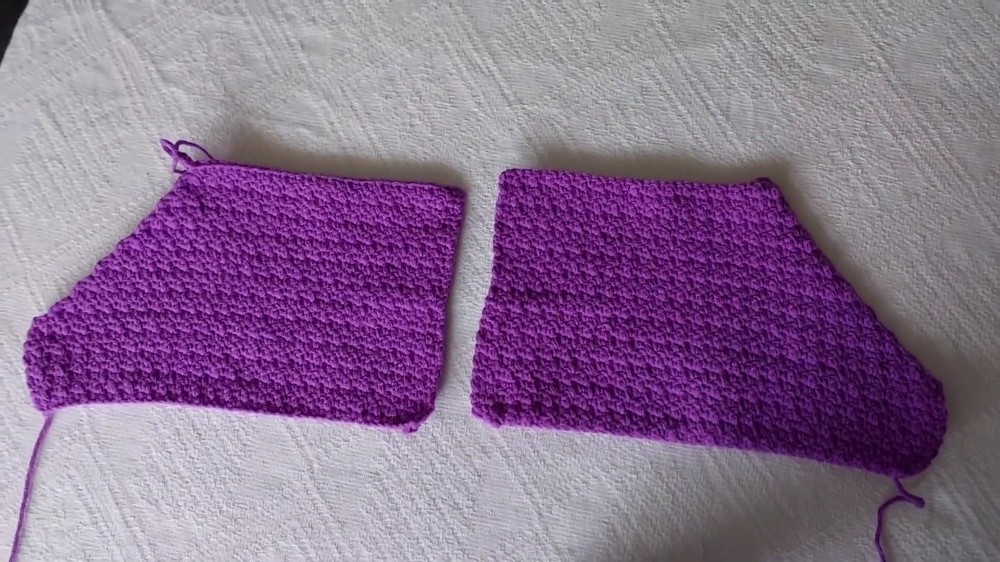
3. Create the Second Bra Cup
- Work an identical bra cup using the same method.
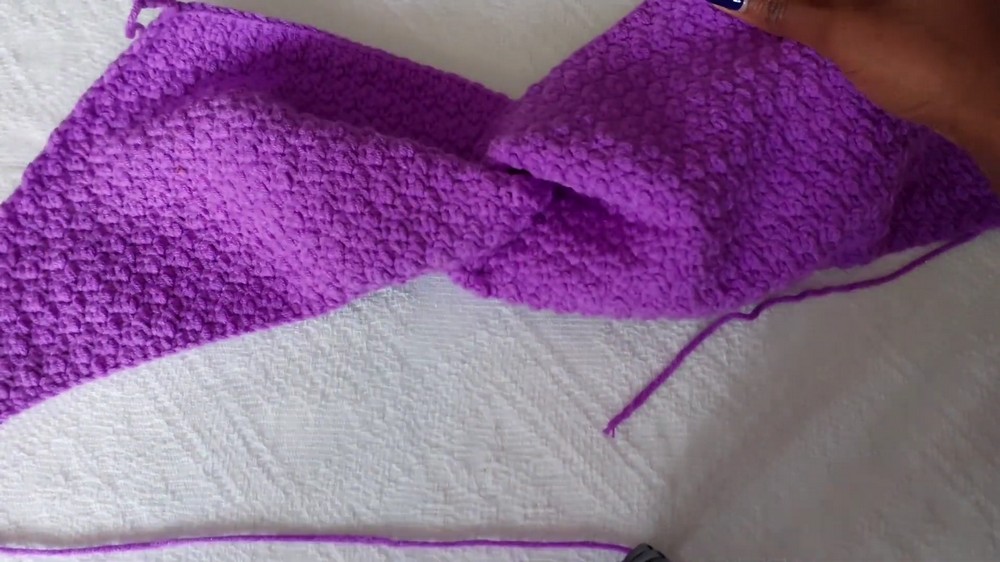
4. Combine the Two Cups
- Flip one cup upside down so the points face in opposite directions.
- Align the edges of one cup to the centerline of the other cup.
- Overlap the two cups as shown in the video description:
- The top edges (strapless ends) meet at the same level, but the cups twist at the center.
- Use a darning needle to sew:
- The overlapping central area together.
5. Create the Side Panels
Measure half of your waist circumference to determine the next section:
- Attach yarn to the lower edge of the assembled bra cups.
- Work alternating SC and DC rows:
- Repeat the SC/DC pattern, as before — decreasing only one side of the panel for shaping.
- For the adjustment straps (optional):
- Work a long chain or a double crochet chain for a more durable strap.
- Attach at the base of the lower panels.
6. Add the Peplum
- Attach yarn to the bottom edge of the joined bra cups and side panels.
- Work 1 DC into each stitch around.
- Join the row with a slip stitch, ch 2, and turn.
- Increase for Peplum:
- Work 1 DC in the first stitch, 2 DC in the next stitch.
- Alternate between:
- 1 DC in one stitch, 2 DC in the next stitch across the row.
- Subsequent Rows:
- Continue working double crochet rows without increases to create a subtle peplum flare.
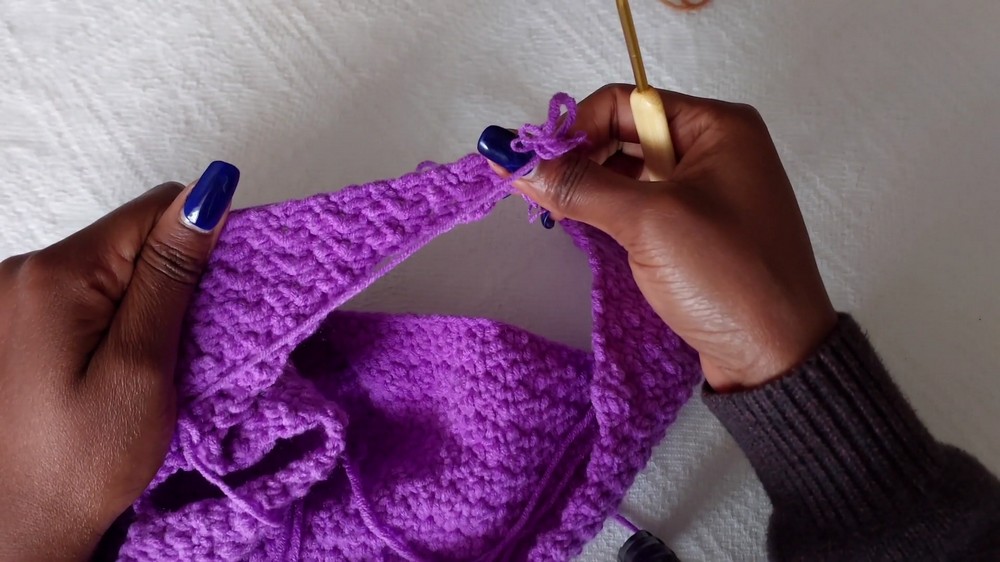
7. Add the Straps
- For durable straps:
- Work rows of double crochet into a chain, creating straps long enough to crisscross or tie at the back.
- Recommended Length: Straps should comfortably extend across your entire back.
- Attach straps to the top corners of the cups.
8. Final Touches
- Weave in all ends using the darning needle.
- Block the finished top gently to ensure it fits and drapes well.
- Adjust strap placements as needed to ensure a snug and comfortable fit.
Tips and Recommendations
- Customizing Fit: Take detailed measurements of your bust, waist, and underarm-to-cleavage distance for the most accurate sizing and fit.
- Avoid Over-Decreasing: Decrease slowly and uniformly to avoid distorting the shape of the cups or the body panels.
- Peplum Ruffle Options: Add more increases for a fuller, ruffled peplum effect or reduce increases for a subtle flare.
Conclusion
The Twisted Peplum Crochet Top is a versatile and stylish piece that is both flattering and comfortable. This project is perfect for intermediate to advanced crocheters who enjoy creating intricately designed yet wearable garments. The alternating SC/DC pattern adds texture, while the twisted design creates a unique aesthetic.

Pattern Corrections
- If your stitch count or pattern seems inconsistent, recheck the SC/DC alternation. Each row must flow seamlessly into the next.
Final Look
After weaving in the ends and blocking, your top will showcase soft ruffles, a beautiful twisted centerpiece, and a secure yet elegant fit. This creation can be paired with jeans, skirts, or shorts for a chic summer outfit!