This list is a great resource for parents who want to spend quality time with their children with these quick and easy crafts to make. These fun activities can be made in under 30 minutes using everyday items you probably already have around the house! All instructions include "kid-approved" difficulty ratings so you can choose the crafts that match your child's skill level. One of our favorite things about these fun DIY Kids Crafts is that they are all designed by moms. Whether it's glitter slime, paper plate crafts, or toy cars, your family will love these creative ideas and enjoy them together.
Creative Kids Crafts To Have Fun
Creativity can be a wonderful thing, and it certainly helps that children are creative, but what to do with their creativity? Creativity gets stuck – when we don't know how to help our children create or provide somewhere and something to get them started. There is no need to worry if you don't consider yourself 'crafty' as there are hundreds of craft projects that you can make with your children using items you probably already own. Yes really!
Children always love to get creative, and parents love it when they bundle that creativity up into a nice, neat package that doesn't leave them with a big mess to clean up afterward. DIY crafts are the perfect solution for those who want to get kids in the habit of being creative – like the parents who have spent their entire weekend cleaning up art projects from the living room carpet! I rounded Up my favorite simple kids' crafts here: all of which take less than fifteen minutes to make. Most take less than half an hour! So whether you want to do something with your children out of necessity or simply because you want some fun and easy craft ideas for kids without having to put much effort into them, this list has something on it for everyone.
Why Crafting Is Necessary For Kids
These quick and easy kid's crafts are one of my favorites for kids to create! It provides the perfect opportunity for parents and children to spend time creating memories and enjoying the fruits of their labor. Using homemade or store-bought paints, children will be able to create their masterpieces while experiencing the joy of working with their hands. Adhere your masterpiece to a canvas, then hang it proudly on your wall to enjoy for years to come.
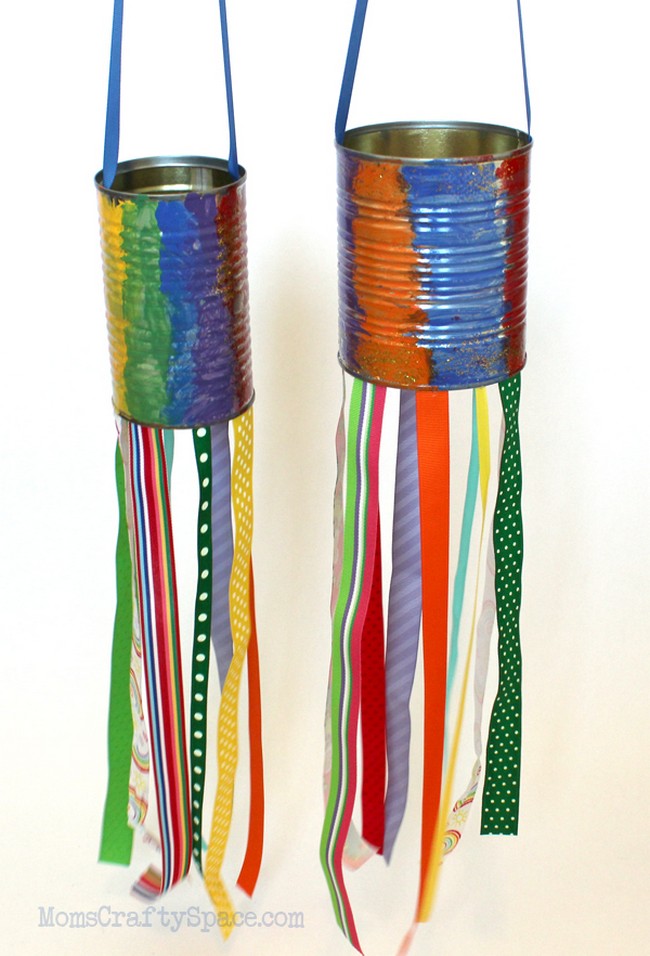
Recycled Tin Can Windsocks
Celebrate Independence Day with this fun and easy Rockets kids craft, perfect for the entire family to get involved in. You can embellish the rockets with glitter, sequins, ribbons, pipe cleaners, and paint, letting the kids unleash their creativity! This craft is not only a great way to repurpose recyclables but also offers a fantastic opportunity to spend quality time together as a family.
Start by painting the can in colors of your choice. Let the paint dry. After, attach colorful ribbons to the bottom rim of the can using glue. Also, add a ribbon to the top of the can for hanging. Finally, make sure to line the inside rim of the cans with masking or duct tape to avoid sharp edges. You now have a beautiful recycled tin can windsock to add to your yard or garden!
Materials:
- Recycled Can
- Acrylic Paint
- Paintbrushes
- Glue
- Assorted Ribbons (or alternatives like yarn, colored paper)
- Optional Embellishments (glitter, stickers, gemstones, sequins)
- Masking Tape or Duck Tape
Microwave Puffy Paint
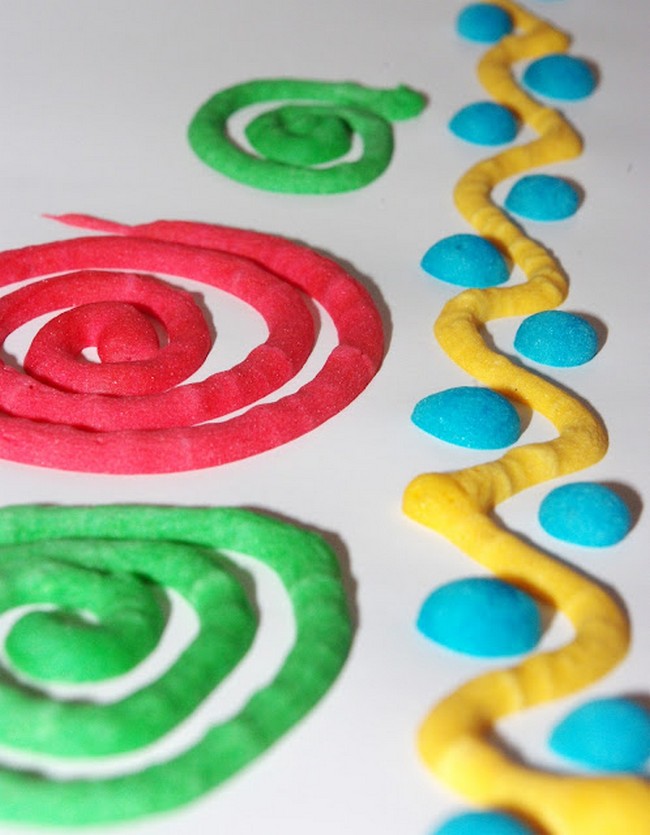
Puffy Paint is microwave safe and made with simple ingredients that your kids will love!It uses reusable, non-toxic, non-staining, eco-friendly crafting material that resists shrinking and cracking when heated. This project is a fun way to expose your child to art and science!
Combine flour, baking powder, salt, and enough water to form a pancake batter-like consistency. Divide the mix and add food coloring into separate Ziploc bags. Squish the bags to mix the colors. Rubber band the baggies like you would for icing a cake, and snip off a tiny tip. Paint your designs on paper, then microwave for 30-45 seconds. Watch the paint puff up and enjoy your microwave puffy paint artwork!
Materials:
- Flour
- Baking powder
- Salt
- Water
- Food coloring
- Ziploc baggies
- Rubber bands
- Paper or cardstock for painting
Colorful DIY Key Windchime
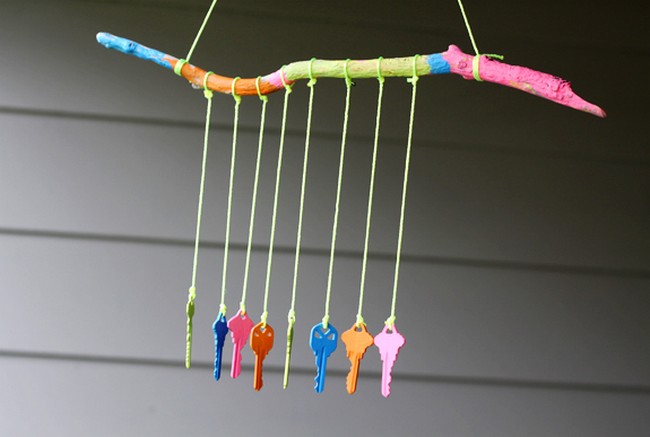
This DIY Key Wind Chime offers children a fun, hands-on craft experience while demonstrating the power of recycling. Children will revel in painting the keys and assembling the wind chime, a process perfectly suited for little hands. Once assembled, the wind chime can be a proud display in your garden, on your balcony, or a heartwarming gift for loved ones.
Begin by painting your keys and a piece of driftwood. Allow these to dry completely. Attach a piece of string to either end of the driftwood. Tie another piece of string to each key. Proceed to tie the keys to the driftwood, ensuring they are close enough to bump into each other to create a chime effect. Your DIY key wind chime is now ready to be gifted or hung around your home.
Materials:
- at least 5 old keys
- a piece of drift wood or stick
- string or fishing line
- optional: acrylic paint
Airplane Clothespin
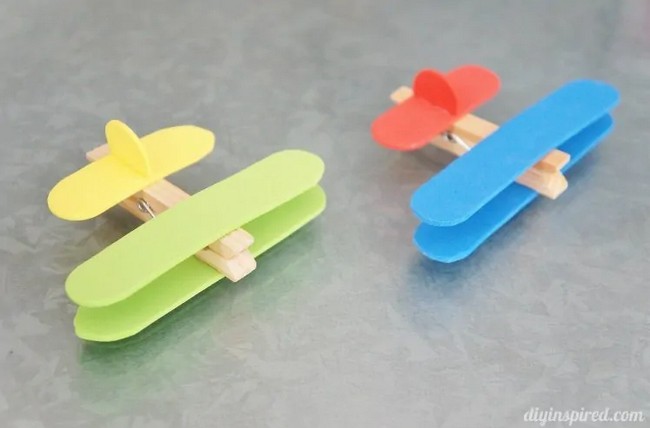
Looking for a fun and easy craft to do with the kiddos? These airplane clothespins are perfect for kids of all ages and work well when used as ornaments for a bulletin board display or just as little gifts.They are also the perfect addition to an airplane or travel-themed classroom!
Start by cutting foam craft sticks into two parts for the wings. Glue the larger pieces onto the top of the clothespin and the smaller ones at the bottom of it. Attach a cut piece of the foam stick at the back of the clothespin to create a fin. Let it dry, and you have your own miniature airplane!
Materials:
- Clothespins
- Foam craft sticks
- Glue
- Scissors

Tissue Paper Streamer Rainbows
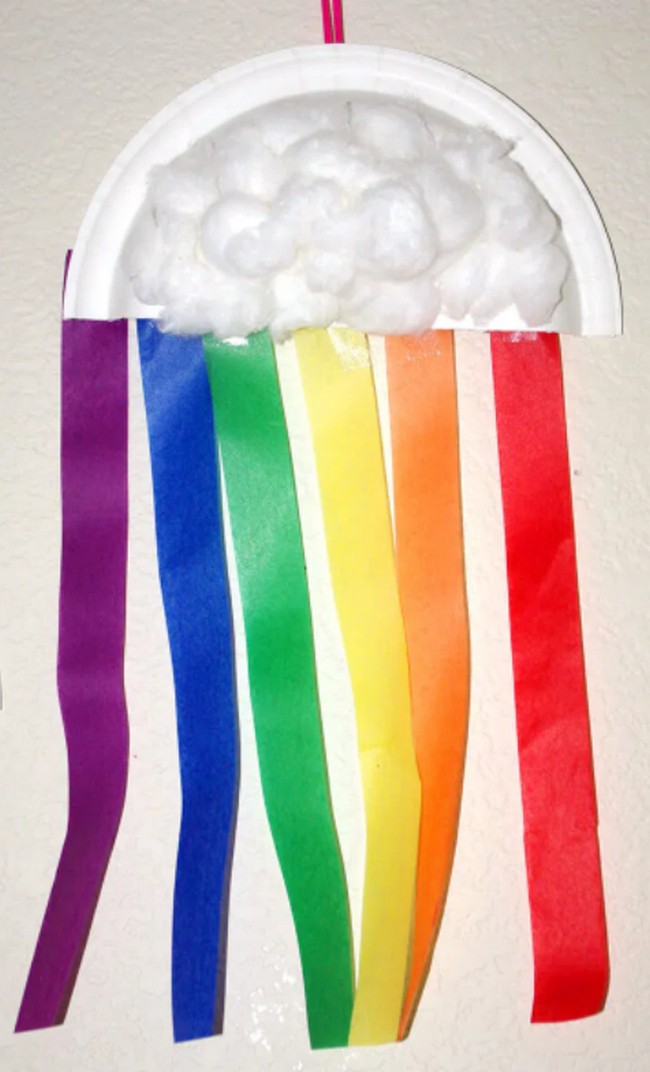
Add a pop of color to any day with this enchanting Kids Craft Streamer Rainbows project, perfect for keeping little hands busy.They can be used as decorations for a rainbow-themed party, hung from the ceiling in groups, singly, or even grouped in a colorful mobile.Plus,Children can experience the delight of creating their personal rainbows, learning color sequences, and manually enhancing their fine motor skills.
Begin by cutting a paper plate in half. To the back side, attach multi-colored strips in the correct order of a rainbow, starting from top to bottom. Afterwards, attach cotton balls to the other side of the plate, which will represent the clouds. You can either attach the cotton balls as they are or break them up to create a more texturized look. There you go; a vibrant, cheery rainbow craft is ready!
Materials:
- Paper plates
- Colored tissue paper
- Glue
- Cotton balls
DIY Cardboard Marble Run
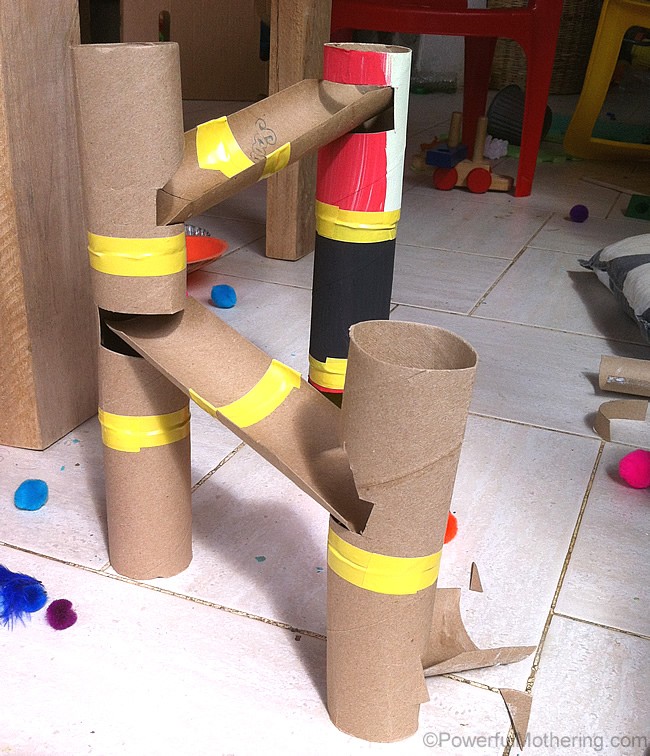
- Toilet paper rolls
- Cardboard base
- Tape
- Paint
- Glue
- Marbles or Pom Poms
Bubble Painting
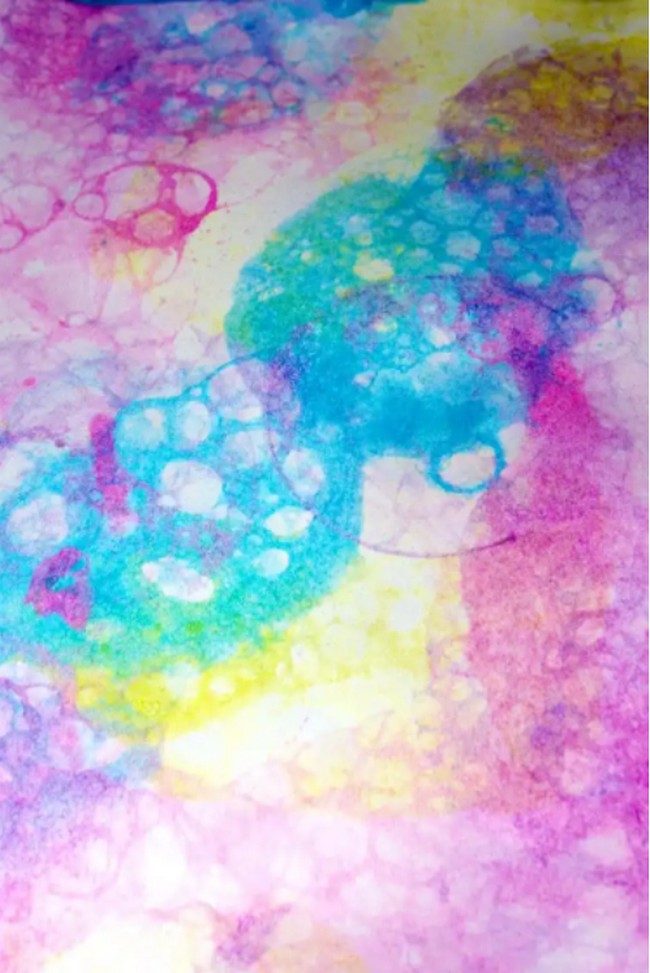
- Dish soap
- Paint
- Cups
- Straws
- Paper
Garden Flowers
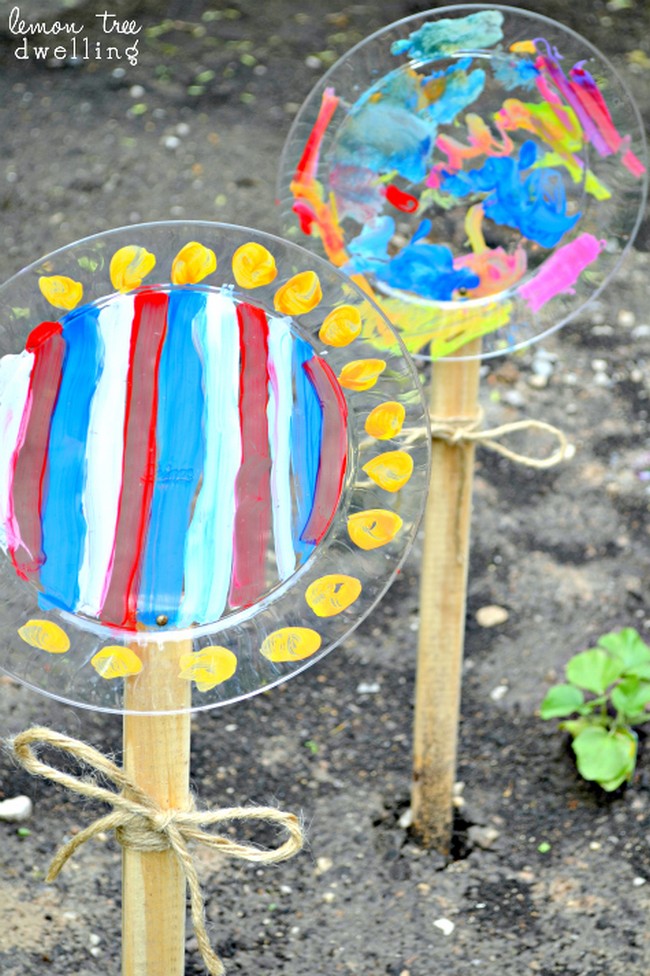
- wooden garden stakes
- clear plastic plates
- outdoor acrylic paint* & paintbrushes
- small screws
- screwdriver
- drill
- twine
Tie-Dye Sharpie Bookmarks
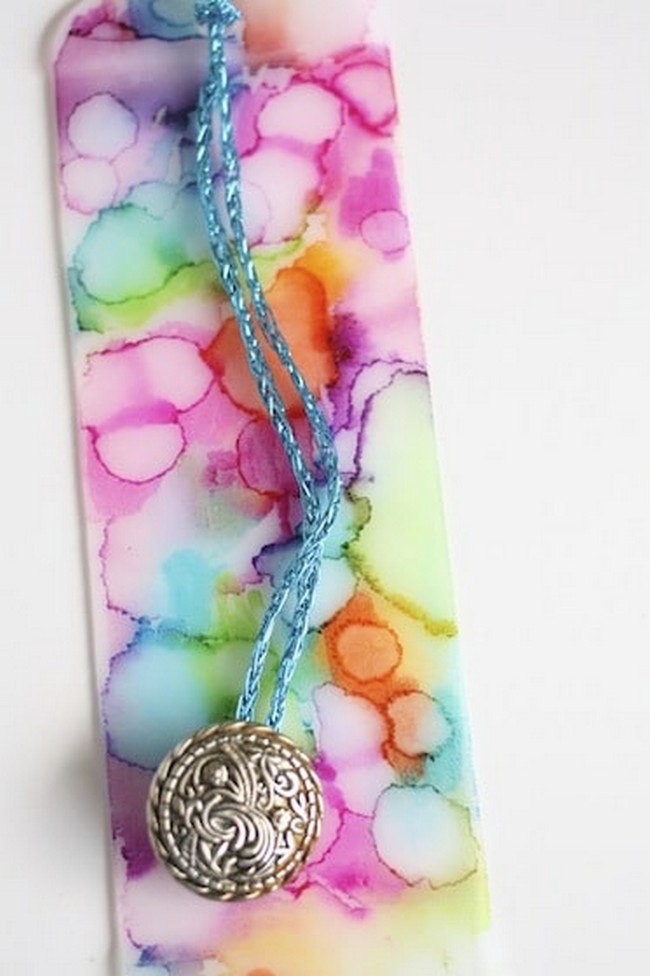
- A plastic vinegar jug (or similar opaque jug I.E. Milk jug, juice jug)
- Sharpie fine-tip permanent markers
- Rubbing alcoho
- Spray varnish (I use plolyurethane)
- Medicine dropper or pipette
- Ribbon, twine or cording
- Button or decorative bead
- Scissors,
- Hole punchhole punch
Perler Bead Bowls
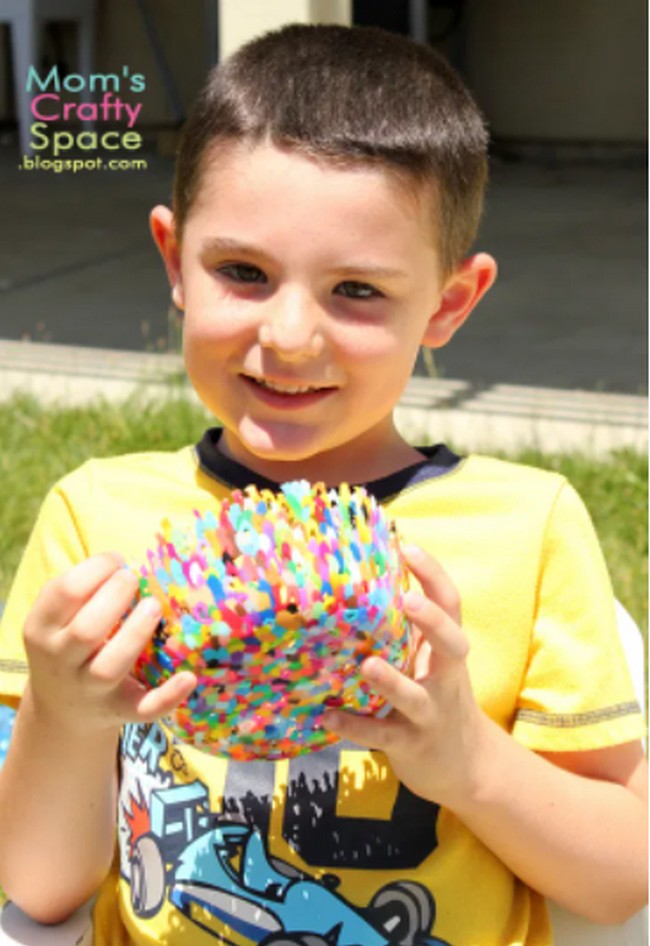
Preheat the oven to 375 degrees. Spray the inside of an oven-safe bowl with cooking spray. Pour a handful of perler beads in the bowl and gently push them around so that there is a single layer of beads covering the base. Place your bowl on a baking sheet and into the oven. After about 5 minutes, the beads will start to stretch out and begin to melt. After 15-20 minutes, the bead bowl will be fully melted. Leave it to cool for 20-30 minutes, then remove the bead bowl from the outer bowl. Wipe the outside of your bead bowl with a soapy sponge.
- Perler Beads
- Oven-safe bowl
- Cooking Spray
- Oven
Pour Painted Flower Pots
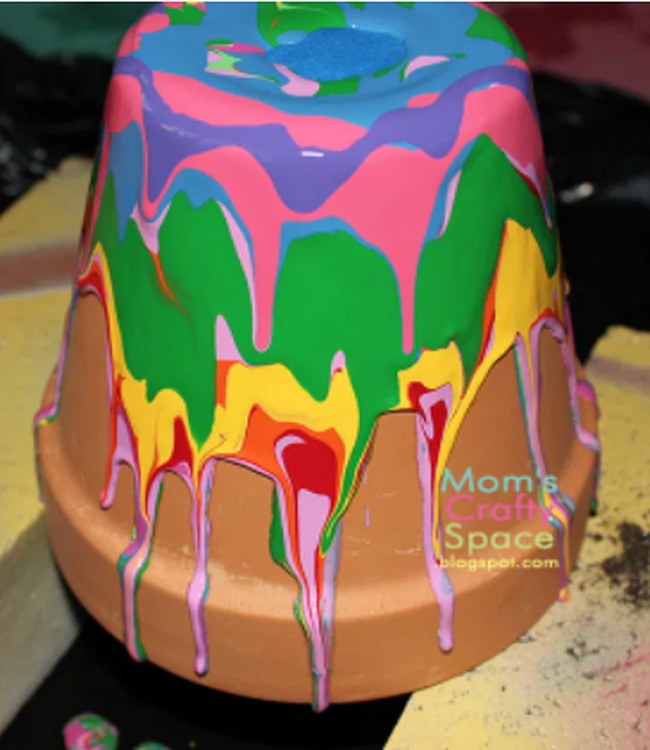
- Pottery pots
- Acrylic paints
- Clear gloss spray varnish
QUICK & EASY KIDS CRAFTS
Stained Glass Heart Crowns
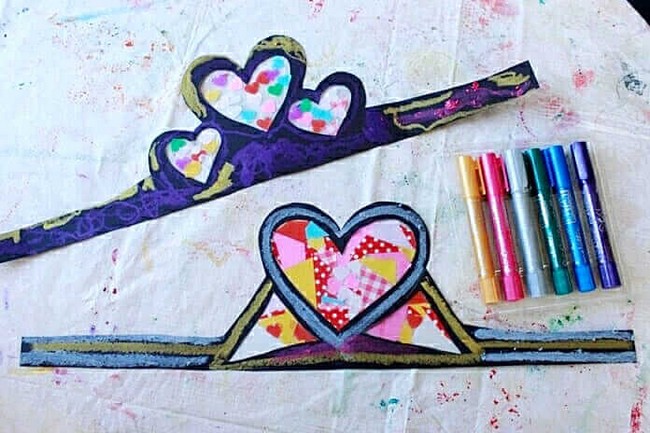
- 1 sheet of poster board (makes 4-5 crowns)
- White or metallic drawing tools, such as crayons, colored pencils, or paint sticks
- X-Acto knife or other utility knife
- Cardboard or a self-healing cutting mat
- Transparent contact paper (sticky-back plastic)*
- Scissors
- Colored tissue paper
- Heart-shaped paper punch (optional)
- Stapler or tape
Stained Glass Pennant Bunting
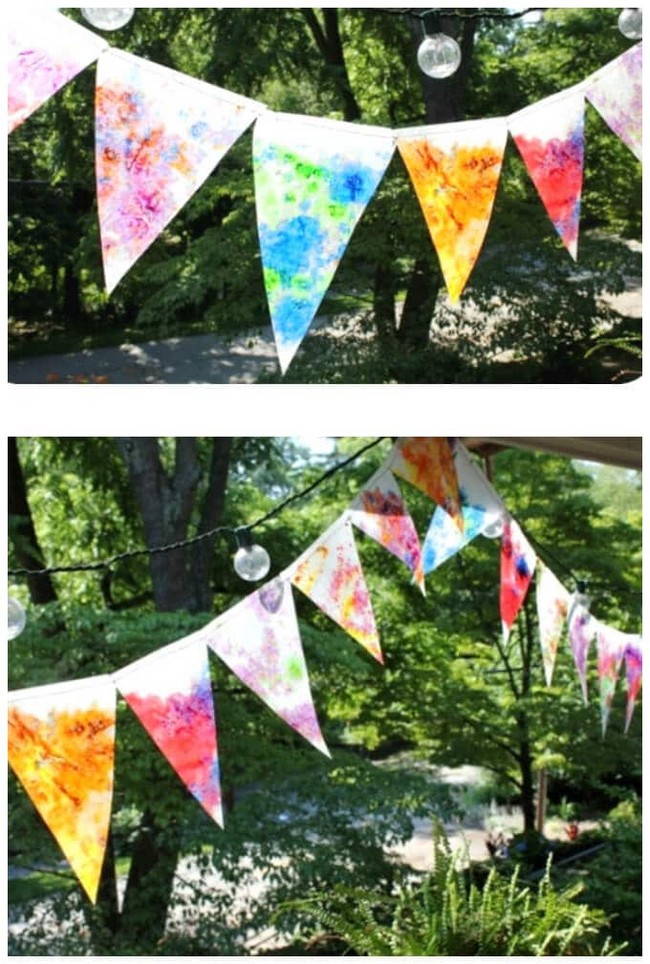
Begin by grating crayons and separating the shavings. Arrange these on a folded wax paper and fold it over to make a 'crayon sandwich'. Apply heat to the sandwich to melt the crayons. Once cool, cut the result into triangles. If you have a sewing machine, use it to sew these together. If you don't, use tape or a hot glue gun to attach the triangles together. Hang your new bunting in a place of your choosing.
Materials:
- Crayons
- Cheese grater
- Wax paper
- Iron
Clothespin Catapult
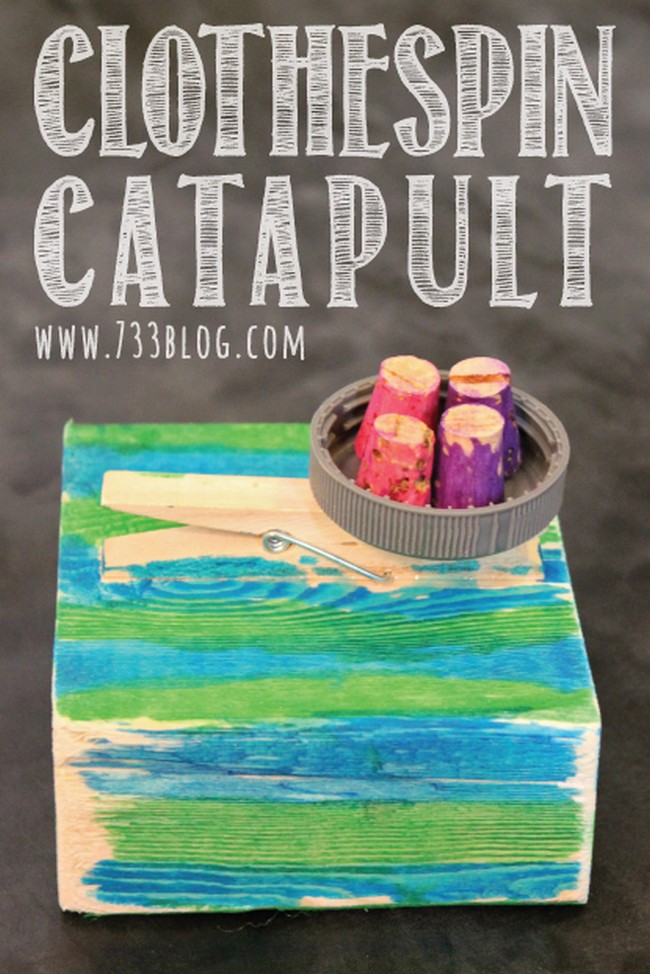
- Clothespin
- Block of wood
- Milk or juice cap
- Gorilla Glue or similar
- Markers or Paint
Monster Truck Painting
- Canvas
- Tempera paint
- Paintbrushes
- Small toy cars and monster truck
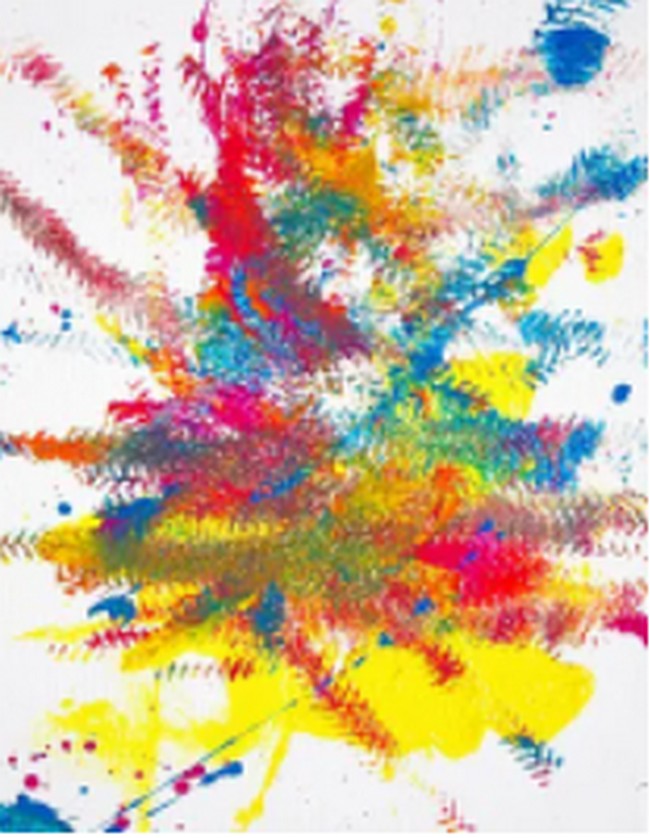
Spin Art Notecards
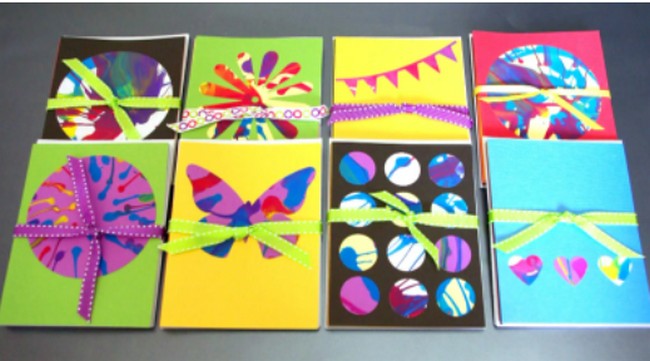
- Salad Spinner
- Acrylic or Tempera paint
- Cardstock or other heavy weight paper
- Scissors
Melted Bead Sun Catchers
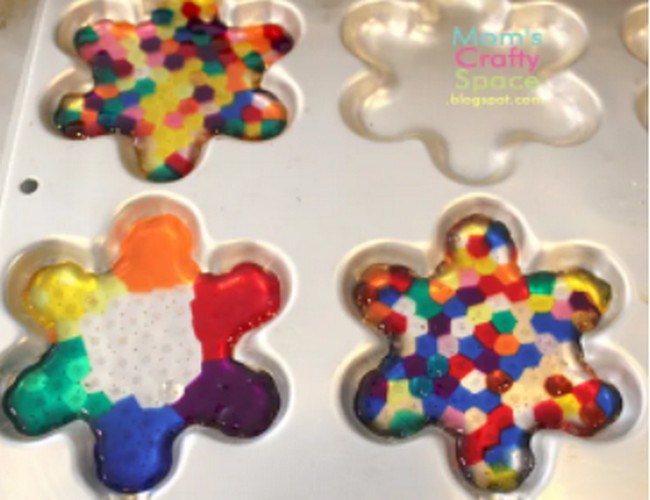
- Plastic beads (preferably octagonal faceted beads, pony beads, or any cheap plastic beads)
- Baking dish, muffin tin, or decorative pan
- A drill (to create a hole to hang them)
- Oven
Tissue Paper Collage Birdhouses
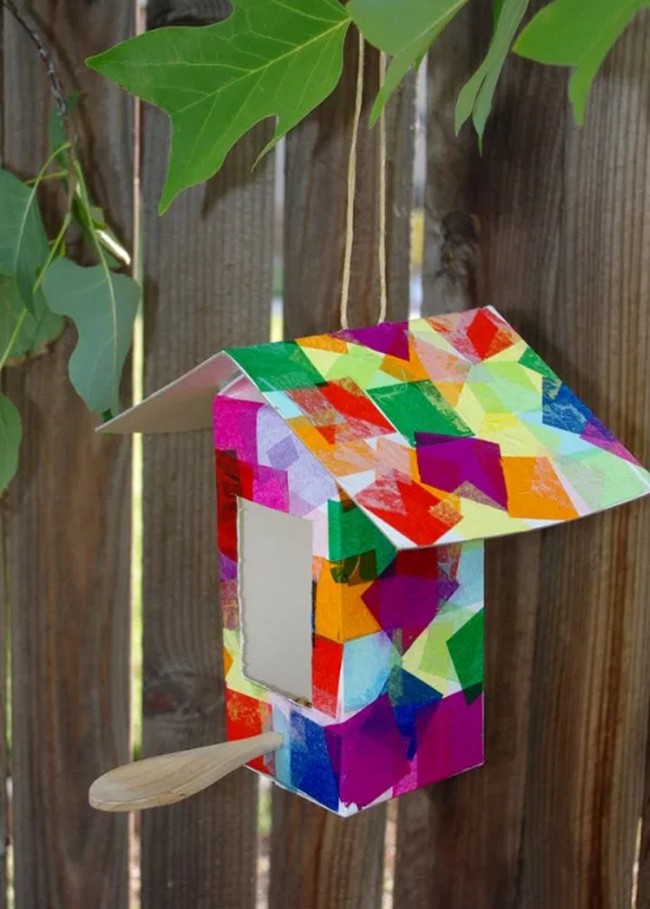
- Clean and Dry Recycled Milk or Juice Carton
- White Paint
- Sheet of Chipboard or Recycled Cardboard
- School Glue
- Foam Paintbrush
- Tissue Paper Squares in Assorted Colors
- Twine
- Wooden Spoon
- X-Acto Knife (if needed, parental use only)
- Mod Podge or Spray Sealer (optional)
Cupcake Liner Flowers
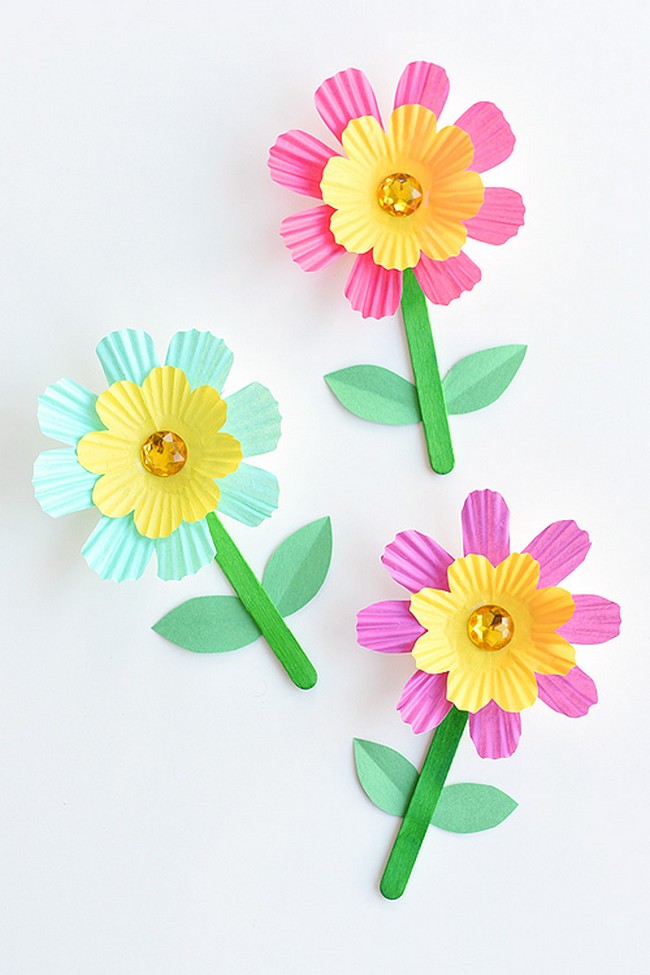
Learn to make vibrant and gloomy DIY paper flowers with this DIY guide. These easy-to-make and eye-catching flowers are created using cupcake liners, which adds a unique touch to your flower-making process. They are perfect for decorating greeting cards, adorning gifts, or simply as decorations around your home.
To create simple cupcake liner flowers, first flatten the large and mini cupcake liners. Fold each liner in half four times to create eight petals. Carefully cut curves into the liners to form petal shapes. Unfold and gently shape the liners, placing the mini one inside the larger one. Attach a rhinestone sticker to the center of the flower. Fold a piece of paper, cut out two leaf shapes, and attach them to the back of a popsicle stick. Finally, adhere the stick to the flower, and it's done!
- 1 regular cupcake liner
- 1 mini cupcake liner
- 1 green popsicle stick
- 1 large yellow sticker rhinestone
- Crafter’s tape
- Green construction paper
- Scissors
Easy DIY Princess Wands
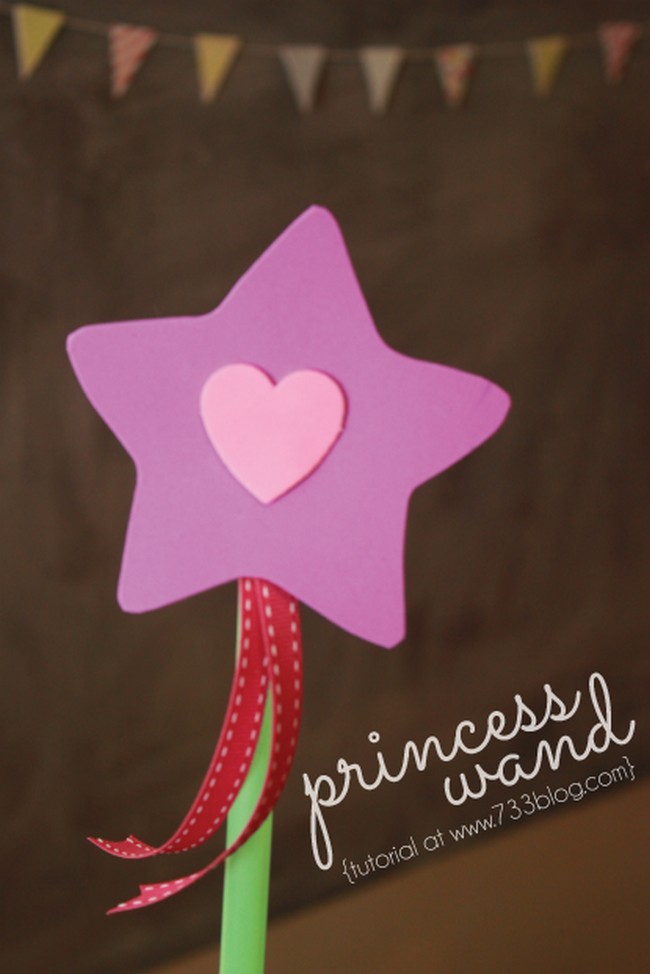
Make this interesting DIY craft by cutting a star shape from foam. Staple two pieces of ribbon to the foam. Next, staple the ribbon and stars to a straw. Proceed to glue a smaller foam shape to the front of the wand to cover up the staples. That's it! Now you have a simple and cute DIY Princess Wand, perfect for imaginative play.
- 9×12 Sheets of foam, or foam shape
- Straws
- Ribbon
- Stapler
- Glue gun
Button Tree Art Canvas
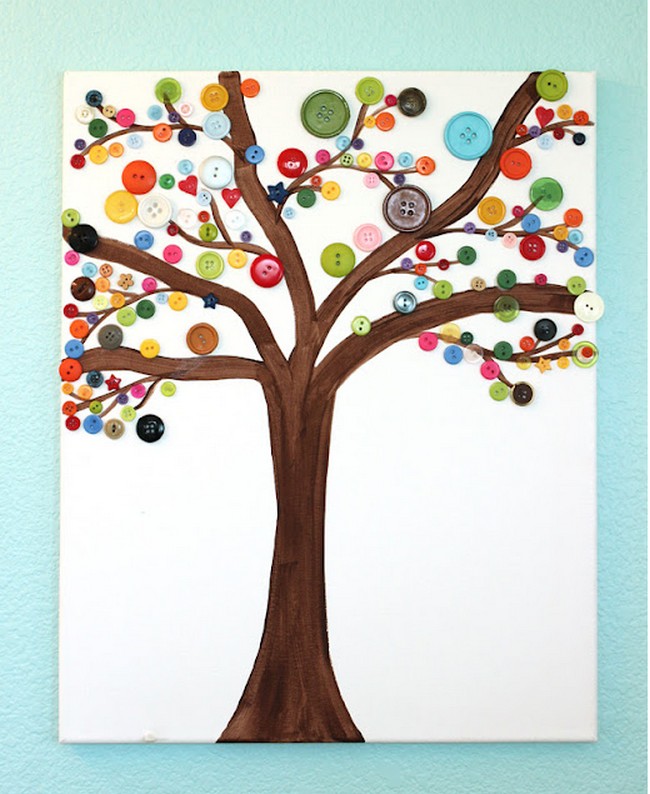
- Buttons in various colors and sizes
- A blank canvas
- A design or image to follow
- Paints to color the design/image on the canvas
- Tacky Glue or any strong adhesive
Paper Dream Catchers
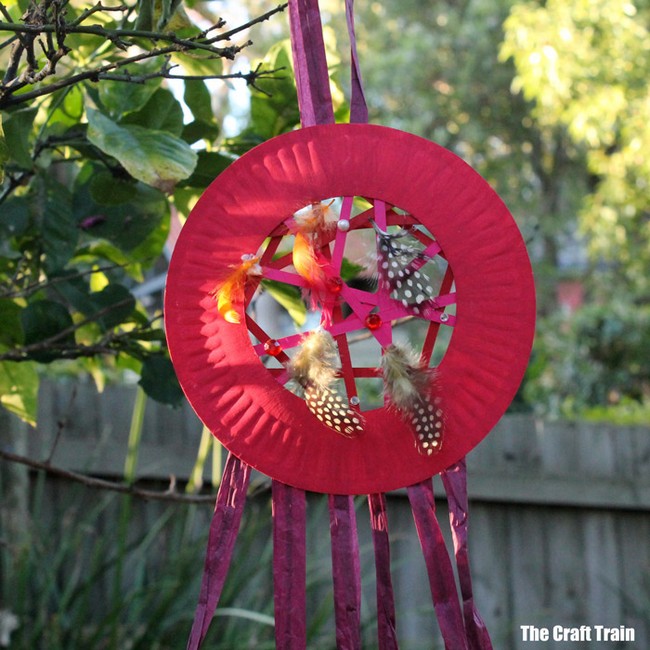
-
- Paper plates
- Paints and brushes
- Coloured craft paper – we used card stock but ordinary construction paper would also work
- Raffia or crepe paper
- Feathers
- Plastic jewels to decorate
- Glue or double sided tape
Pretty Paper Flowers
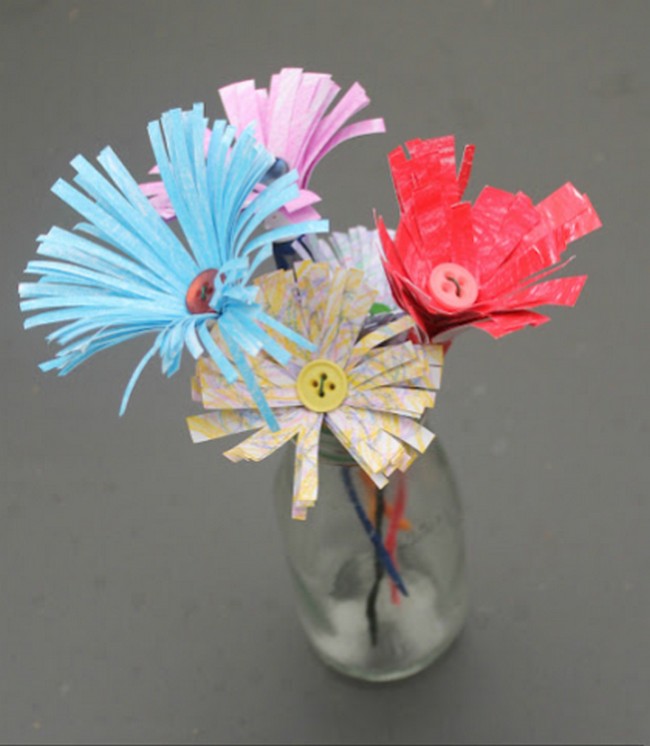
- Cardstock
- Crayons
- Buttons
- Wire
- Washi tape or Floral tape (optional)
Recycled TP Roll Rockets
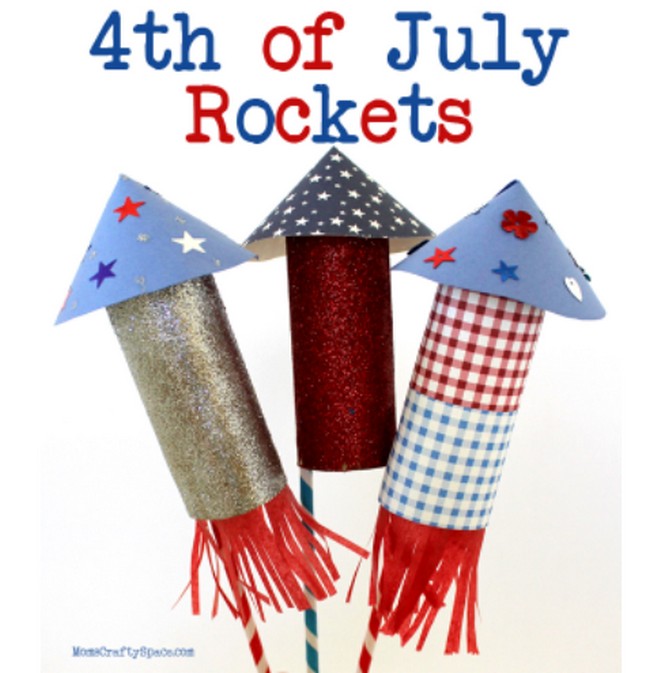
Start by decorating tubes as you like, you can use decorative items like glitter. Once your tubes are decorated and dry, cut a circle from paper and slide halfway through to the center, forming a cone shape. Secure this with a binding agent to make the rocket cap and attach it to the tubes. Insert a thin, flexible component to act as a fuse, and mimic flames with flared elements. Allow everything to dry completely before using.
- Cardboard tubes
- White glue
- Paper – construction or scrapbook papers work well
- Straws
- Decorations & embellishment, glitter, sequins, ribbons, pipe cleaners, etc.
- Optional: paint, paint brushes, tissue paper for “flames”