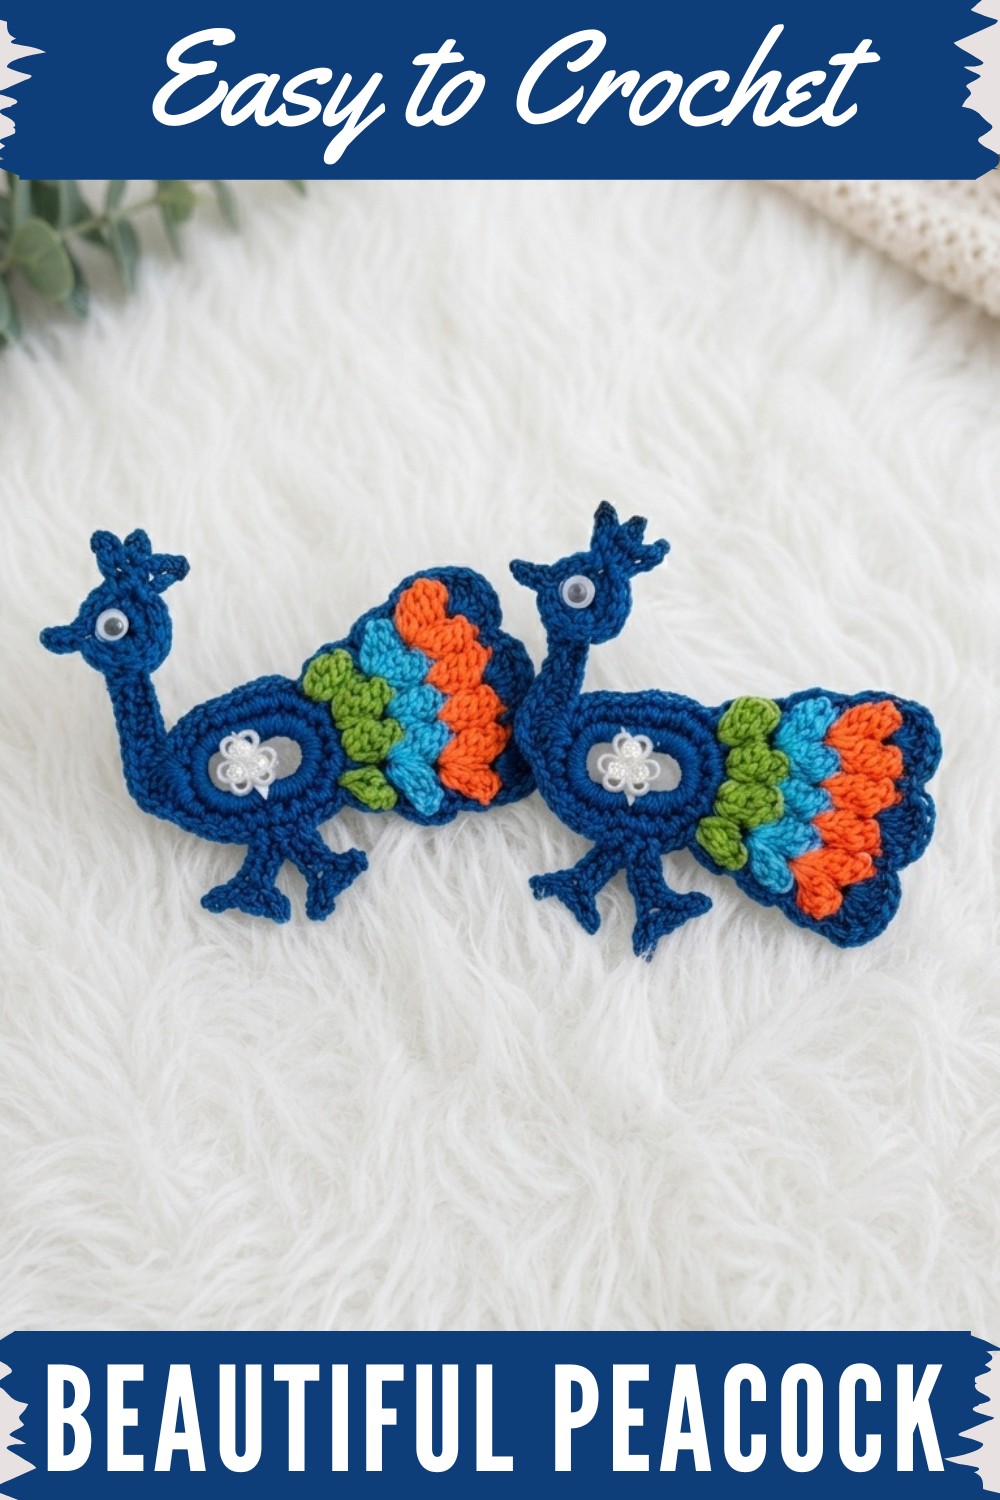
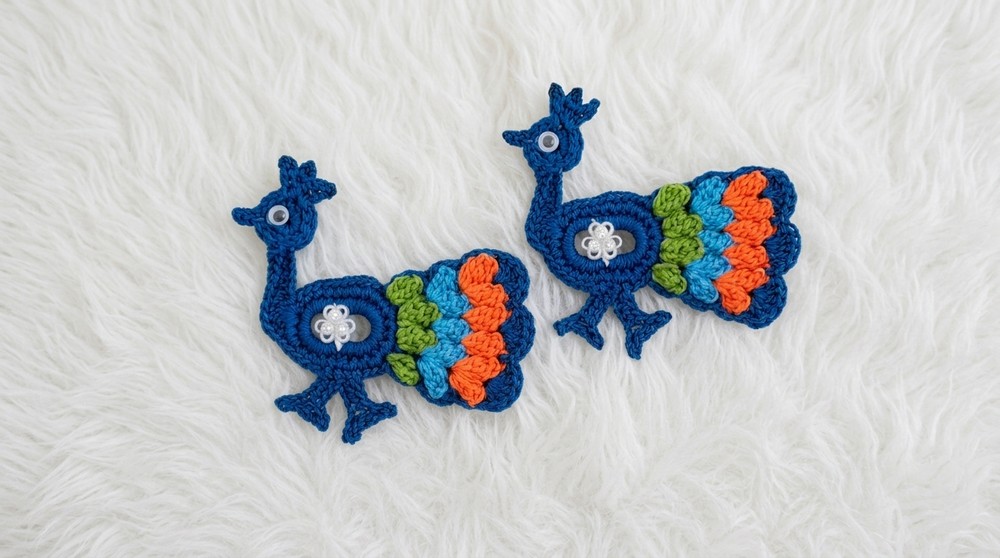
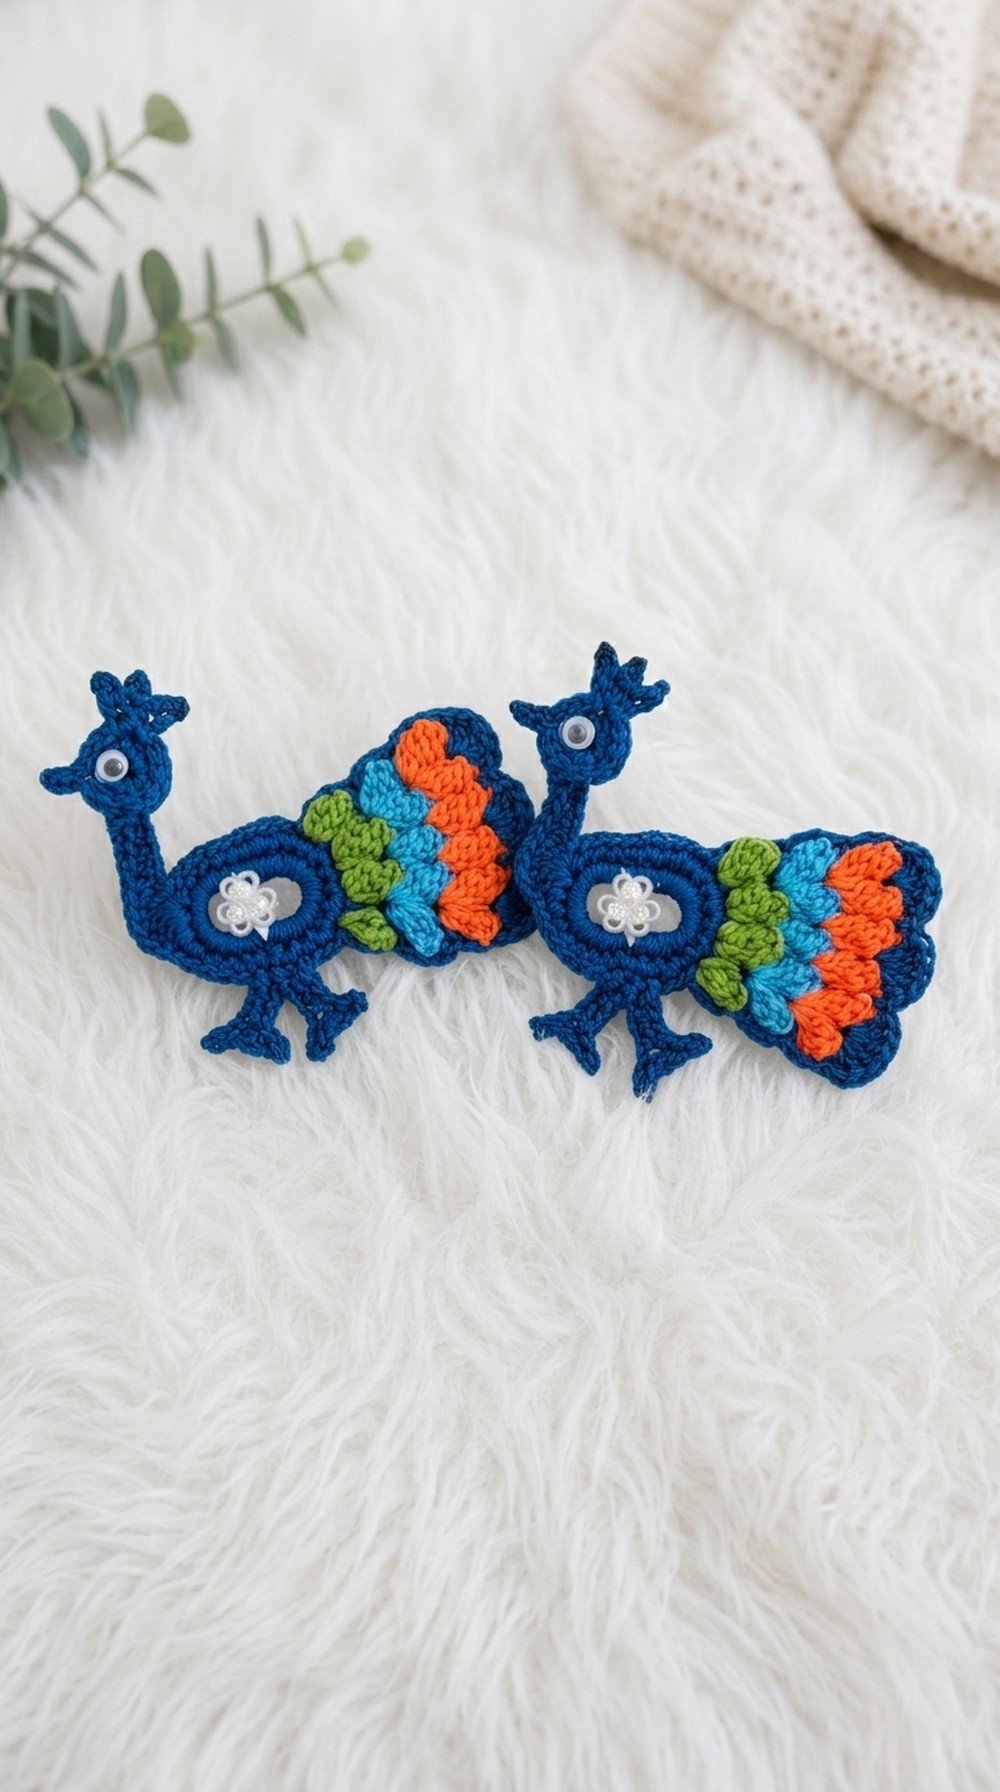
Learn to crochet a beautiful peacock pattern with simple instructions which is perfect for creating elegant and intricate handmade designs.
Creating a colorful and eye-catching crochet piece recently led me to try out a free crochet peacock pattern that beautifully captures the majestic bird’s elegance. This project is a decorative motif that can be used as an applique, a coaster, refrigerator magnet, or even part of a larger wall hanging. Its style is vibrant and detailed, featuring the peacock’s signature fan-shaped tail with layered feathers that showcase intricate stitch work and a mix of textures. The shape is rounded with a graceful spread of “feathers” that truly make this design stand out.
Free Crochet Peacock Pattern With Step-by-Step Guide
This pattern is perfect for those who have some experience with crochet and are comfortable working with various stitches, including chains, double crochets, and clusters. It offers options to customize size by using different yarn weights or adjusting hook size, allowing you to create anything from a small decorative piece to a larger statement motif. The construction involves working in rounds and layering stitches to build the textured, feathery tail, so patience and attention to stitch count come in handy.
Inspired by the peacock’s proud and colorful plumage, this design calls for yarn with a bit of sheen, like a cotton-blend or mercerized cotton—to really make the intricate stitching pop. It’s a fantastic project for gifts during festive seasons or for anyone who loves nature-inspired decor. Feel free to play with different color combinations to make each peacock uniquely yours and add a splash of charm wherever it goes.
Crochet Peacock from Bottle Seal: Step-by-Step Pattern
Pattern Notes
- This project makes creative use of recycled plastic bottle seals, decorating them with colorful crochet.
- All embellishments (eyes, rhinestones, bows) are optional—feel free to personalize your peacock.
- Secure all ends and trim closely for a neat finish.
- Work stitches tightly for durability, especially on the small neck and tail motifs.
- You can use any colors, but blue, green, yellow, and metallics create a vibrant “peacock” effect!
Turn an ordinary bottle seal into a delightful, decorative peacock using simple crochet techniques and very little material! The pattern transforms the seal into the peacock’s body, while crochet stitches add feathers, neck, head, and details. Decorate with a bead eye and rhinestones for an ornamental finish—perfect for gifts, fridge magnets, ornaments, and more.
Skill Level
Beginner to Intermediate – Basic crochet skills are required, including single crochet, slip stitch, half double crochet, double crochet, popcorn stitch, and picot. Familiarity with crocheting around objects helps but is not required.
Measurements / Sizing
- Finished peacock measures approximately 3 inches (7.5 cm) tall and 2.5 inches (6.5 cm) wide.
- The head, neck, and legs are delicate but durable thanks to thick silk thread.
- Tail can be scaled by adding or subtracting popcorn stitches.
Gauge (and Stitch Pattern if applicable)
Gauge is not critical, but tight, even stitches are preferred for small motifs:
- Around the seal: 14 sc (body), 12 sc (narrow end)
- Popcorn stitch: 4 dc in same stitch, remove hook, insert in 1st dc, draw through loop to close
Materials
- 1 plastic bottle seal (“coolant leak” type or similar)
- Thick silk crochet thread, Tex 288, 100% (blue or peacock color for body, green/yellow for tail, other for details)
- 1.75 mm crochet hook
- Small scissors
- Pliers (to remove burrs)
- Universal glue or hot glue gun for securing decorations
- Magnet, rhinestones, flower sequins, or ribbons for decorating
- 1 small bead (or magnetic stone) for the eye
Stitch Abbreviations
sc = single crochet
sl st = slip stitch
ch = chain
hdc = half double crochet
dc = double crochet
popcorn = 4 dc in same stitch, remove hook, insert in first dc, yarn over, pull loop through
st(s) = stitch(es)
Special Stitches
- Popcorn Stitch: Work 4 dc in one stitch, drop hook, insert it in first dc, draw up active loop and pull through all stitches, ch 1 to secure.
- Picot: Ch 3, sl st into 1st ch made.
- Invisible join (optional): Fasten off and use a required method to create a smooth join.
The Crochet Pattern
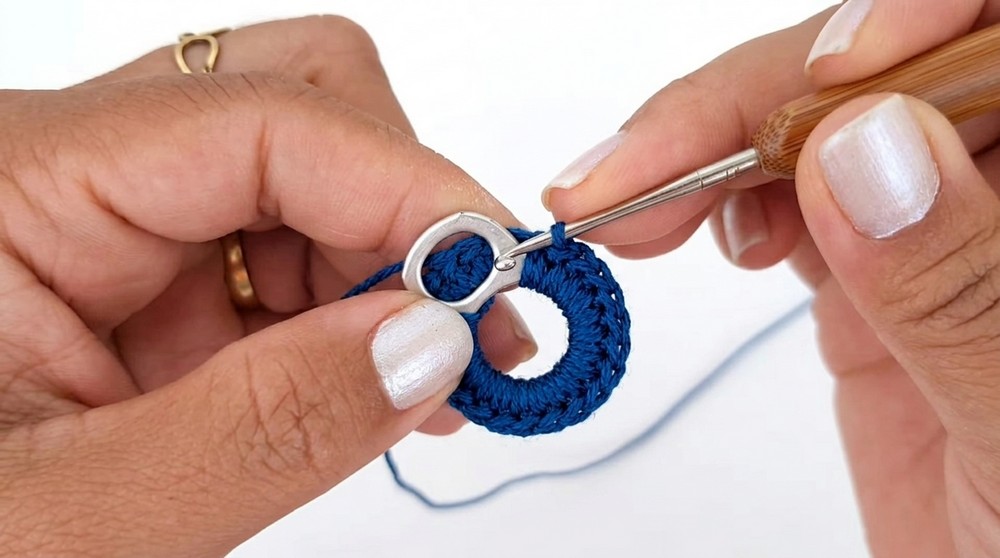
1. Prepare the Bottle Seal
- Use pliers to remove any burrs or sharp areas from the plastic seal. Twist and pull to create a smooth surface.
2. Cover the Seal with Crochet (Body)
- Join thread with a slip stitch to the larger part of the seal.
- Work 14 single crochet evenly around the broadest circumference.
- Continue to the narrower part and crochet 12 single crochet stitches around.
- At end of round, join last stitch to first with a slip stitch.
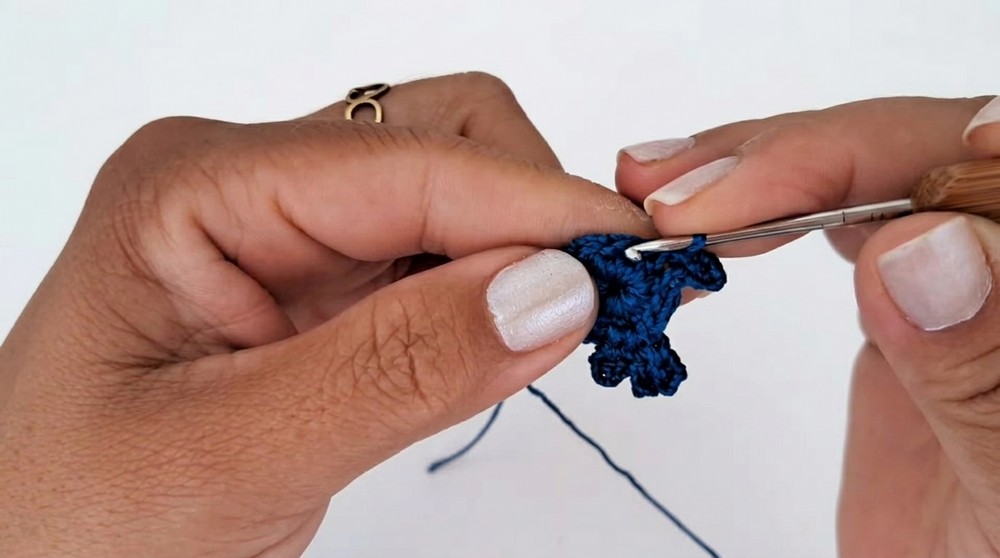
3. Sculpt Body and Start Neck
- Chain 1 and sc in the next st.
- For shaping, alternate: (inc, sc) round the seal until reaching the “seam” section.
- On seam section: work 6 single crochet evenly to reach bottom (“amendment”).
- From the last sc, chain 7 for the peacock’s neck and head.
- At the tip of the chain, slip stitch to form a loop, then ch 4 and sl st to the marked spot (start of loop).
4. Head & Headcrest
- Into the chain ring just formed, work 12 hdc.
- Join with sl st to first hdc.
- Chain 2 (counts as first hdc), then work remaining 11 hdc, joining with a slip stitch at the end.
- Slip stitch 5 times toward the center-top of the head.c
- For crest: (chain 2, + 3 for picot, sl st to 2nd ch), hdc in same space—repeat three times to make crests.
- After third hdc/crest, slip stitch once to move slightly, then sl st back to base of head.
5. Forming the Beak
- Ch 3, sl st back down the chain (forms a point).
- Sl st into base of head to join beak.
6. Peacock's Legs
- Insert hook at lower body, pull up a loop.
- Chain 7 downwards, sl st 1, sl st 2, sc in 3, ch 3 (to form claw), sl st into previous chains as you work back up; finish with sl st to base.
- Repeat for the second leg (chain 7, sl st, sc 3, ch 3 for claw, back to base), fasten off and weave in ends.
7. Peacock’s Tail
- Join contrasting thread at the base; skip 2 stitches, insert, and secure.
- Ch 3 (counts as dc), work 3 dc in same space (4 dc total), remove hook, insert in 1st dc, pull loop through to close: popcorn.
- Ch 1 for spacing, skip 1 st, into next: popcorn—repeat three more times (total 4 popcorns).
- On next tail row: join yarn in first chain space, make 2 popcorns in same space, then one popcorn in each of next 3 spaces, and 2 popcorns in last space (total 5 popcorns).
- Last row: similar, with increase on ends, for 6 popcorns total.
- Fasten off, weave in ends.
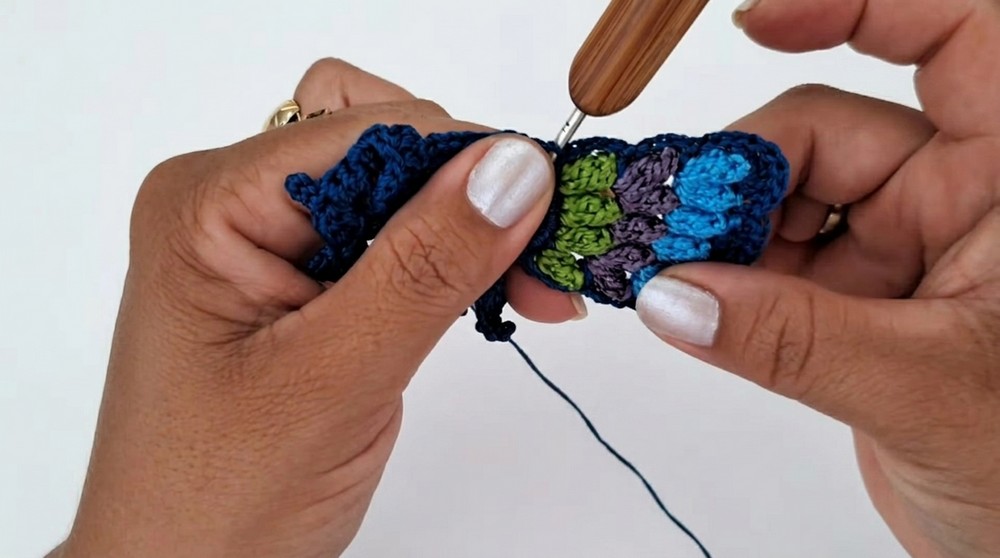
8. Feather Layer for Extra Effect
- Join blue (body color) thread at tail-top.
- Ch 3, sc in next spot between popcorns; in each “valley” between popcorns, (ch 2, sc in space).
- Over each popcorn, work (5 dc in same spot), sc to anchor between popcorns.
- Continue around edge, finish with slip stitch in starting point.
- Fasten off and weave in ends.
Assembly & Finished Size
- Weave all remaining ends to the back and trim excess.
- Using glue (universal or hot), attach bead or stone for eye, one on head.
- Add additional rhinestones or flowers to the tail as desired.
- Attach a magnet to back for fridge décor, or a ribbon/bow at neck for ornament/hanging.
- Finished peacock measures about 3 inches (7.5 cm) by 2.5 inches (6.5 cm)
- Embellish with ribbons, bows, or more beads to your taste.