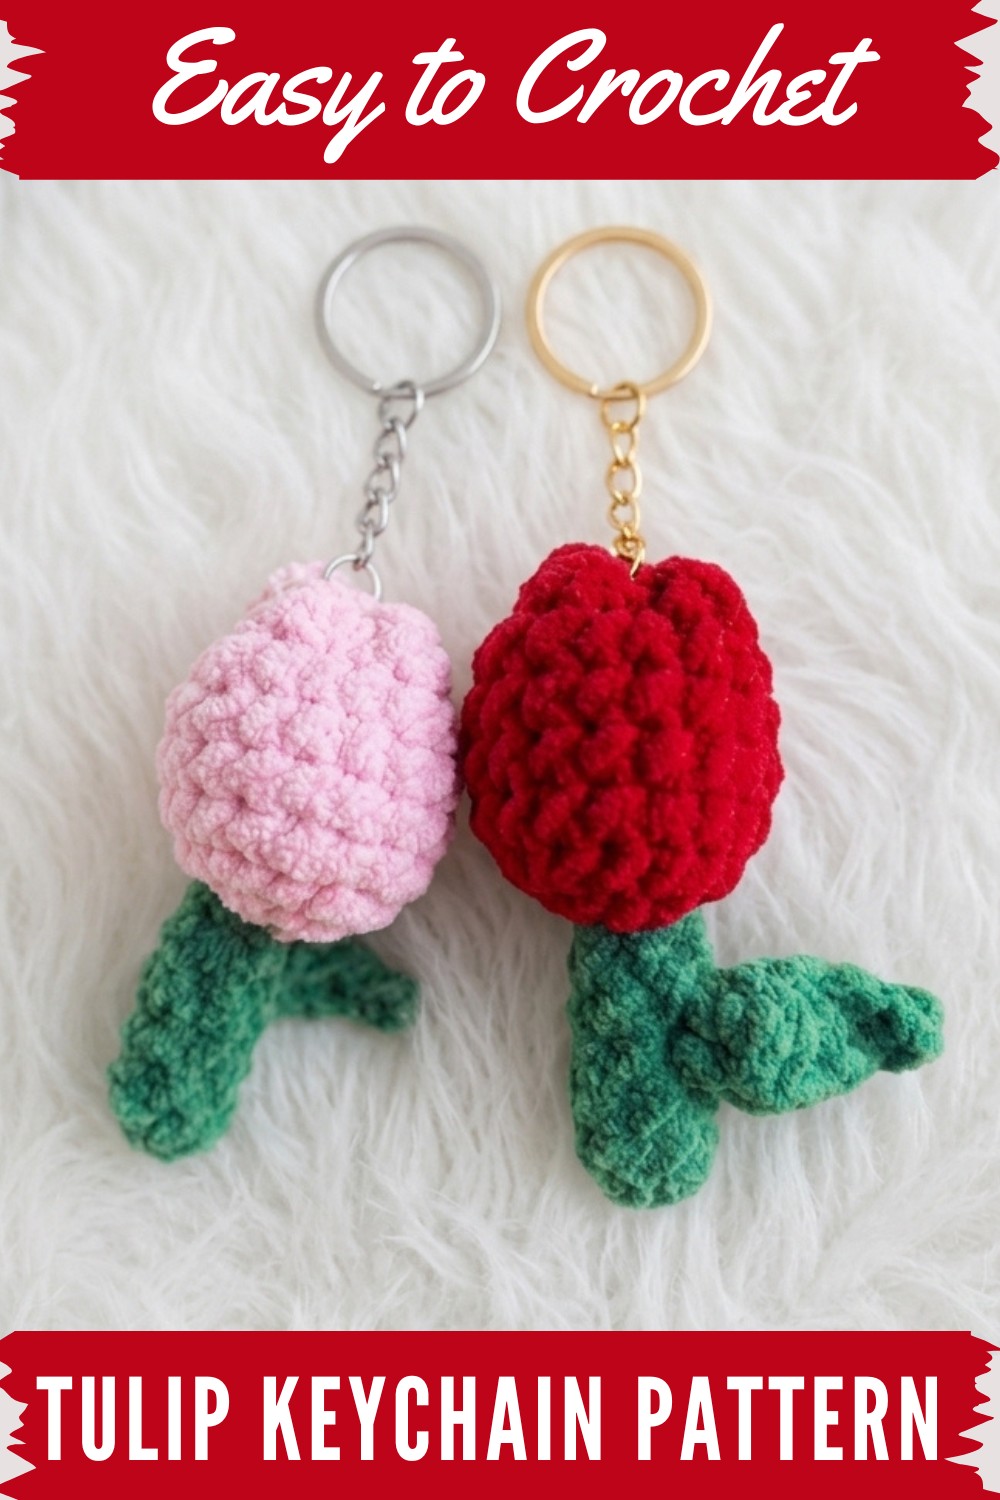
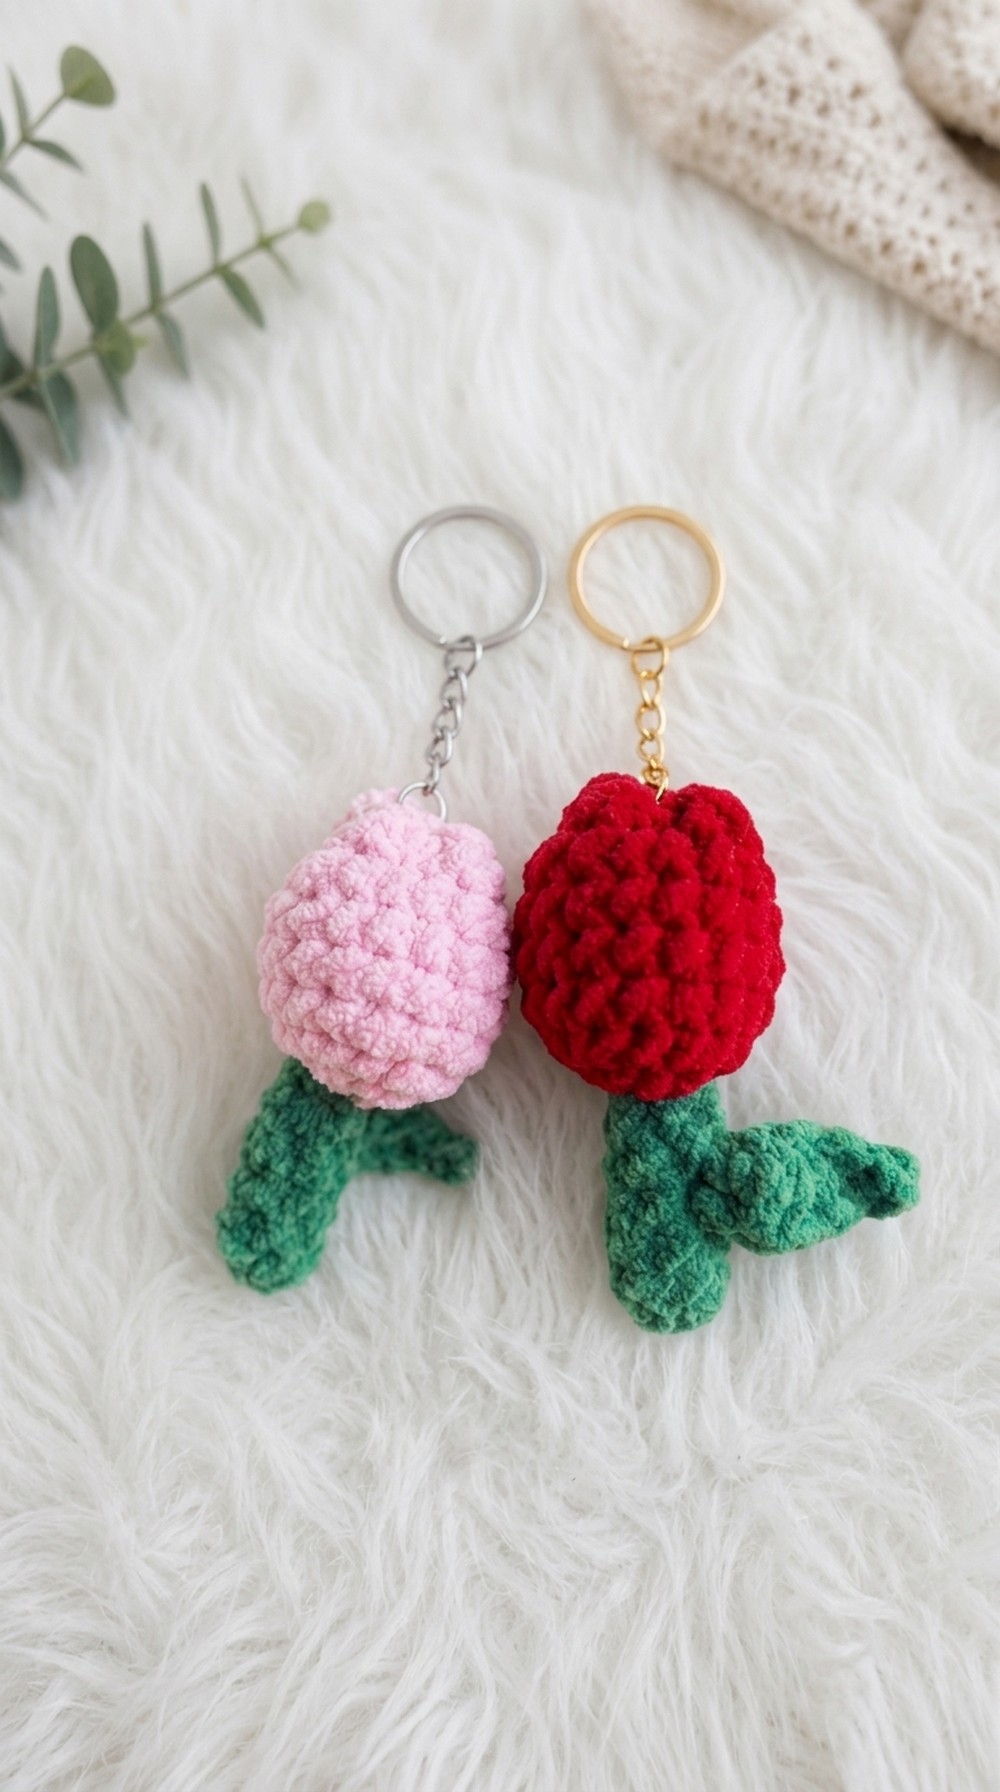
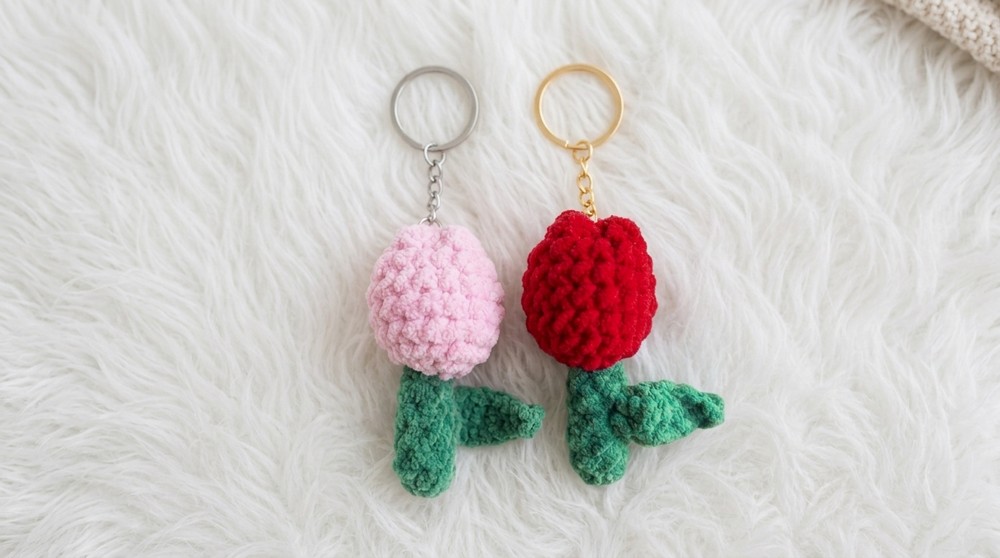
Bring to life a charming tulip keychain with this free crochet pattern which is for adding a touch of handmade elegance to your accessories or gifting to loved ones.
There’s something truly charming about making a little tulip keychain with crochet. This lovely project uses bright colors and soft yarn to create a tulip flower with a pretty shape and texture. The petals are carefully formed to look like real tulips, giving the keychain a delicate and cheerful appearance. It’s small enough to carry around and feels smooth and gentle to the touch.
Easy Crochet Tulip Keychain Pattern - Free
What makes this tulip keychain stand out is how each petal fits together perfectly. The petals have a rounded shape and a gentle curve, which gives the flower a realistic and cute style. The stem and leaf add extra detail, making the keychain look lively and full of character. Crocheters will enjoy working on this pattern because it’s quick and simple, and it uses basic stitches. Watching the tulip come together is very satisfying, especially since you can play with different yarn colors to make each keychain unique.
Making this tulip pattern is great for beginners and experienced crocheters alike. With a few small changes, you can turn the tulip into other small decorations—like a bag charm, a zipper pull, or even make a bunch for gifts. Changing the size or color lets you match the keychain to your favorite bags or outfits.
This tulip keychain is perfect for adding a touch of spring to your keys, purse, or backpack. It’s also a thoughtful handmade gift that will bring joy to friends and family. The simple shape, lovely texture, and bright colors make it a beautiful, cheerful accessory that is both fun to make and delightful to use.
Crochet Tulip Keychain Pattern
This small, soft tulip is a perfect beginner project and makes an adorable gift or accessory. The pattern uses plush chenille yarn for a squishy finish and is worked in pieces: a sturdy stem, a shaped leaf, and a lovely tulip flower top. The entire tulip is assembled and then attached to a keychain, making a charming and unique handmade item. Step-by-step directions and plain-language explanations are included throughout this pattern.
Skill Level & Terminology
Skill Level: Beginner
Terminology: US Standard Crochet Terms
Materials & Tools
- Yarn: Chenille yarn (or plush/velvet yarn recommended), such as Confi Mini by Karina Yarn
- Green: for stem and leaf
- Flower color: your choice (pink, red and yellow etc.)
- Hook: 3.5 mm crochet hook
- Stuffing: Small amount of fiberfill
- Notions: Tapestry/yarn needle, keychain hardware, scissors, (optional) stitch markers
Gauge
Gauge is not crucial for this small decorative project. Your tension will affect the final size but not the proportions.
Abbreviations List
| Abbreviation | Meaning |
|---|---|
| MR | Magic Ring |
| ch | Chain |
| sc | Single Crochet |
| hdc | Half Double Crochet |
| dc | Double Crochet |
| inc | Increase (2 sc in st) |
| st(s) | Stitch(es) |
| sl st | Slip Stitch |
| FO | Fasten Off |
Special Stitch Instructions
- Magic Ring (MR): Wrap yarn into a ring, work given stitches into the ring, pull the tail tight to close the hole.
- Increase (inc): Crochet 2 sc into the same stitch.
Finished Size
Approximately 7–10 cm tall depending on yarn and tension.
How to Start & Stitches Used
Start with a magic ring for rounded parts. Main stitches used: single crochet, slip stitch, double crochet, half double crochet, and chain. A little easy sewing is required for assembly.
The Pattern
A. Stem
With green yarn and 3.5 mm hook:
- Round 1: MR, 6 sc in ring. (6)
- Pull the ring tightly to close the hole.
- Rounds 2–6: sc in each st around. (6 per round)
Fasten off, leaving a long tail for sewing. Stuff lightly.
Beginner tip: The stem is a small tube. Adjust rounds for a longer stem, if desired.
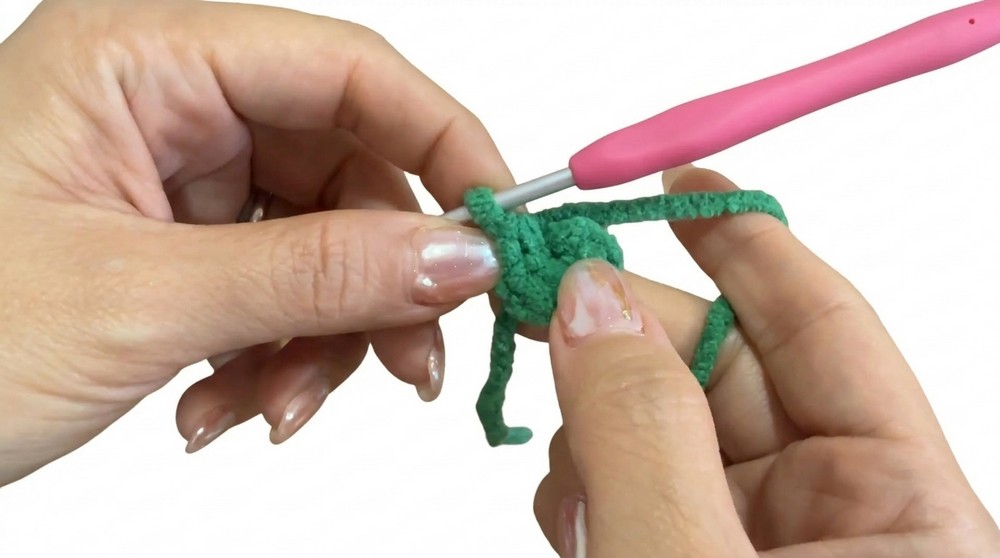
B. Leaf
- Attach green yarn to a stitch halfway up the stem.
- Row 1: Ch 5.
- Row 2: Starting in the second ch from hook:
1 sl st, 1 sc in next ch, 1 hdc in next ch, 1 dc in last ch. - Attach the leaf to the same point on the stem with a sl st.
- FO, pull ends through the tube, tie a knot inside to secure, and trim/hide tails.
Beginner tip: The leaf is worked directly onto the stem with a chain, then worked back for a natural shape.
C. Tulip Flower Top
With your chosen flower color:
- Round 1: MR, 6 sc in ring. (6)
- Round 2: 1 inc in each st around. (12)
- Round 3: [sc in next st, inc in next st] repeat around. (18)
- Rounds 4–8: sc in each st around. (18)
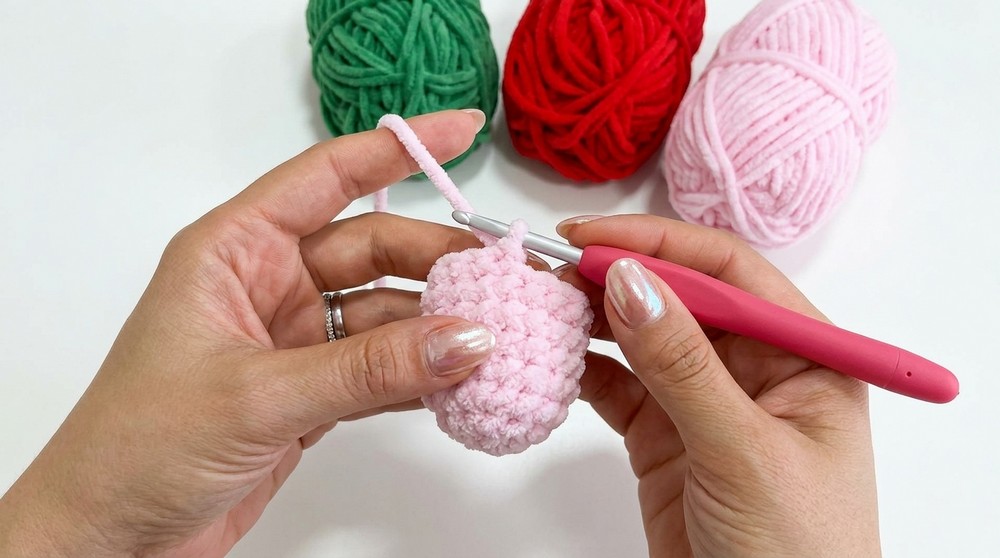
FO, leaving a long tail for sewing. Stuff lightly with fiberfill.
Beginner tip: The flower is a simple ball using single crochet with increases for shaping and a few rounds plain for height.
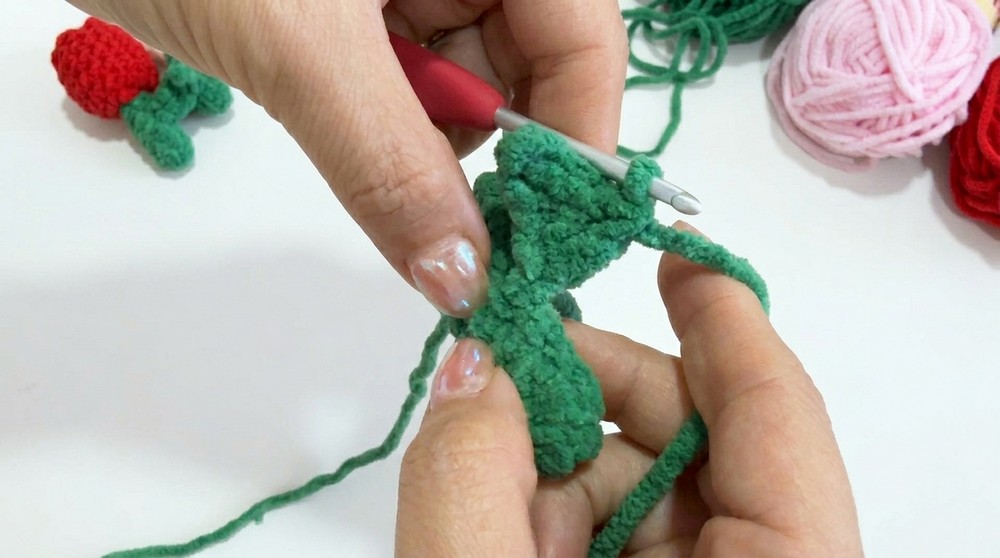
D. Shaping and Closing the Flower Top
- Fold the flower tube slightly in half.
- With the yarn tail and tapestry needle, sew the top shut as follows:
- Sew through the front and then the back at the halfway point, pulling together.
- Go back through these points for security, making a small knot inside.
- Repeat at the remaining two sides to give a squared, tulip-like shape.
- Secure yarn, weave through the inside to hide and trim excess.
Beginner tip: Folding and sewing down the sides gives the flower the classic tulip “petal” shape.
E. Assembly
- Sew Flower to Stem:
- Stuff the stem lightly.
- Using the long green yarn tail from the stem and a tapestry needle, center the stem on the base of the flower top and sew securely all around.
- Go through both the stem and the base of the flower, stitching back and forth to join evenly all around.
- Secure with a firm knot. Pull the needle through the stem, hiding the tail inside.
- Hide Tails:
- Weave in or snip any remaining yarn tails, tucking them into the stem or flower using your hook or needle.
Beginner tip: When sewing, use short, firm stitches all around for a neat look and durable keychain.
F. Add Keychain
- Attach your keychain ring or clasp to the top of the flower, at the sewn knots or through a stitch at the flower’s top. Optionally, pierce through the flower top with a small yarn loop and use that as your hanging loop.
Beginner tip: You can put the keychain wherever you like (at the petal seams for upright hanging, or at the stem for dangling style).
Plain English Steps After Each Section
Stem:
Make a circle with 6 single crochets and keep going until it is a tube. Cut yarn and leave a long end.
Leaf:
Join new yarn halfway up the tube, chain 5, and work back with four stitches. Attach back to the stem and hide both yarn ends inside.
Flower Top:
Make a magic ring, increase to 18 single crochets, do 5 rounds without increases, then sew the top so it looks like a tulip.
Assembly & Finishing:
Sew the stem to the flower top, stuff softly as you go, and attach your keychain hardware at the end.
Conclusion
You’ve created a cheerful crochet tulip keychain using simple stitches: single crochet, chain, slip stitch, double and half double crochet, with basic increases for shaping. Its small size and easy construction make it perfect as a quick gift, party favor, or colorful bag charm. Feel free to use any color for the tulip top and make as many as you like!