Create a trendy crochet tie cardigan with this simple pattern, offering step-by-step instructions for a stylish and unique wardrobe piece.
Elegant front ties, soft cotton fabric, and a flattering modern silhouette distinguish this cardigan. Crochet tie cardigan beginner-friendly project offers straightforward assembly with simple rectangles and minimal shaping, making it accessible to those new to this technique.
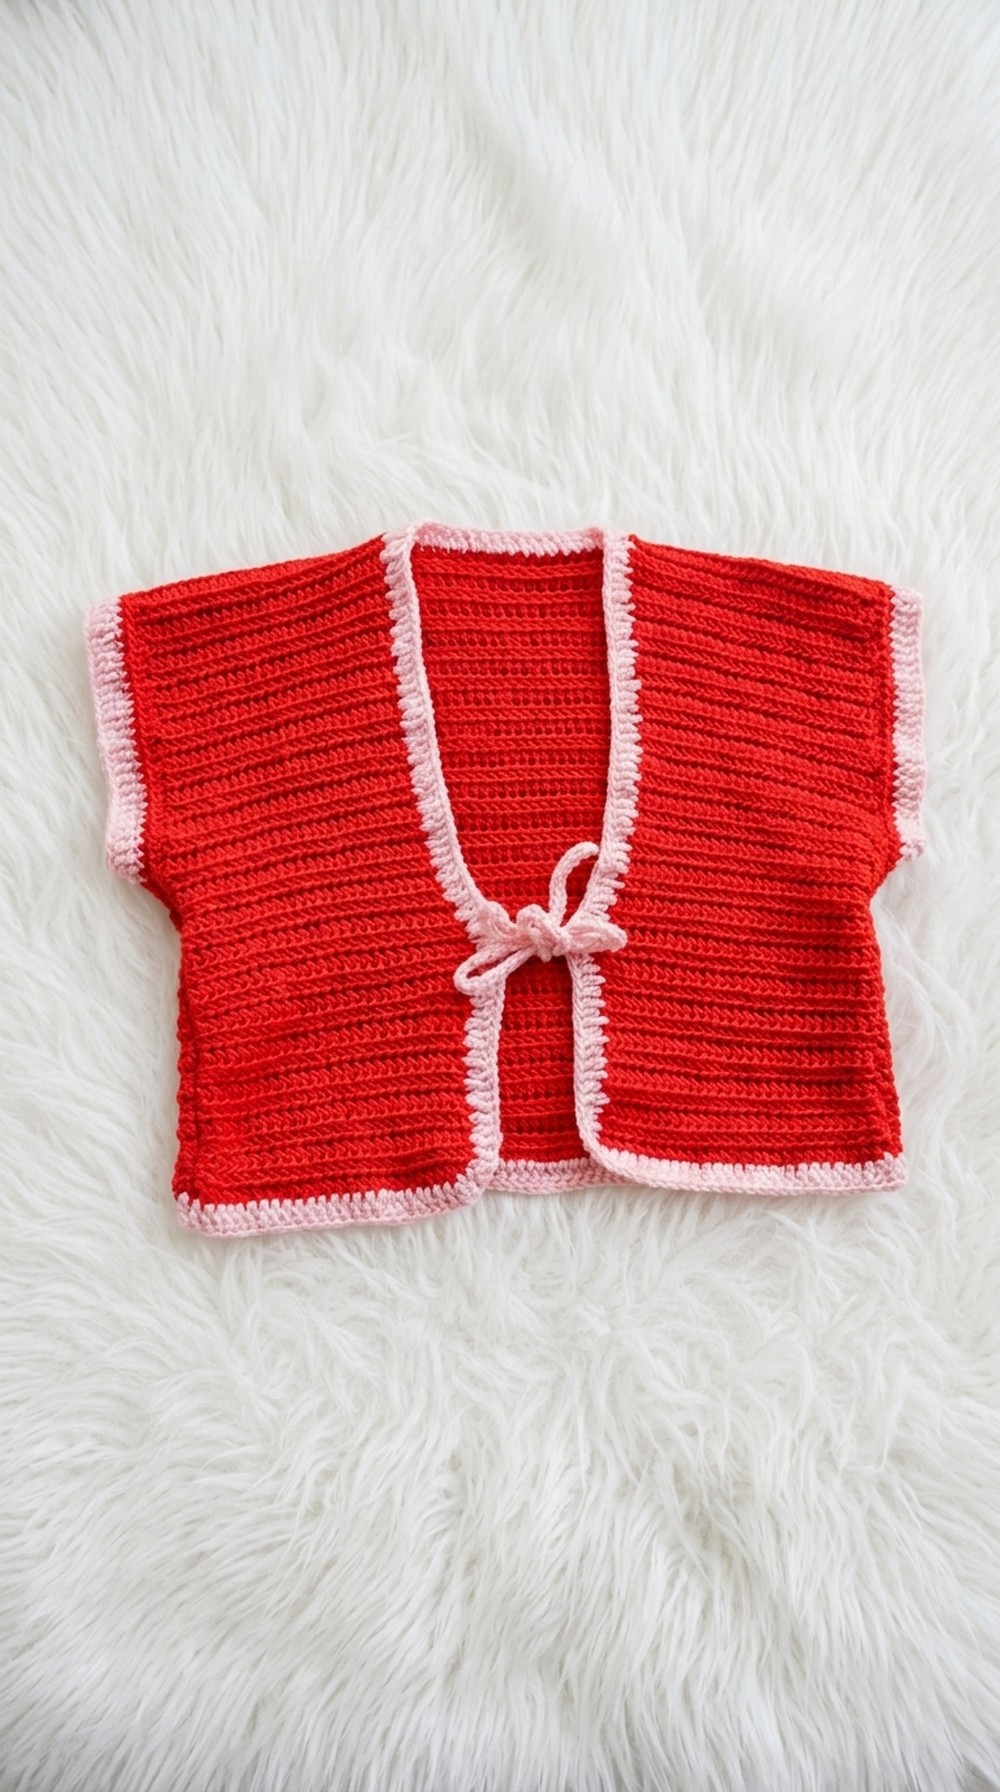
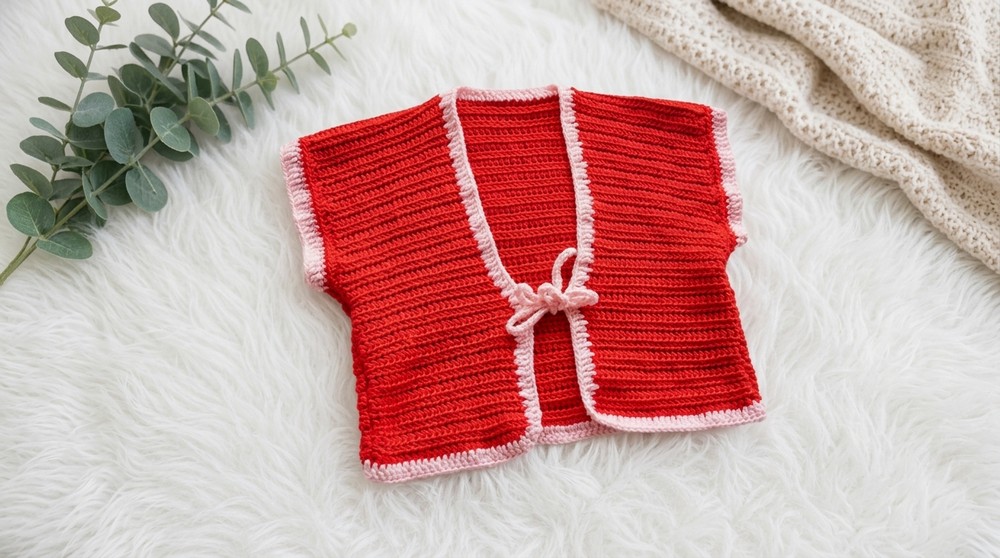
Crochet Tie Cardigan With Free Pattern
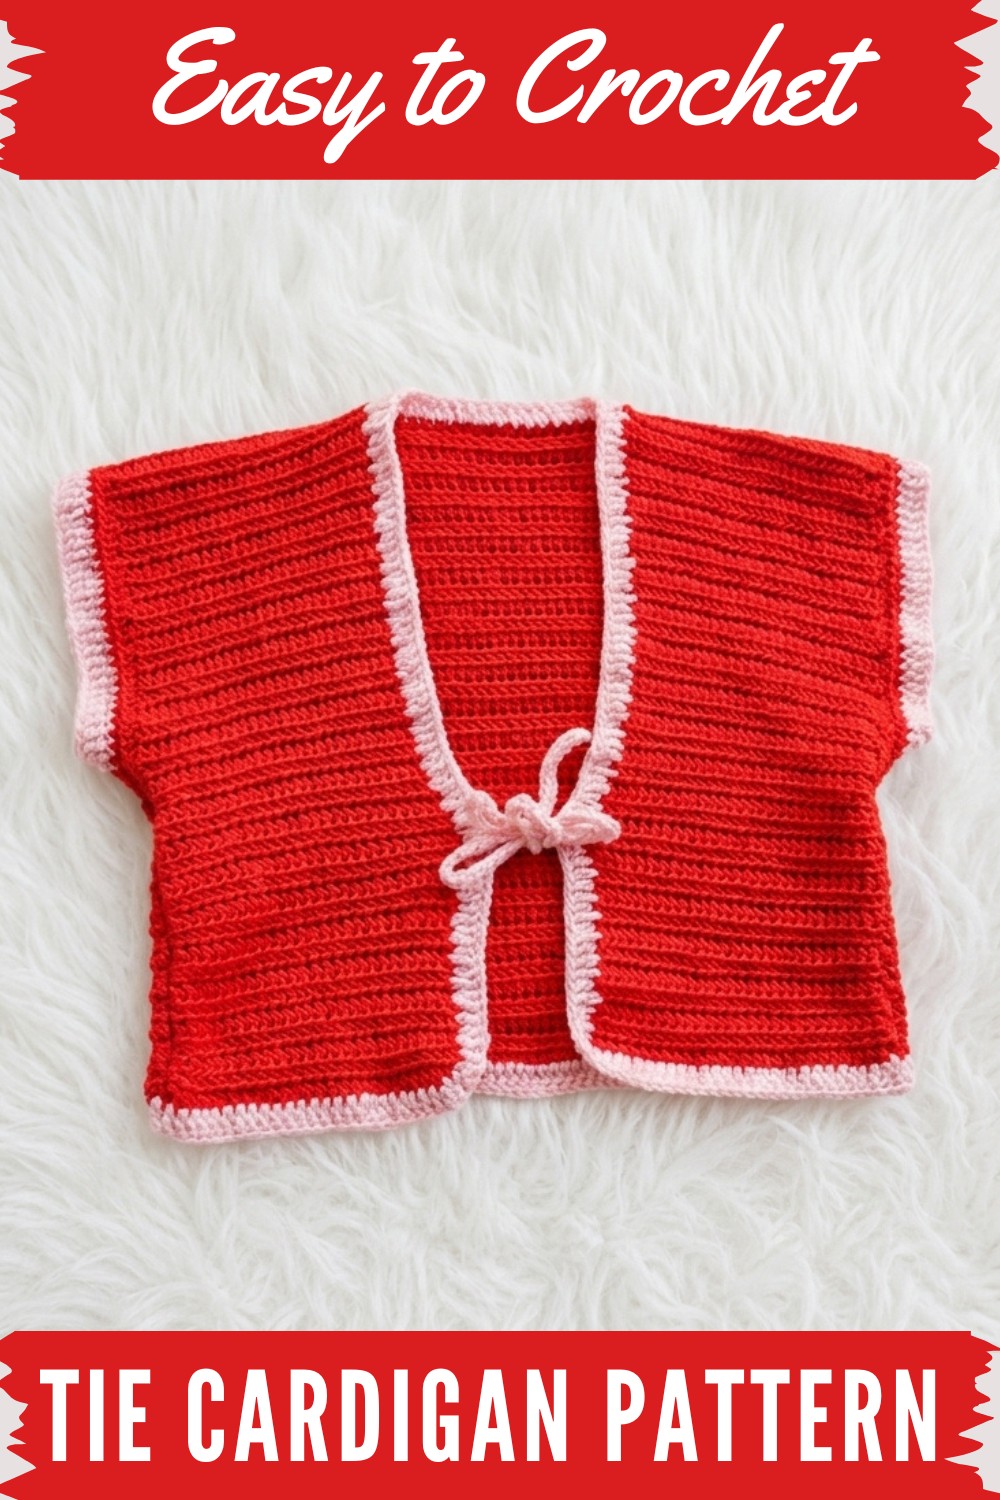
The adjustable waist ties not only enhance the look but also allow a comfortable, custom fit, choose open or cinched styling to suit your preference. Lightweight cotton aran yarn delivers breathability and softness, while the front loop only half double crochet stitch adds subtle, neat texture without excess bulk.
Seams are direct, armholes roomy, and finishing steps uncomplicated. Adapt the sleeve length or body for warm or cool weather, or omit the sleeves for a versatile vest. Contrasting trim provides a stylish finishing touch.
Easy Crochet Tie Cardigan Pattern
This simple, modern tie cardigan is perfect for beginners and intermediate crocheters alike. It’s worked in cotton Aran yarn for beautiful stitch definition, comfort, and versatility. The pattern features a neat front loop half double crochet texture and bold contrast trim, plus practical ties for closure. The garment is constructed in basic panels and assembled with straightforward techniques. Adaptable to any size, it’s a quick way to elevate your wardrobe with a handmade classic.
Skill Level & Terminology
Skill Level:
Beginner
Terminology:
US crochet terminology throughout.
Materials & Tools
- Approx. 250g cotton Aran yarn for main body (e.g., Yarn and Colors Epic, in Limestone or your choice)
- 50g contrast yarn for trim
- 4 mm crochet hook
- Scissors
- Tape measure
- Stitch markers
- Tapestry/yarn needle
Gauge
- 17 hdc (half double crochet) stitches = 4" (10 cm)
- 12 rows = 4" (10 cm)
- Example panel: 69 stitches = approx. 17 inches wide
- Adjust hook size if needed to achieve gauge.
Abbreviations List
- ch = chain
- hdc = half double crochet
- FL = front loop
- dc = double crochet
- sl st = slip stitch
- sc = single crochet
- rep = repeat
- st = stitch
- RS = right side
Special Stitch Instructions
Half Double Crochet (hdc):
Yarn over, insert hook in stitch, yarn over, pull up loop (3 loops), yarn over, pull through all 3.
Front Loop Only Half Double Crochet (FL hdc):
Work hdc inserting hook through the front loop only of each stitch.
Double Crochet (dc):
Yarn over, insert hook in stitch, yarn over, pull up loop (3 loops), yarn over, pull through 2, yarn over, pull through the remaining 2.
Slip Stitch (sl st):
Insert hook in stitch, yarn over, pull through both stitch and loop on hook.
Finished Size
UK Size 8–10 (adjustable):
- Back panel: 17" wide, 15" long
- Front panels: Each 6.5" wide, 15" long
- Armholes: 9” deep (customize to your fit)
- Trim/ties: 13.5” each side
To adjust, use your own measurements as described below; numbers serve as a guide.
How to Start & What Stitches Are Used
Start with a chain foundation for the back panel, and half double crochet in the front loop only for texture. The same stitch is used throughout for panels. Double crochet is used for trims. Assembly is with slip stitch and the ties are chains finished with slip stitches for strength.
If you don’t read patterns:
Make a back rectangle, add two front rectangles, sew up the sides leaving space for armholes, finish the sleeves and border with contrasting color, and add long ties.
The Pattern Itself
Back Panel
1. Foundation Row
- With main yarn, make a slip knot and ch 69 (or until your work measures 17" wide, ribcage-to-ribcage).
- Add 2 more chains (ch 71).
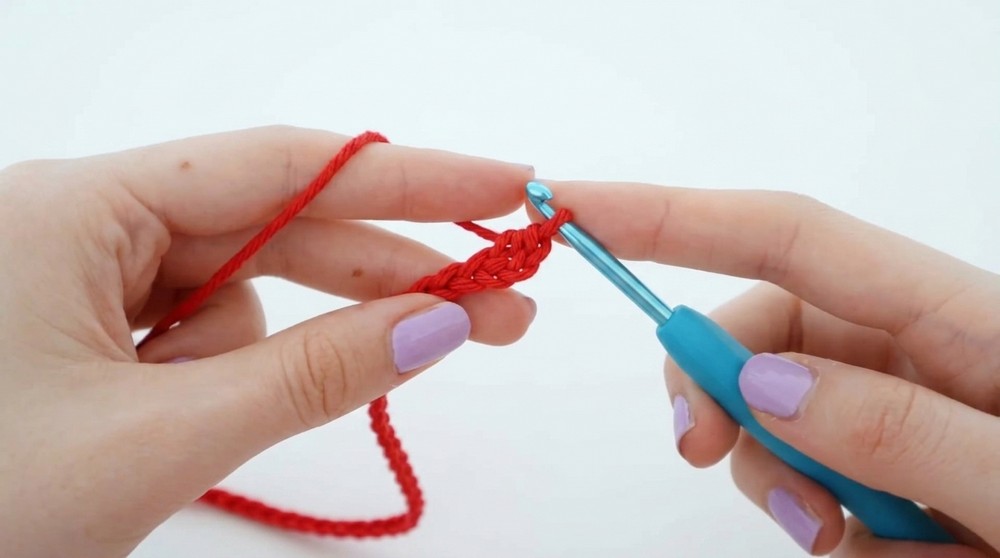
2. Row 1
- Yarn over, hdc in 3rd ch from hook (counts as first hdc).
- Hdc in each chain across. (69 hdc, ignore turning chains)
- At end, ch 2, turn.
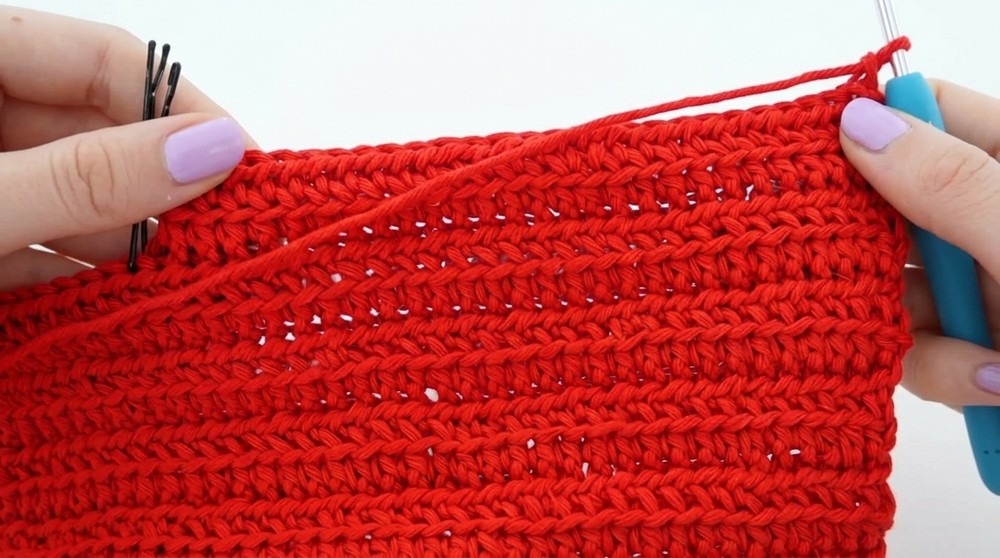
3. Rows 2–37
- FL hdc in each st across (work in front loop only).
- Ch 2, turn.
- Repeat until panel measures 15” (approx. 37 rows).
At completion, you have a textured rectangle for the back.
For non-pattern readers:
Just make a rectangle of hdc rows, start each row by chaining 2 and always turn your work.
Front Panels (Make 2)
1. Mark front panel width
- On back panel, measure and mark 6.5” from each edge (28 stitches). Place stitch markers at these points.
2. Panel Rows
- Attach yarn to left marked stitch. Ch 2, FL hdc across to next marker.
- Work until front panel matches back panel in length (15", 37 rows).
- Repeat for the second panel, attaching yarn to the right marker.

After finishing, you have two panels that are the same length as the back, ready to fold over.
For non-pattern readers:
Make two rectangles just like the back, but half as wide (6.5”). Attach them to each side of the main rectangle.
Armholes and Assembly
1. Mark armholes
- From the base of panel, measure up 9" on each side, place stitch markers. Double check fit by draping over yourself.
2. Join Sides
- Fold front panels over back panel.
- With yarn attached at the base, slip stitch through both layers from base up to the stitch marker (working on the wrong side).
- At the marker, chain 1 and fasten off.
- Repeat for the other side.
You now have a cardigan shape with open armholes.
For non-pattern readers:
Sew the sides up, leaving space at the top for your arms to go through.
Sleeve Finishing (Optional hem/edge)
Round 1 (Both sides):
- Attach yarn at the armhole.
- Ch 2.
- Hdc (normal, not FL) in each st around the opening (work into spaces, there may not be clear stitches).
- Sl st to join at beginning.
Round 2:
- Ch 2, FL hdc in each st around.
- Sl st to join.
- Fasten off.
This creates a clean, edge around each armhole.
For non-pattern readers:
Crochet around the opening for a neat finish.
Contrast Trim and Ties
Trim Around Body Opening
- Attach contrast yarn to lower edge.
- Ch 3 (counts as first dc).
- Dc in each stitch/border up, around neckline, and down the other side.
- If desired, do only one row, as shown for a slim finish.
Ties (Each side):
- On front panels, mark 5” from bottom edge and place stitch marker.
- At marker, ch for 13.5” (approx. 33–40 chains).
- Turn and sl st back down the chain to strengthen it.
- Continue dc trim as before.
- Repeat for opposite side.
For non-pattern readers:
Make a border round with contrasting color, add long chains at each side, slip stitch down for sturdy ties.
Final Finishing
- Fasten off and weave in all ends securely with tapestry needle.
- Try on and ensure armholes, panels, and ties are to your liking.
- Adjust and block if needed.
Conclusion
Congratulations on finishing your stylish tie cardigan! This project develops skills in textured crochet, slip stitch assembly, and working finishes. With practical ties and contrast trim, this versatile cardigan fits a range of wardrobes and can be easily customized for any size. To adapt, modify panel width, length, or sleeve finish as desired. Enjoy your new handmade cardigan.