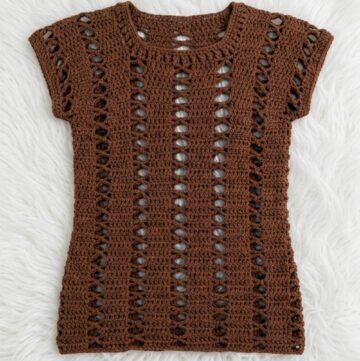
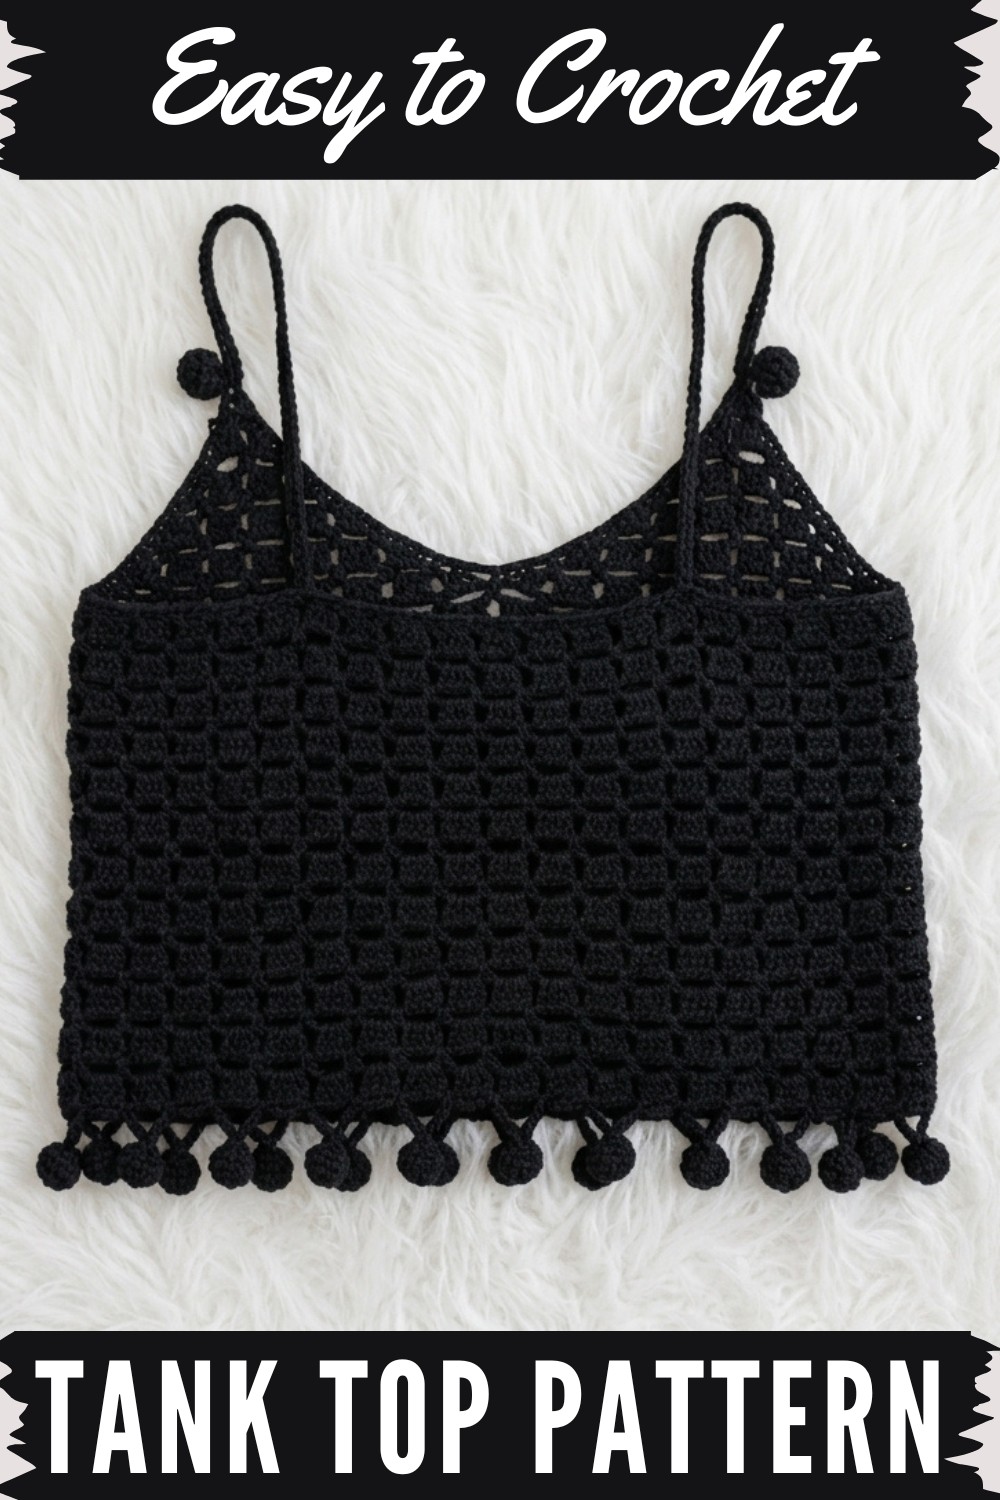
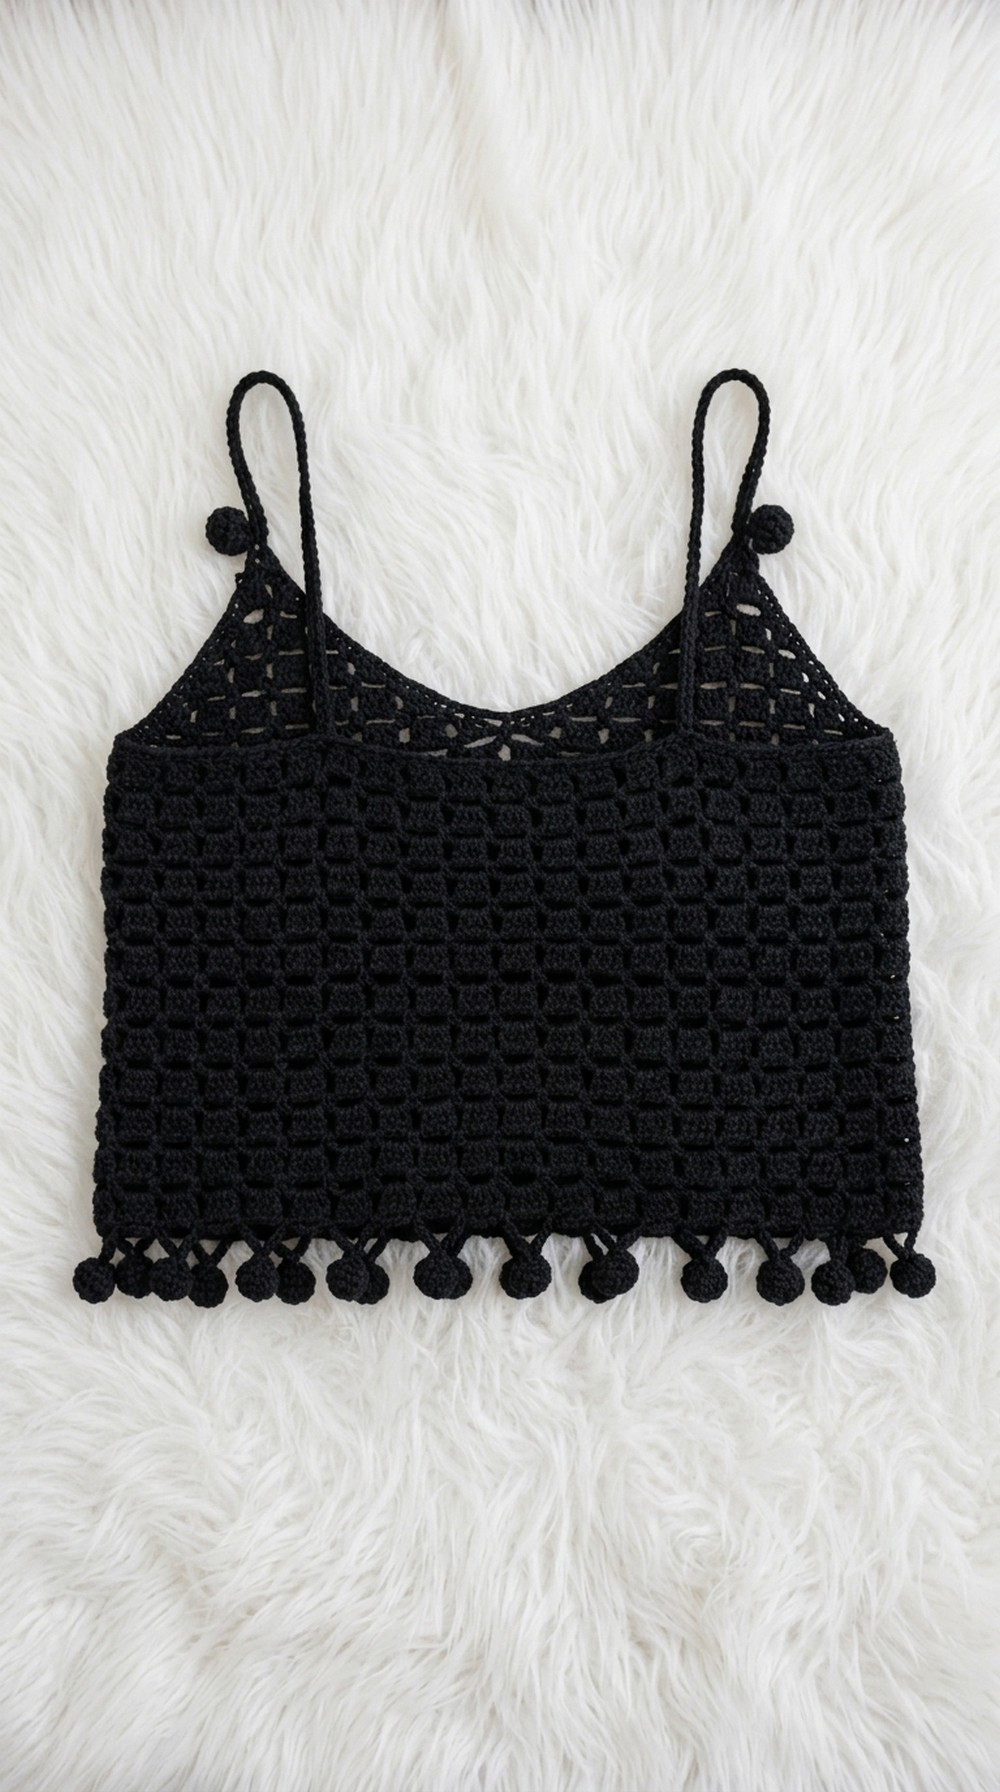
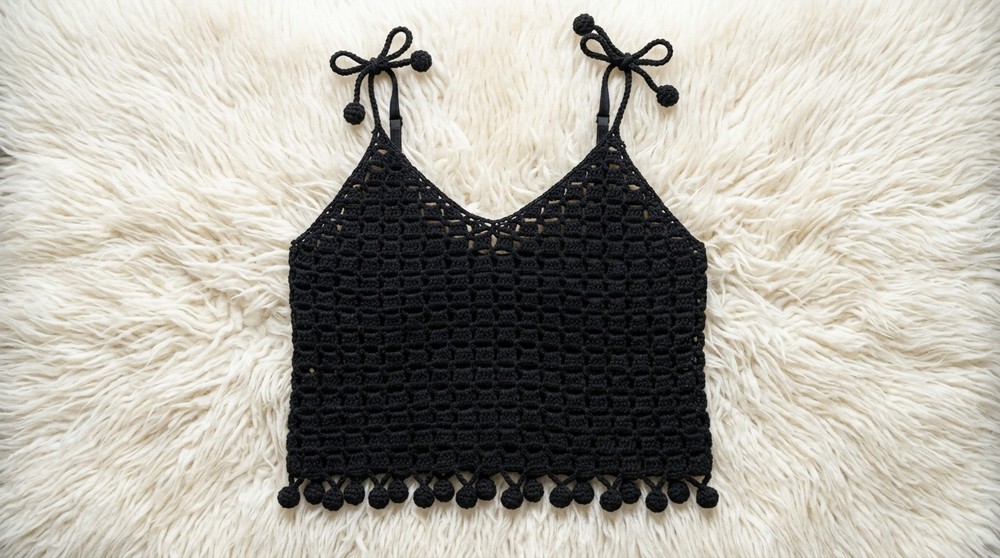
Learn to create a stylish crochet tank top with this easy-to-follow pattern, perfect for crafting lightweight and trendy summer wear.
Few things feel sweeter than pulling on a handmade top that’s light, breathable, and shows off beautiful stitches. A free crochet tank top pattern offers a wonderful blend of style and comfort, perfect for warm days or layering year-round. The beauty really shines in the open, airy design and the gentle drape that flatters all body types.
One of the features I find most attractive is the unique texture you get from crochet. Depending on the stitches used, the fabric can look delicate and lacy or sturdy with a little extra stretch. Many designs include special touches like decorative edges or simple lace panels, adding pretty detail without making the top too fussy or complicated. Classic tank shapes work well for all occasions, and with crochet, you can customize the length, width, or neckline to suit your taste.
Free Crochet Tank Top Pattern for Women
The soft, shimmery look of cotton yarn is a favorite for these tops. Not only does it feel good against your skin, but it also creates a gentle texture that stands out—especially with nice stitchwork. I love slipping these tops over a camisole or swimsuit, pairing them with shorts or skirts, and even using them over long sleeves when the weather cools down.
Another highlight is the versatility. Hand-crocheted tank tops look great dressed up or down and always carry that “made just for you” charm. It’s the handmade quality and personalized finish that collects compliments every time.
In short, choosing a free crochet tank top pattern means adding both style and function to your wardrobe, and you get to enjoy clothes that truly show your creativity and personality.
For starting the Pattern Read This!
- Know your bust measurement; use a measuring tape for accuracy.
- Divide your bust measurement by four; this will be the width of each triangle.
- Gather all materials before beginning.
- Practice the magic ring and basic stitches if you are new to crochet.
- Read through the pattern once before you start.
Pattern Notes
- Written for sizes Large to Extra Large but easily adjustable.
- The main structure is four triangle motifs joined together.
- Repeats rows for length; add or reduce rows for your fit.
- Seamless rounds are worked after joining triangles.
- Yarn tails are left at triangle tips for straps and joining.
How I made the Crochet Pattern?
- Used a 44” bust, divided by 4 (equals 11” per triangle).
- Made four triangle motifs, each measuring 11” wide.
- Joined the triangle motifs with slip stitches.
- Worked in rounds to add length and texture.
- Added straps with decorative pom pom ends.
Skill Level
Beginner to confident beginner
(Uses magic ring, chains, single crochet, double crochet, slip stitch, and cluster stitches)
Finished Size
- Fits bust sizes 44” (L–XL); width of each triangle is 11”
- Length from tip to hem: approx. 13”
- Finished width across: approx. 22”
Materials
- Size 4 acrylic yarn
- 4.25 mm crochet hook
- Scissors
- Darning needle
- Tape measure
- Stitch marker (optional)
Measurements / Sizing (Optional Schematic)
- Draw four triangles to represent the motif layout.
- Each triangle should measure your bust/4 width, un-stretched.
- The length is adjustable by adding more rounds after joining.
Gauge (and Stitch Pattern if applicable)
- Gauge: Not critical, but check triangle width before joining.
- Main pattern: Clusters of dc 4, chain spaces, and pom pom (popcorn) clusters.
Stitch Abbreviations
- ch – chain
- sc – single crochet
- dc – double crochet
- sl st – slip stitch
- sk – skip
- MR – magic ring
Special Stitches
- Magic ring for triangle base.
- Cluster stitch: Four double crochets worked together in one space.
- Popcorn/pom pom: Four double crochets together, pull through all loops.
THE PATTERN!
1. Make Triangle Motif (Make 4)
Magic ring.
Begin with a magic ring as the base for your triangle.
Ch 5.
This creates height for the triangle's point.
Dc 4 into ring.
Make four double crochets into the ring.
Ch 1, dc 1 into ring.
Make a chain and another double crochet; this finishes the first row. Pull the tail to close the ring tightly.
You’ve made the first row of your triangle. This is the tip.
2. Second Row
Ch 5, turn.
Chain five for height and turning.
Insert your hook in chain-one space; sc 1.
Ch 5, skip four dc, and in the next space sc 1.
Ch 2, dc 1 on top of fourth chain.
Repeat this row, chaining and single crocheting into spaces, then end with a double crochet on the chain's top.
Now you have three spaces for the next row, which are your triangle’s “steps.”
3. Third Row
Ch 5, turn.
In first space, dc 4.
Ch 1.
Next space, dc 4.
Ch 1.
Last space, dc 4.
Ch 1, dc 1 atop fourth chain.
This row increases the triangle and sets up the mesh pattern.
4. Repeat Rows for Triangle
Alternate repeating “chain row” and “double crochet row”:
- Chain row: Ch 5, sc 1 in each chain-one space, then end with ch 2, dc 1 on fourth chain.
- Double crochet row: Ch 5, then dc 4, ch 1 clusters in each space, ending with ch 1, dc 1.
Continue until you have completed 11 rows and your triangle measures your desired width (e.g. 11”).
Each triangle grows larger with every row. Adjust the length or number of rows for your bust size.
5. Join Triangles Together
Align four triangles side by side, wrong sides facing.
Insert hook in first space on both triangles and pull through yarn. Ch 1 and pull tight.
Repeat at all corners, joining with slip stitch.
Join all triangle motifs together using slip stitches, making sure long tails are left for strap attachment.
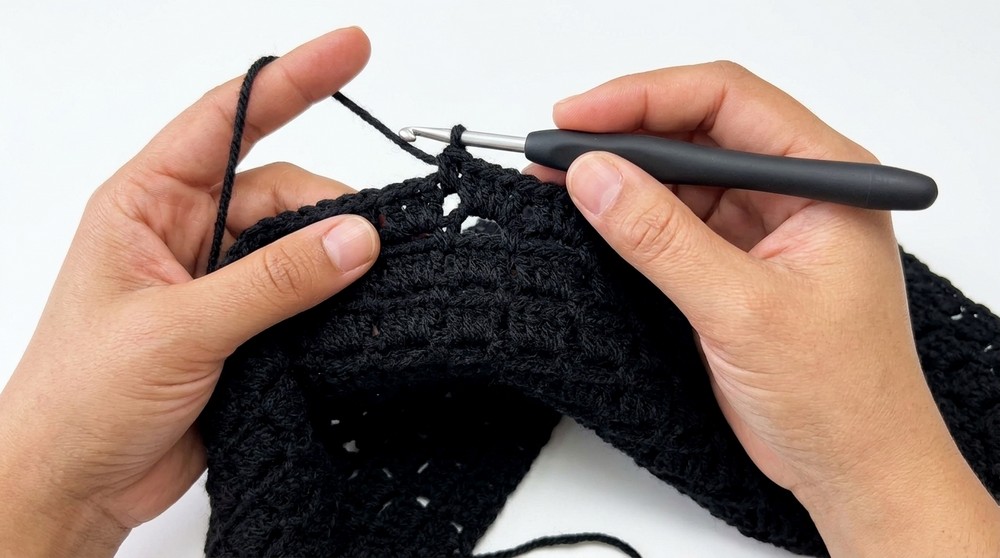
6. Work in Rounds
After triangles are joined, continue:
- Insert hook into first space, ch 1.
- Turn work; right sides facing up.
Insert hook in both spaces of triangles at corners, ch 5, sk 4, sc 1 in chain-one space.
Repeat: ch 5, sc 1 in next space, around all corners.
Slip stitch to first single crochet to close the round.
This begins seamless rounds to grow the length. Repeat alternating chain and double crochet rows.
7. Mesh Rounds
Turn work, in first ch 5 space, sl st 1.
Ch 4 (= first dc), then dc 3 in same space.
Ch 1, and repeat dc 4, ch 1 in every chain-five space.
At round end: ch 1, sl st on fourth chain to join.
This mesh creates open, airy fabric and repeats for each round.
8. Repeat Mesh Rows
Alternate mesh and chain rows:
- One round: dc 4, ch 1 clusters in each chain-five space.
- Next round: ch 5, sc 1 in each chain-one space.
- Repeat until desired length (about 35 rounds, or 13” long).
Just keep alternating open chain rows with closed double crochet rows until your top reaches the desired length.
9. Pom Pom/Popcorn Edge (Last Row)
Ch 5. Hold last chain, ch 3 more.
Yarn over, skip two, into third chain, make dc 4 together (popcorn style).
- Yarn over, pull through two; keep loops.
- Repeat for four double crochets.
- Yarn over, pull through all loops.
Ch 3, skip two, in third, make another dc 4 together.
Ch 1, slip stitch to next stitch below.
Repeat pattern: ch 5, slip stitch in chain-one spaces, and pom pom clusters.
Popcorn clusters add texture and fun to the bottom edge.
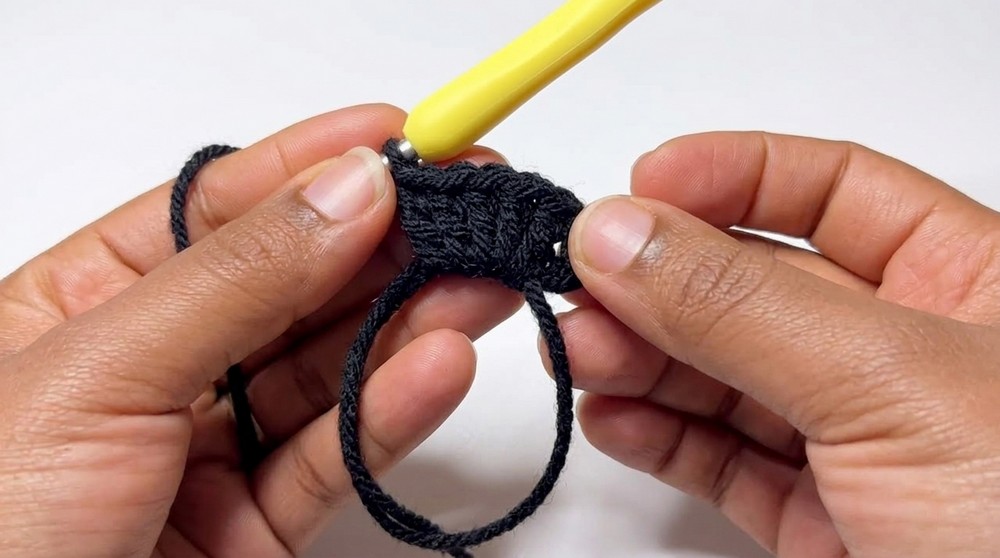
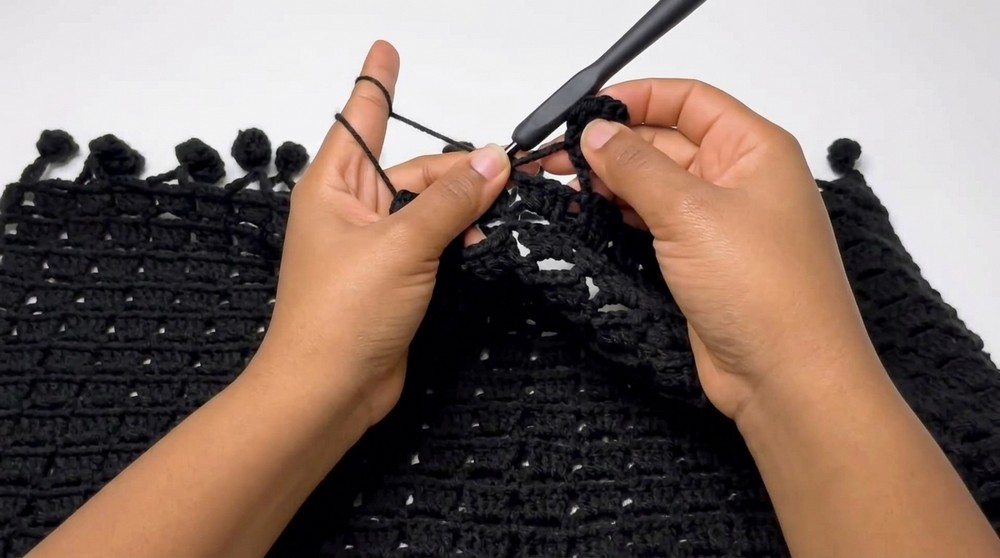
10. Straps
Attach yarn to triangle tip.
Ch 4, skip four dc, dc 1 in space.
Ch 60 for strap.
>Ch 3 more, skip two, dc 4 together for pom pom.
Ch 3, dc 4 together in third chain.
Sl st 1 in next space.
Repeat: ch 5, skip five, slip stitch in fifth chain.
Continue pom pom and chain pattern across strap.
Straps are made with long chains, decorated with pom poms, and slip stitched for strength.
What you can make by using these stitches
- Stylish summer tops and tank tops
- Halter tops and festival wear
- Strappy crop tops
- Bags or accessories with triangle motifs
- Blanket motifs with triangle mesh
Assembly & Finishing
- Weave in all yarn tails with a darning needle
- Tie knots at strap corners for security
- Steam block or hand wash top for shape
- Adjust straps for best fit
- Enjoy your stylish finished Tong Top!
Summary:
You will start by making four triangle shapes, each the same size as your bust divided by four. These are made with chains, double and single crochets. Once all triangles are done, you join them together, making the top’s body. Then, you work in open, mesh rounds to lengthen the top. For the final touch, you add decorative pom poms around the edge, and make straps by chaining and adding pom poms for a fun look. Finish by sewing in all yarn ends, adjust the straps, and block or wash your top for neatness.