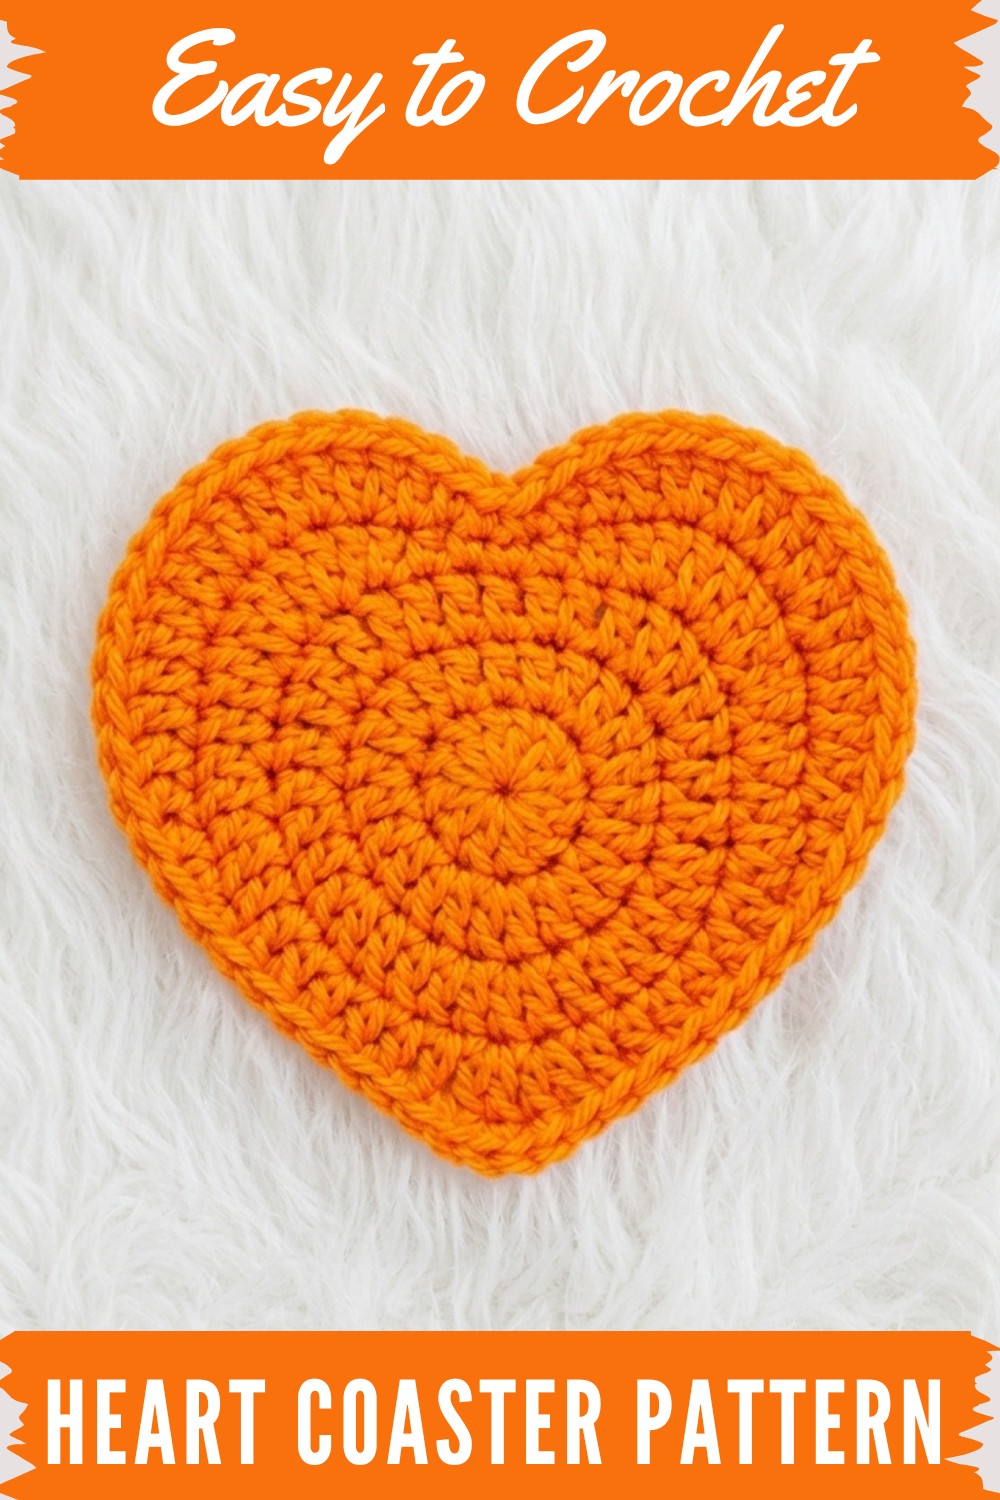
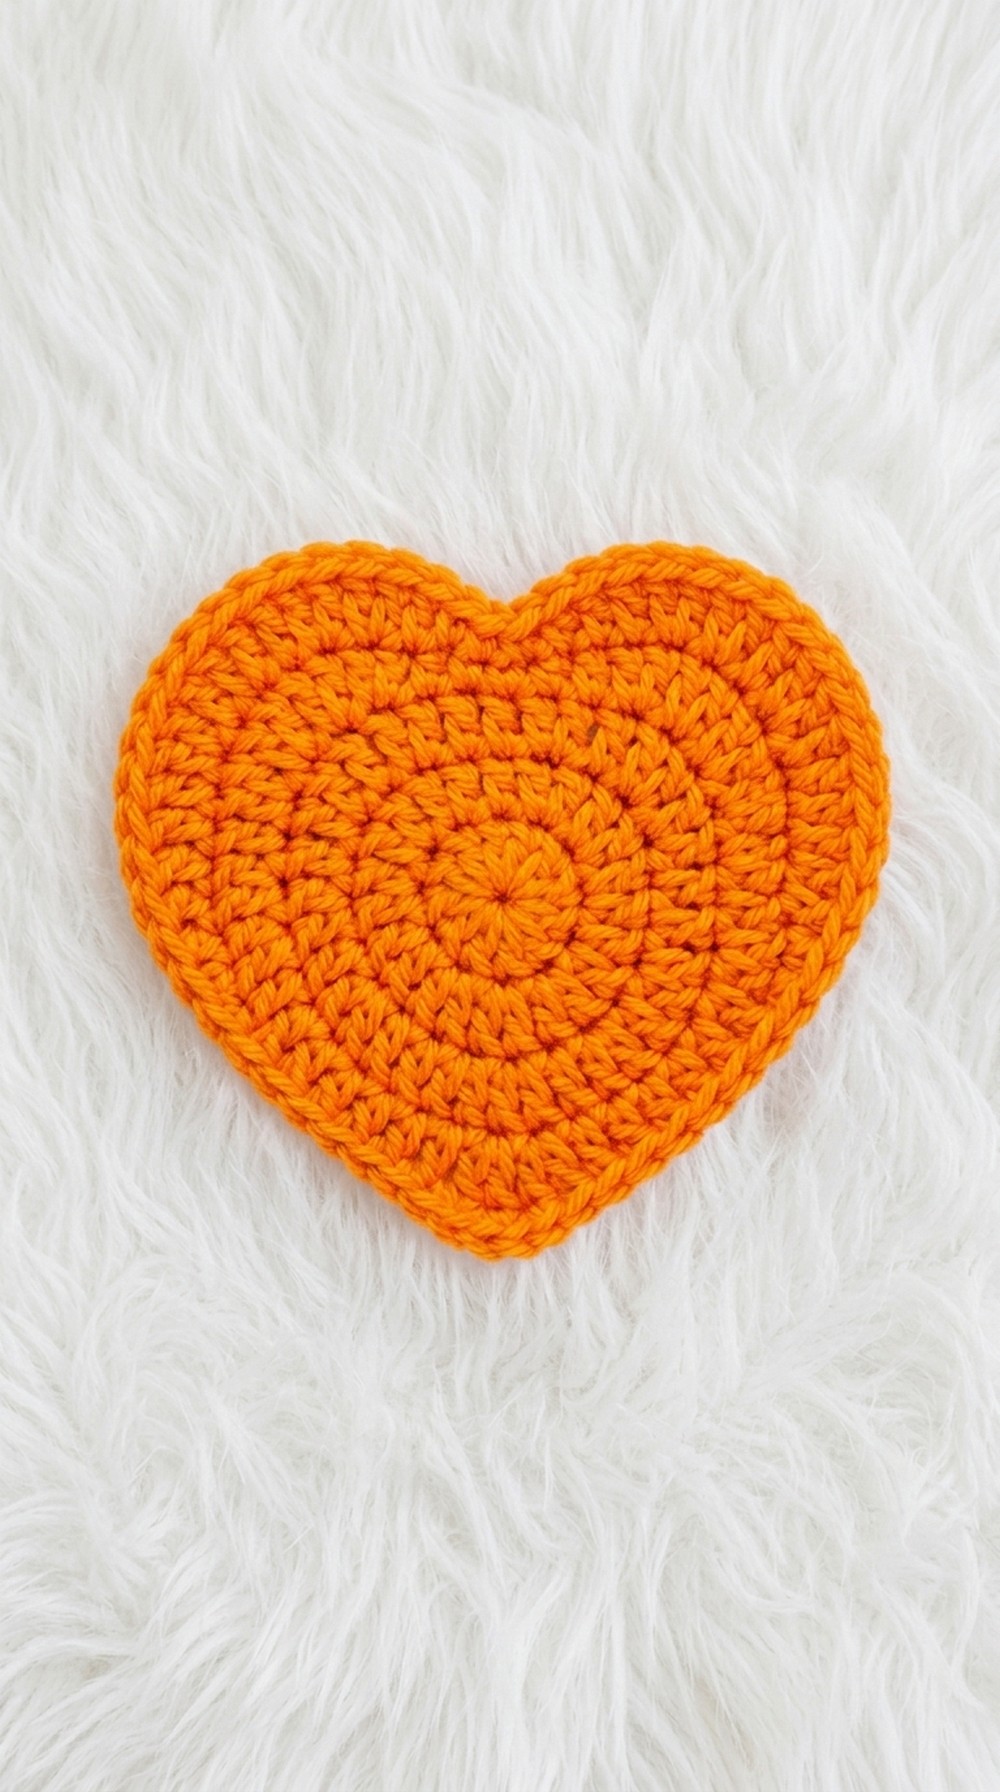
Design a charming Free Crochet Heart Coaster Pattern to bring a cozy vibe to your table, protect surfaces, and make heartfelt gifts that everyone will cherish.
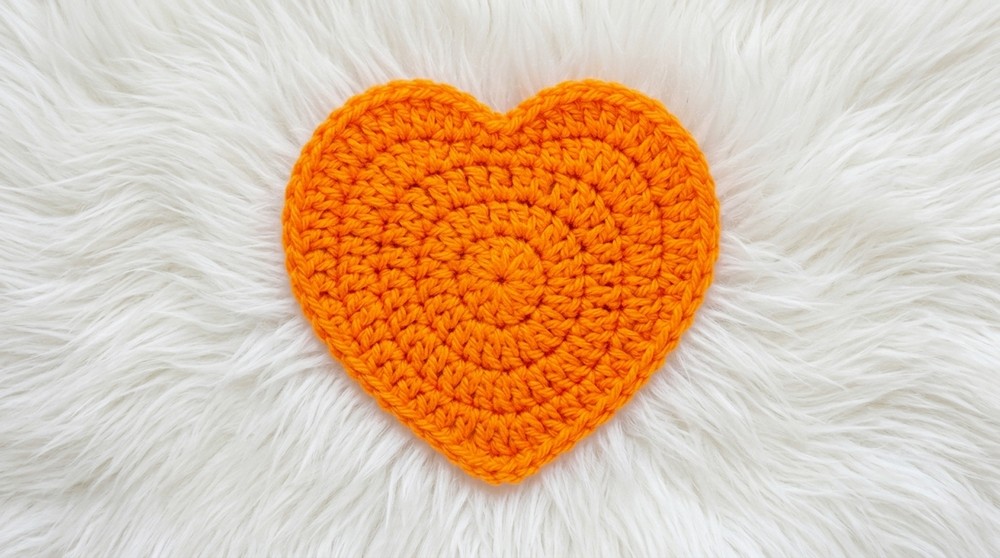
Anyone looking to add a touch of handmade love to their table decor will appreciate this charming project. The Free Crochet Heart Coaster Pattern is the perfect way to create a practical and decorative home accessory that also makes a sweet gift for friends and loved ones. The completed piece showcases a classic heart shape with smooth, well-defined curves, a flat surface, and clean edges, making it both eye-catching and functional. Whether you choose a bold red, playful pink, or a subtle neutral, your heart coaster will beautifully complement any setting.
Unique Free Crochet Heart Coaster Pattern for Home Decor
A standout aspect of this coaster is its elegant, symmetrical shape and gently textured surface. This effect is achieved through a thoughtful mix of fundamental crochet stitches including single crochet, half double crochet, and double crochet, with increases used to create rounded lobes and defined curves. The abundance of increases throughout the pattern helps the heart maintain its fullness and balanced proportions, while alternating different stitch heights adds to the dimensional look. The piece is worked in joined rounds, keeping the overall finish neat and giving the project a polished edge.
Accessible for beginners yet engaging for seasoned crocheters, this pattern uses easy-to-learn techniques such as making a magic ring, stitch increases, and finishing rounds with slip stitches for a seamless join. The heart coaster comes together quickly, making it a fantastic project for practicing stitch placement and learning to shape motifs in crochet.
Ideal as a coaster to protect tables from mugs or glasses, this project also works beautifully as a decorative accent, party favor, or heartfelt handmade present. It helps beginners gain confidence with round work, increases, and basic stitch patterns, while offering experienced makers a chance to create something both adorable and practical. If you’re eager to craft a small project that’s full of personality and love, the Free Crochet Heart Coaster Pattern is a delightful choice for any skill level.
Crochet Heart Coaster Pattern
Before You Start
- Familiarize yourself with basic stitches and increases, especially double crochet (dc), half double crochet (hdc), and single crochet (sc).
- Use a smooth, light color yarn if you're a beginner to better see your stitches.
- Keep a stitch marker handy if you lose track of rounds easily.
- Block your finished coaster for best shape and appearance.
Pattern Notes
- Pattern is worked in the round from the center outwards.
- You start with a magic ring for a neat center.
- All increases are placed carefully to help shape the heart.
- Slip stitch is used to close each round neatly.
- Stitch counts are essential for proper shaping—count often.
How I Made the Crochet Pattern
- Created a magic ring as the foundation for a seamless center.
- Built the heart with increasing rounds of double crochet.
- Incorporated a mixture of single crochet, half double crochet, and double crochet for the defining heart shape and curves.
- Used increases and strategic placement of clusters to form the pointed bottom and two rounded top curves.
Skill Level
Beginner – Advanced Beginner
Finished Size
Approx. 4–5 inches (10–12.5 cm) across, depending on yarn and hook.
Materials
- Worsted weight cotton yarn (solid or variegated, your color choice)
- 4 mm (G) crochet hook (adjust if you crochet tightly/loosely)
- Yarn needle for weaving in ends
- Scissors
- Stitch marker (optional)
Measurements / Sizing
- Typical heart coaster is 4–5" (10–12.5 cm) wide and tall.
- Thickness depends on your yarn and tension.
Gauge
Gauge is not critical. For reference:
12 dc x 7 rows = 4 inches (10 cm)
Stitch Abbreviations
- MR = Magic Ring
- ch = chain
- sc = single crochet
- hdc = half double crochet
- dc = double crochet
- sl st = slip stitch
- inc = increase (2 stitches in the same stitch)
- st(s) = stitch(es)
Special Stitches
Magic Ring (MR):
Wrap yarn around fingers to make a loop, insert hook into the loop, yarn over and pull up a loop. Work stitches into the ring, then pull the yarn tail to tighten.
Increase (inc):
Work two (or more) of the specified stitch in one stitch or space.
The Pattern!
FOUNDATION RING
- Start with a Magic Ring (MR).
- Ch 2 (counts as starting chain).
- Work 11 dc into the ring. (11 dc)
- Pull yarn tail to tighten and close the ring.
- Sl st into the first dc to join round.
Paragraph for Non-Pattern Readers:
Begin your coaster by creating a magic ring. This gives you a neat, tight center. Place 11 double crochet stitches into the ring, then slip stitch to the first stitch to create a closed circle base.
ROUND 2
- Ch 2 to start the round.
- In each st around, work 2 dc (increase) in every stitch (22 dc).
- Sl st into first dc to close the round.
Paragraph:
In the second round, make two double crochet into each stitch around. This increases your stitch count and evenly expands your circle, keeping the edges flat.
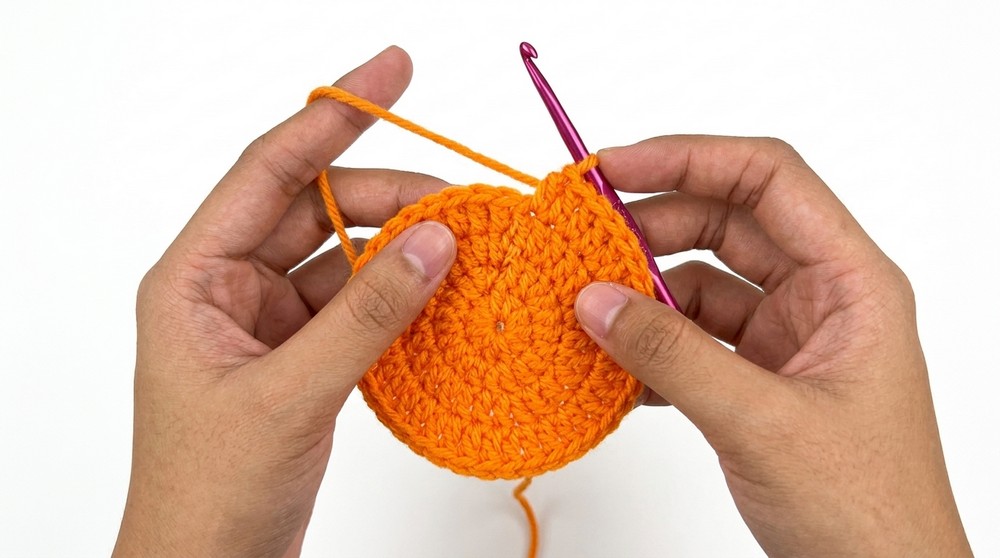
ROUND 3
- Ch 2.
- [1 dc in first st, 2 dc in next st (inc)] around. Repeat sequence—(1 dc, inc)—through the round (33 dc).
- Sl st into first dc to close.
Paragraph:
This round alternates between single and double stitches to gradually expand the circle while preparing for the next sculpting round.
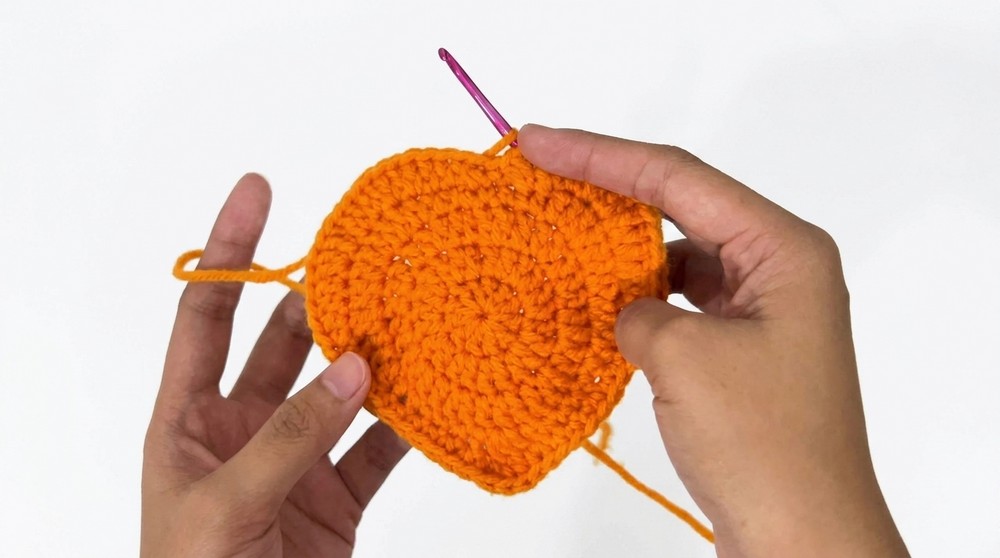
ROUND 4 (Heart Shaping)
- Ch 1.
- 1 sc in first st.
- 1 hdc in the next st.
- 2 hdc (inc) in the next st.
- In next 5 sts, 2 dc in each st (five increases to form one top curve of heart).
- 1 dc in next st.
- 1 dc in next st.
- 1 hdc in next st.
- 1 hdc in next st.
- 1 sc in next 3 sts.
- 1 hdc in next st.
- 3 dc in next st (this is the pointed bottom of the heart).
- 1 hdc in next st.
- 1 sc in next st, then sc in next st, and another sc in next st (total 3 sc).
- 1 hdc in next st.
- 1 hdc in next st.
- 1 dc in next st.
- 1 dc in next st.
- In next 5 sts, 2 dc in each st (another curve at top of heart).
- 2 hdc in next st.
- 1 hdc in next st.
- 1 sc in last st.
- Sl st to first sc to join.
Paragraph:
Now you sculpt the heart shape by mixing different stitch heights—singles make the dips, half doubles round the curves, and multiple doubles in one stitch form the top bump and bottom point. The three doubles (dc) in one stitch form the heart's tip, and clusters of doubles create the curves at the top.
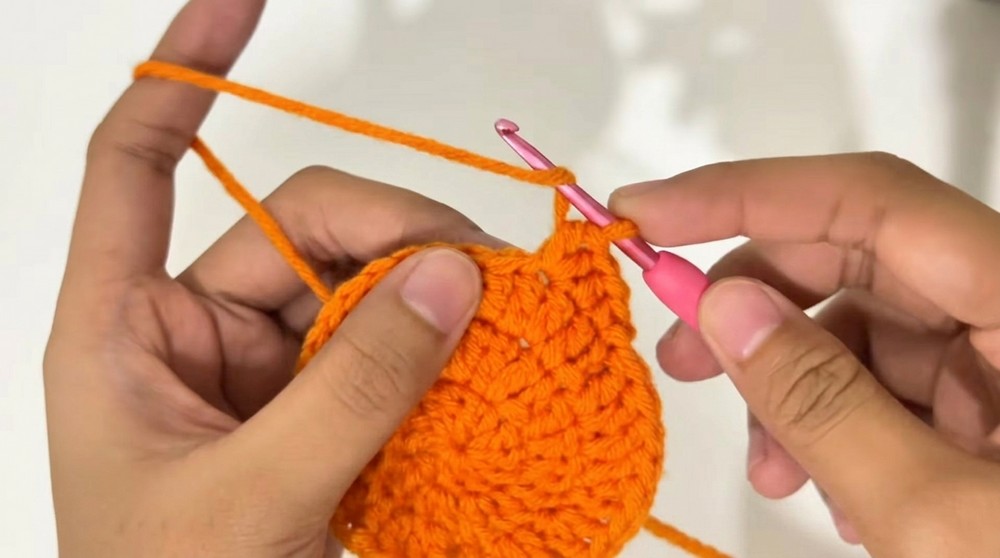
ROUND 5 (Heart Edge)
- Ch 1.
- 1 sc in first st.
- 1 hdc in next st.
- 1 dc in next st.
- [2 dc in next st] x 6 (six increases at the top left curve).
- 1 dc in next 3 sts.
- 1 hdc in next 2 sts.
- 1 sc in next st.
- 1 sc in next 7 sts (this creates a smooth, rounded heart edge).
- 1 hdc in next 2 sts.
- 3 dc in next st (bottom point of heart).
- 1 hdc in next 2 sts.
- 1 sc in next 7 sts.
- 1 hdc in next 2 sts.
- 1 dc in next 3 sts.
- [2 dc in next st] x 6 (six increases on the top right curve).
- 1 dc in next st.
- 1 hdc in next st.
- 1 sc in last st.
- Sl st to first sc to join.
- Ch 1, fasten off, and weave in ends.
Paragraph:
The last round adds another layer, smoothing out the heart curves and reinforcing the point. The extra increases at the top give the heart a well-defined shape. The result is a thick, sturdy, heart-shaped coaster.
Assembly & Finishing
- Pull yarn tail to secure and weave in.
- Block the coaster for optimal shape (optional but recommended).
- Gift or use your finished heart coaster.
Solution of Problem
Possible Problem: If your heart is curling or seems wavy.
Solution: Block your finished crochet by dampening it lightly, shaping it on a flat surface (such as a towel or foam board), and letting it dry. This will even out the stitches and display the heart shape cleanly.
What You Can Make Using These Stitches
- Heart-shaped coasters
- Appliqués for bags, blankets, or garlands
- Small wall or window decor
- Gift toppers or package decorations
- Valentine's Day or wedding favors
For Non-Pattern Readers
You start your coaster by working into a loop, making rows of double crochet, and increasing regularly. As you go, you start using a mix of short and tall stitches—single crochet for dips, half doubles for rounding, and doubles for puffy heart curves. More stitches in the corners help create the two top humps of the heart, and a group in one stitch forms a neat point at the bottom. As you finish, you slip stitch to close, weave in your loose ends, and shape your heart coaster with your hands or a gentle block.