Design a stylish and playful accessory with this free crochet handbag pattern that lets you add a personal touch and carry your essentials in a fun way.
If you’ve ever wanted a stylish accessory that’s both practical and handmade, a crocheted handbag is the perfect project for you. What’s so wonderful about making your own bag is the endless room for personal creativity, choose bold, bright colors for a playful statement or go with gentle neutrals for a classic, timeless look. There are so many free patterns available online, so you can easily find one that matches your style and matches your skill level.
Free Handbag Crochet Pattern – So Cute & Simple
The variety in design is truly impressive. Some patterns create a beautiful, textured body with popcorn or shell stitches that stand out, while others feature simple, elegant lines for a modern finish. I love patterns that add charming extras like tassels, wooden buttons, or floral appliqués. The handles can be made from the same yarn or you can add leather straps for a more polished finish. Some bags come with handy inside pockets, making it easy to organize everything you carry.
Texture is one of the handbag’s most attractive features. A tightly crocheted bag will feel sturdy enough to handle your daily essentials, yet still have that signature handmade softness. If you choose a thicker cotton or blended yarn, the bag will keep its shape beautifully. Lighter yarn gives a delicate drape, perfect for summertime or casual outfits.
In terms of shape, crochet handbags come in every style imaginable. From boxy totes perfect for the market to slouchy bucket bags and snug little purses for nights out, the possibilities really are endless. These bags can easily hold your wallet, phone, and makeup, or even serve as a small project bag for your latest knitting or crochet work.
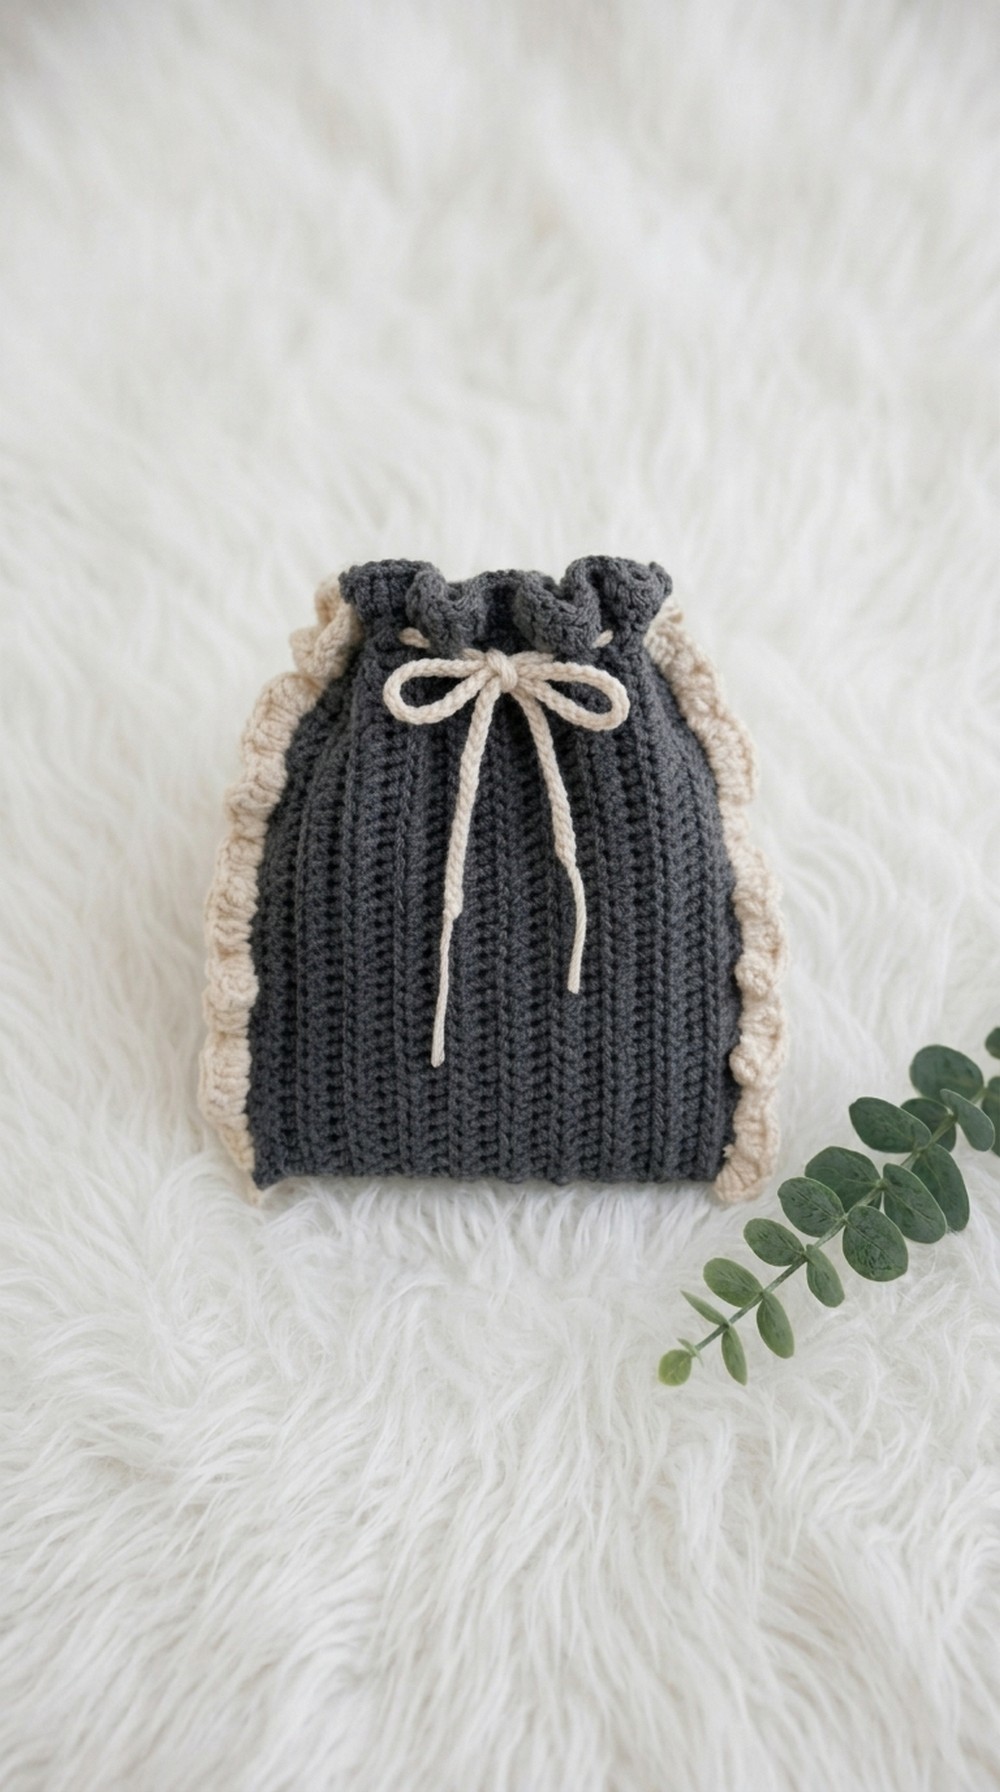
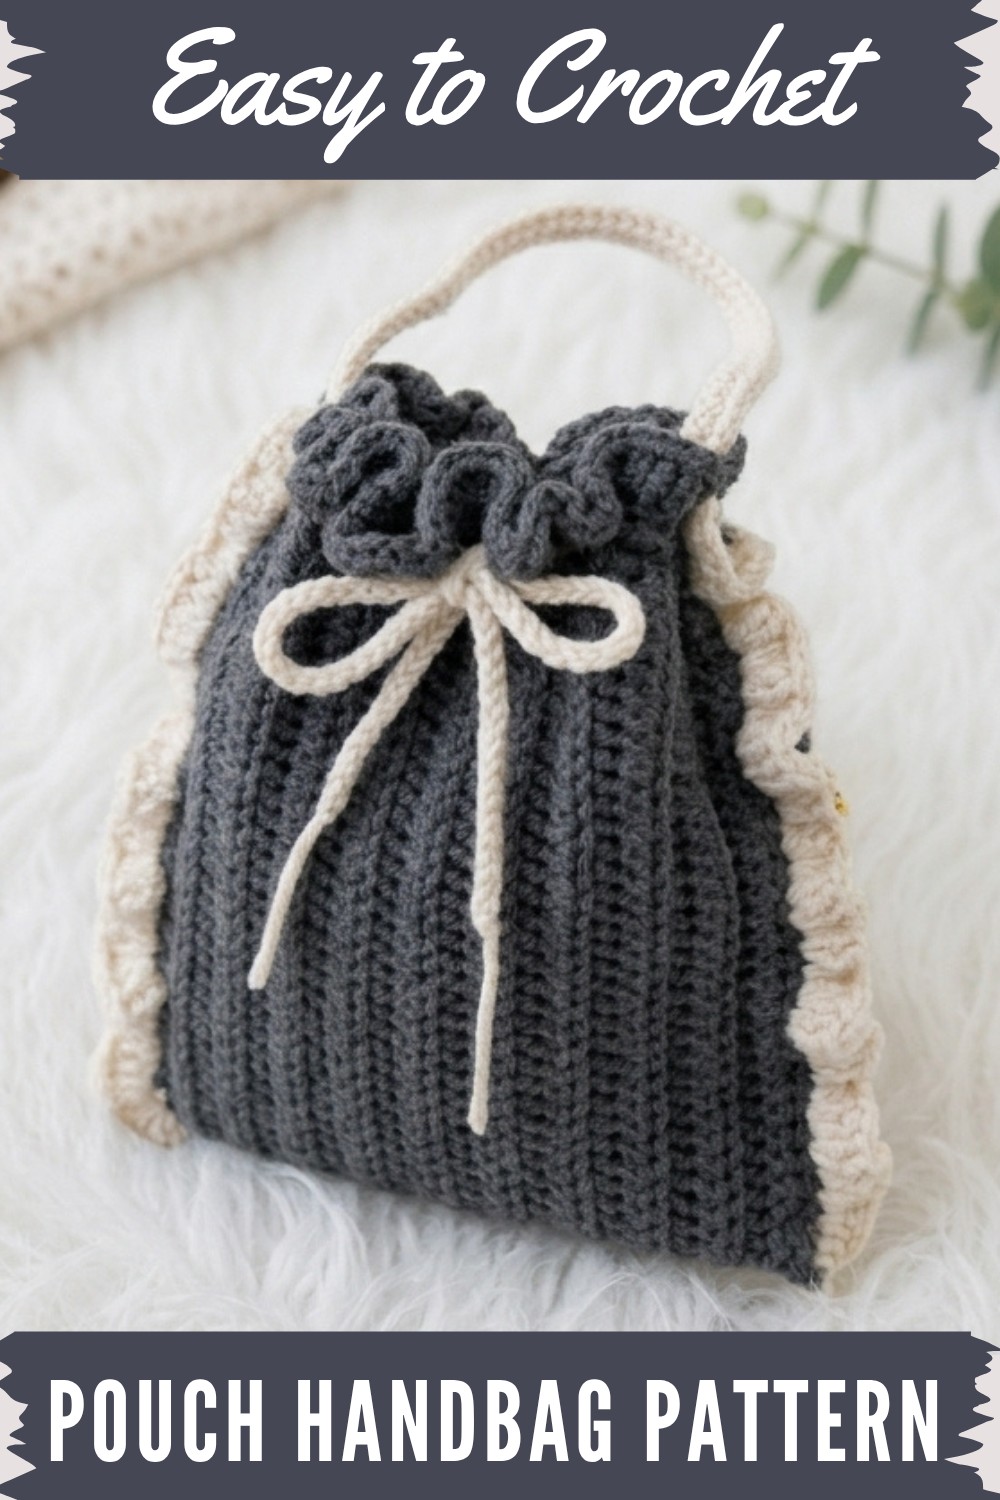
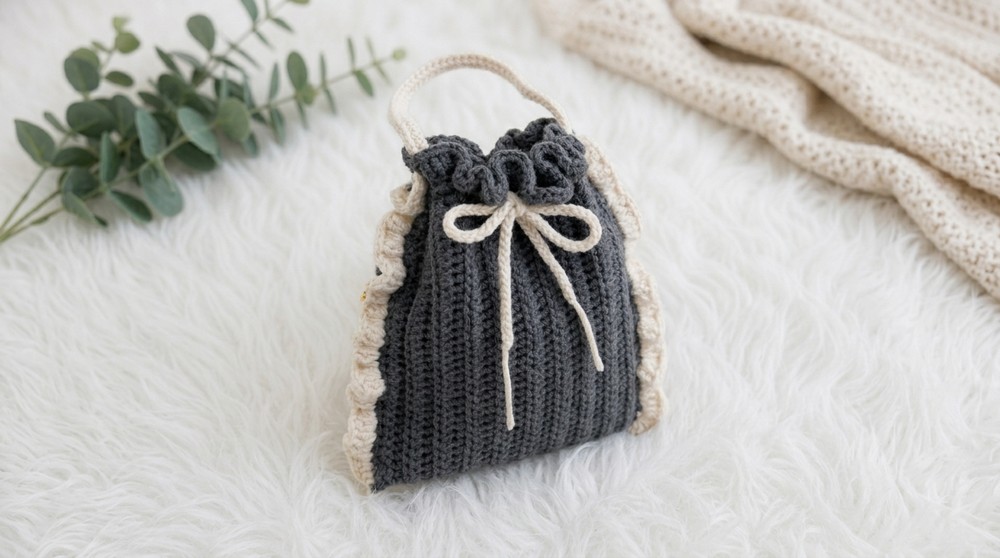
Cute Crochet Pouch Handbag – Step-By-Step Pattern
This structured pouch handbag is the perfect beginner project, easy construction, sturdy fabric, and a trendy look.
Before You Start
- Practice a slip knot, chaining, single crochet, half double crochet (hdc), double crochet (dc), back loop only (BLO), and slip stitch.
- Ensure you have time and a comfortable workspace without distractions.
- Prepare all required tools and materials before beginning.
- Read through the entire pattern, including project notes and tips.
Pattern Notes
- This bag is created flat in rows then joined to form a pouch.
- Most of the fabric is worked in BLO-hdc for strong yet flexible texture.
- Side seams are made with single crochet for easy finishing.
- The top closure and straps are made and attached separately.
- Use a consistent tension for a professional look.
How I Made the Crochet Pattern?
- Started with a foundation chain matching the desired bag width.
- Worked rows of half double crochet in the back loop only for structure.
- Joined the long rectangle to make a pouch and seamed the sides.
- Added a double crochet “flap” and ruffled edge for the closure.
- Crocheted a hand strap and decorative cord separately, then attached.
Skill Level
Beginner-Friendly:
Great for crocheters new to bags or three-dimensional accessories.
Finished Size
- Approximate finished dimensions: 5.5” (14cm) wide x 9.25” (23.5cm) long.
- Strap and closure cord lengths are adjustable.
Materials
- 200g 5-ply milk cotton yarn (main color)
- White yarn (for brim and strap accents)
- 3.5mm crochet hook
- Scissors
- Tapestry needle
- Measuring tape
Measurements / Sizing
- Base bag panel: 14cm x 23.5cm (5.5" x 9.25")
- Handle strap: About 50 chains (adjust to desired length)
- Drawstring cord: About 110 chains
Gauge
- 17 hdc and 13 rows = 10cm x 10cm (4" x 4")
- Adjust hook or tension for matching finished size.
Stitch Abbreviations
| Abbreviation | Meaning |
|---|---|
| ch | Chain |
| sl st | Slip Stitch |
| sc | Single Crochet |
| hdc | Half Double Crochet |
| dc | Double Crochet |
| BLO | Back Loop Only |
Special Stitches
- Back Loop Only (BLO): Insert hook through only the back loop of the stitch (furthest from you) when working hdc.
- 3-dc Increase: Make 3 double crochets in the same stitch—used for ruffle effect.
The Pattern!
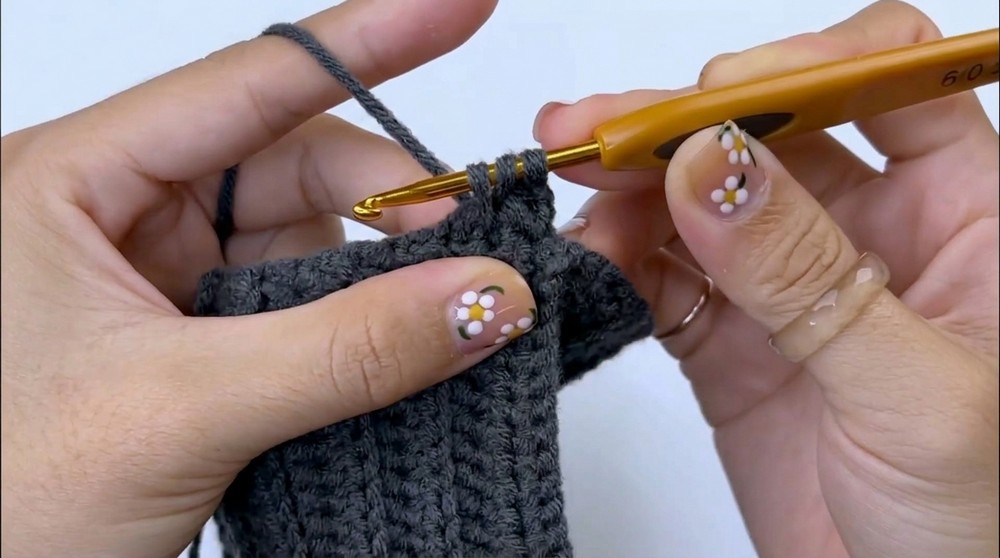
1. Create the Base Panel
Pattern Steps:
- Ch 72.
- Row 1: Skip 2 ch, hdc in each chain across. (70 hdc)
- Row 2: Ch 2, turn. Work hdc-BLO in each st across.
- Rows 3–19: Ch 2, turn. Hdc-BLO in each st across. At the end of each row, sl st to finish.

Simple Guidance:
Chain 72 for a rectangle base. Work rows of half double crochet, always inserting your hook in the back loop, to get a ribbed, stretchy fabric. Keep crocheting for 19 rows, forming a rectangle.
2. Seam the Sides
Pattern Steps:
- Fold the rectangle in half, short ends together.
- With a new yarn end, join yarn at one side edge.
- Sc evenly along each side edge to join (work into both thicknesses).
- Repeat for both sides.
Easy Steps:
Fold to align the sides. With your hook and yarn, single crochet along each side through both layers to create firm seams for your pouch.
3. Form the Top Closure Flap
Pattern Steps:
- Attach new yarn at the opening edge.
- Ch 2 and dc in each stitch around the opening. Join with sl st.
- Next round: Ch 2, work 3 dc in every stitch around. Join with sl st.
Accessible Explanation:
Switch colors if you like. Work one round of double crochet all the way around the bag’s opening. In the next round, make three double crochets in each stitch for a decorative, ruffled effect. Join at the end.
4. Add the Brim
Pattern Steps:
- Attach white yarn at any point on new round.
- Ch 2, 3 dc in each stitch around.
- Join with sl st. Fasten off and weave in all ends.

Step-by-Step Direction:
For contrast, use white yarn and repeat the ruffle-edged round (three double crochets in every stitch). Fasten off and hide all yarn tails securely.
5. Create & Attach the Hand Strap
Pattern Steps:
- Attach and secure white yarn at one side seam near the bag opening.
- Ch 50 for a medium-length strap.
- Attach chain to opposite side with sl st.
- Ch 1, hdc in each chain of the strap, join with sl st.
- Fasten off and weave in yarn tails.
Extra Details:
Make sure your strap is flat—not twisted—when you attach it. Cover the chain with a row of half double crochets for durability. Secure and hide any loose ends.
6. Drawstring Cord (Optional)
Pattern Steps:
- Attach yarn at desired ruffle or opening height.
- Ch 110 (or as long as preferred for a cinch cord).
- Weave it in and out around the opening ruffle.
Guidance for This Step:
Create a long chain and thread it through the top ruffle for easy opening/closing, or tie decoratively.
Assembly & Finishing
- Sew all yarn tails for a neat finish.
- Shape the pouch and ruffles with your hands.
- Block the pouch if needed to give a defined body.
- Adjust or shorten handles or cords as desired.
- Add a button or charm (optional) to personalize the look.
Solution of problem
Problem: If your seams are puckered or uneven after joining:
Solution:
Be sure you single crochet through both layers evenly and don’t pull too tightly. Adjust tension or rework as needed for a smooth finish.
What you can make by using these stitches
- Zippered or button-closure pouches
- Glasses or phone cases
- Clutch bags
- Pencil pouches
- Kids’ coin purses
If the pattern format feels confusing:
Just work a chain for your starting width, build up a rectangle of half double crochets in the back loop, fold in half, seam the sides with single crochet, add a double crochet ruffle opening, then a hand strap and a closure chain. This charming and practical bag is a great project to practice stitches and build finishing skills.